- Zabbix мониторинг smart linux
- Saved searches
- Use saved searches to filter your results more quickly
- License
- nobody43/zabbix-smartmontools
- Name already in use
- Sign In Required
- Launching GitHub Desktop
- Launching GitHub Desktop
- Launching Xcode
- Launching Visual Studio Code
- Latest commit
- Git stats
- Files
- README.md
- Zabbix v6 SMART HDD Check
- Using Smartctl
- Add SMART Zabbix Plugin
Zabbix мониторинг smart linux
So, мониторинг параметров SMART жёстких дисков на Zabbix для машин на Linux. Для машин на windows в этой зарисовке.
Для этого, на компьютере который мы будем мониторить, должен быть установлен Zabbix-agent и набор для работы со SMART параметрами жёсткого диска. Как установить zabbix-agent можно посмотреть в в этой статье или найти материалы интернете. Установка ПО для работы со SMART.
Переходим к редактированию конфигурации zabbix-agent. В конце файла конфигурации нужно добавить несколько сток:
UserParameter=smartd.value[*],sudo smartctl -A $1 | grep $2 | awk ‘
UserParameter=smartd.trash[*],sudo smartctl -A $1 | grep $2 | awk ‘
UserParameter=smartd.raw[*],sudo smartctl -A $1 | grep $2 | awk ‘
Как можно понять это запуск того самого smartctl, который мы установили в самом начале. Работоспосбность проверяем на сервере Zabbix:
zabbix_get -s 192.168.50.1 -k smartd.value[/dev/sda,Seek_Error_Rate]
zabbix_get -s 192.168.50.1 -k smartd.raw[/dev/sda,Seek_Error_Rate]
Если работает, то в ответ получаем числовое значение. Если ответ пусто или другого рода ошибка, вероятнее всего не хватает прав на выполнение команд zabbix-агентом. Для этого идём в sudoers и разрешаем выполнение smartctl без пароля root. Добавляем в конец файла:
Далее переходим к настройке Zabbix через web-интерфейс.
Идём в Настройка — Шаблоны — Template OS Linux — Группы элементов данных . Создаём группу элементов данных, на пример SMART. После создания группы заходим в раздел Элементы данных . И тут мы создаём элементы, необходимые для мониторинга.
Список всех доступных параметров можно посмотреть, выполнив
Я добавил только те параметры, которые говорят о здоровье диска. Получиться должно что-то вроде:
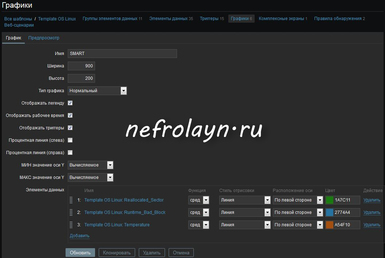
Самое время создать графики. В том же разделе заходим по ссылке Графики и создаём график с именем, на пример SMART.
После создания заходим в этот график на добавляем наши элементы данных. Должно получиться что-то вроде этого:
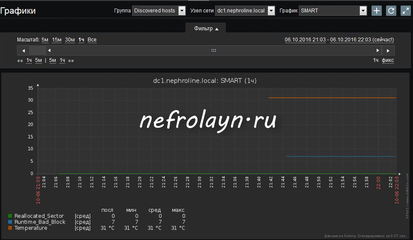
Практически сразу увидите:
You have no rights to post comments
- Вы здесь:
- Главная

- Системы мониторинга
- Zabbix
- Zabbix — HDD SMART на Linux машинах
Saved searches
Use saved searches to filter your results more quickly
You signed in with another tab or window. Reload to refresh your session. You signed out in another tab or window. Reload to refresh your session. You switched accounts on another tab or window. Reload to refresh your session.
Disk SMART monitoring for Linux, FreeBSD and Windows. LLD, trapper.
License
nobody43/zabbix-smartmontools
This commit does not belong to any branch on this repository, and may belong to a fork outside of the repository.
Name already in use
A tag already exists with the provided branch name. Many Git commands accept both tag and branch names, so creating this branch may cause unexpected behavior. Are you sure you want to create this branch?
Sign In Required
Please sign in to use Codespaces.
Launching GitHub Desktop
If nothing happens, download GitHub Desktop and try again.
Launching GitHub Desktop
If nothing happens, download GitHub Desktop and try again.
Launching Xcode
If nothing happens, download Xcode and try again.
Launching Visual Studio Code
Your codespace will open once ready.
There was a problem preparing your codespace, please try again.
Latest commit
Git stats
Files
Failed to load latest commit information.
README.md
Cross-platform SMART monitoring scripts with two display modes: device and serial. LLD discovers and sends data in one pass, using minimal number of utilities. Supports any SMART name and displays it as is.
- Utilises smartctl error return codes
- Low-Level Discovery
- SAS support
- SSD wear monitoring (SAS only)
- csmi support
- Efficient: no unnecessary processes are spawned
- Bulk items upload with zabbix-sender
- Error-proof configuration: various safeguard triggers
- Automatic RAID passthrough (when smartctl detects the drives)
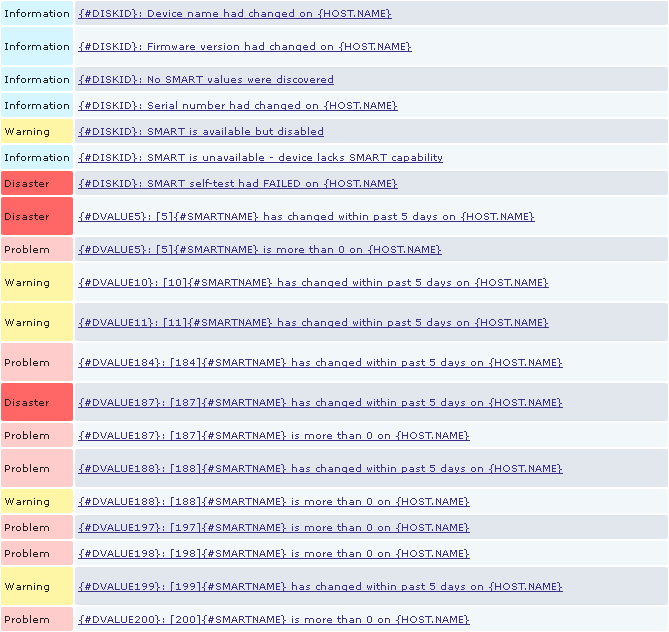
Triggers that contain delta(5d)>0 and last()>0 will fire on any change unless last value is zero. E.g. when disk is replaced with zero values the trigger will not fire, but if value is less or more — it will. Therefore, replacing a faulty drive with faulty one will still trigger a problem that stays for 5 days (default).
As prerequisites you need python3 , smartmontools , sudo and zabbix-sender packages. For testing, zabbix-get is also required.
Take a look at scripts first lines and provide paths if needed. If you have a RAID configuration, also provide that manually. Choose device or serial mode. Import Template_App_smartmontools.xml in zabbix web interface.
client# apt-get install zabbix-agent zabbix-sender smartmontools sudo server# apt-get install zabbix-get # testing client# yum install zabbix-agent zabbix-sender smartmontools sudo server# yum install zabbix-get # testing Note : Your include directory may be either zabbix_agentd.d or zabbix_agentd.conf.d dependent on the distribution.
client# mv smartctl-lld.py sender_wrapper.py /etc/zabbix/scripts/ client# mv sudoers.d/zabbix /etc/sudoers.d/ # place sudoers include for smartctl sudo access client# mv userparameter_smartctl.conf /etc/zabbix/zabbix_agentd.d/ # move zabbix items include here
client# mv smartctl-lld.py sender_wrapper.py /usr/local/etc/zabbix/scripts/ client# mv sudoers.d/zabbix /usr/local/etc/sudoers.d/ client# mv userparameter_smartctl.conf /usr/local/etc/zabbix/zabbix_agentd.d/
client> move smartctl-lld.py "C:\Program Files\Zabbix Agent\scripts\" client> move sender_wrapper.py "C:\Program Files\Zabbix Agent\scripts\" client> move userparameter_smartctl.conf "C:\Program Files\Zabbix Agent\zabbix_agentd.d\"
Install python3 for all users, adding it to PATH during installation. Install smartmontools and add its bin folder to PATH in environment variables (or specify absolute path to smartctl binary in smartctl-lld.py ).
Dependent on the distribution, you may need to include your zabbix conf folder in zabbix_agentd.conf , like this:
Include=/usr/local/etc/zabbix/zabbix_agentd.d/ Its recomended to add at least Timeout=10 to agent and server config files to allow drives spun up in some cases.
Thats all for Windows. For others run the following to finish configuration:
client# chmod 755 smartctl-lld.py sender_wrapper.py # apply necessary permissions client# chown root:zabbix smartctl-lld.py sender_wrapper.py client# chmod 644 userparameter_smartctl.conf client# chown root:zabbix userparameter_smartctl.conf client# chmod 400 sudoers.d/zabbix client# chown root sudoers.d/zabbix client# visudo # test sudoers configuration, type :q! to exit
server$ zabbix_get -s 192.0.2.1 -k smartctl.discovery[get,"Example host"] Default operation mode. Displays json that server should get, detaches, then waits and sends data with zabbix-sender. Example host is your Host name field in zabbix.
server$ zabbix_get -s 192.0.2.1 -k smartctl.discovery[getverb,"Example host"] client$ /etc/zabbix/scripts/smartctl-lld.py getverb "Example host" client_admin!_console> python "C:\Program Files\Zabbix Agent\scripts\smartctl-lld.py" getverb "Example host" Verbose mode. Does not detaches or prints LLD. Lists all items sent to zabbix-sender, also it is possible to see sender output in this mode.
Note : before scripts would work, zabbix server must first discover available items. It is done in 12 hour cycles by default. You can temporary decrease this parameter for testing in template -> Discovery -> SMART disk discovery -> Update interval .
These scripts were tested to work with following configurations:
- Debian 11 / Server (5.0, 6.0) / Agent 4.0 / Python 3.9
- Ubuntu 22.04 / Server (5.0, 6.0) / Agent 5.0 / Python 3.10
- Windows Server 2012 / Server 6.0 / Agent 4.0 / Python (3.7, 3.11)
- Windows 10 / Server 6.0 / Agent 4.0 / Python (3.10, 3.11)
- Windows 7 / Server 6.0 / Agent 4.0 / Python (3.4, 3.7, 3.8)
- Centos 7 / Zabbix 3.0 / Python 3.6
- FreeBSD 10.3 / Zabbix 3.0 / Python 3.6
- Windows XP / Zabbix 3.0 / Python 3.4
Overwrite scripts and UserParameters. If UserParameters were changed — agent restart is required. If template had changed from previous version — update it in zabbix web interface marking all Delete missing checkboxes.
Note : low values in php settings /etc/httpd/conf.d/zabbix.conf may result in request failure. Especially php_value memory_limit .
Q: Trigger fires when it clearly shouldn’t.
Q: Trigger’s macro does not expand.
Q: Triggers from older version does not expire after update.
A: Reassign the template with Unlink and clear on the host for individual resolution. Or reupload the tempate marking all Delete missing checkboxes.
Q: Is it possible to monitor specific drives or exclude some of them?
Q: SCSI drive returns empty results while -A option working correctly.
A: Specify diskListManual in smartctl-lld.py :
diskListManual = ['/dev/sda -d sat+megaraid,4', '/dev/sda -d sat+megaraid,5'] diskListManual = ['/dev/csmi0,0 -d scsi', '/dev/csmi0,1 -d scsi']
Q: Old triggers are misleading after disk replacement.
A: Wait for 24 hours (default) or perform Unlink and clear on the host. You can also adjust the interval at template -> Discovery -> SMART disk discovery -> Keep lost resources period .
Q: Triggers Command line did not parse and Device open failed serves identical purpose in zabbix-smartmontools and zabbix-mini-IPMI .
A: Disable unneeded pair in either template.
Q: Script exits with exception/error.
A: Report it.
- Zabbix web panel displays an error on json discovery, but everything works fine (#7)
- Data on some systems may be absent right after boot due to ACHI warmup (#14)
- Windows version does not detaches, and data will only be gathered on second pass
Zabbix v6 SMART HDD Check

The smartmontools package comes with two utilities, smartctl which you can use to check your hard drives on the command line, and smartd, a daemon that checks your hard disks at a specified interval and logs warnings/errors to the syslog and can also send warnings and errors to a specified email address (usually the admin of the system).
apt install smartmontools smartctl -v smartctl 7.2 2020-12-30 r5155 [x86_64-linux-5.10.0-11-amd64] (local build) Copyright (C) 2002-20, Bruce Allen, Christian Franke, www.smartmontools.org Using Smartctl
df -h Filesystem Size Used Avail Use% Mounted on udev 3.8G 0 3.8G 0% /dev tmpfs 777M 996K 776M 1% /run /dev/sda1 75G 43G 30G 59% / tmpfs 3.8G 0 3.8G 0% /dev/shm tmpfs 5.0M 0 5.0M 0% /run/lock /dev/sda15 121M 130K 120M 1% /boot/efi In the case of my test server below we have a virtual machine — that, obviously, does not have access to the underlying HDD hardware /dev/sda1 :
smartctl -a /dev/sda1 === START OF INFORMATION SECTION === Vendor: QEMU Product: QEMU HARDDISK Revision: 2.5+ Compliance: SPC-3 User Capacity: 81,923,145,728 bytes [81.9 GB] Logical block size: 512 bytes LU is thin provisioned, LBPRZ=0 Device type: disk Local Time is: Sun Jan 30 05:14:03 2022 CET SMART support is: Unavailable - device lacks SMART capability. === START OF READ SMART DATA SECTION === Current Drive Temperature: 0 C Drive Trip Temperature: 0 C When you see that the SMART support is: disabled run the following command to enable it:
Add SMART Zabbix Plugin
The template for monitoring S.M.A.R.T. attributes of physical disk that works without any external scripts. It collects metrics by Zabbix agent 2 version 5.0 and later with Smartmontools version 7.1 and later. Disk discovery LLD rule finds all HDD, SSD, NVMe disks with S.M.A.R.T. enabled. Attribute discovery LLD rule finds all Vendor Specific Attributes for each disk.