- Как настроить статический IP-адрес в Linux и Unix
- В RHEL/CentOS/Fedora/Scientific Linux
- В Ubuntu/Debian/Linux Mint
- В Unix
- How to Change IP Address in Linux
- Using the ip Command to Set an IP Address
- Making an IP Address Permanent
- Using Netplan for Network configuration (for Ubuntu)
- Using Graphical Interface to Change the System IP Address (for Desktop Users)
- Wrapping Up
Как настроить статический IP-адрес в Linux и Unix
Настройка IP-адреса — один из основных навыков, который должен освоить каждый администратор Linux и Unix. Настроить IP-адрес в режиме графического интерфейса намного проще, поэтому мы не будем описывать это в этом руководстве. Но что в режиме командной строки? Это не так уж сложно. Этот статья описывает, как настроить статический IP в ваших системах Linux и Unix. В этой статье описано, как это сделать в дистрибутивах Linux, таких как CentOS, Debian, Ubuntu и Unix, таких как FreeBSD.
В RHEL/CentOS/Fedora/Scientific Linux
В Fedora, RHEL и его клонах, таких как CentOS, Scientific Linux, конфигурация сетевой карты (кратко NIC) хранится в каталоге /etc/sysconfig/network-scripts/. Для выполнения следующих команд используйте пользователя root. Если же вы вошли в систему как обычный пользователь, просто используйте sudo перед каждой командой.
Сначала необходимо узнать имя сетевой карты. Для этого запустите:
1: lo: mtu 65536 qdisc noqueue state UNKNOWN link/loopback 00:00:00:00:00:00 brd 00:00:00:00:00:00 inet 127.0.0.1/8 scope host lo valid_lft forever preferred_lft forever inet6 ::1/128 scope host valid_lft forever preferred_lft forever 2: enp0s3: mtu 1500 qdisc pfifo_fast state UP qlen 1000 link/ether 08:00:27:80:63:19 brd ff:ff:ff:ff:ff:ff inet 192.168.1.150/24 brd 192.168.1.255 scope global enp0s3 valid_lft forever preferred_lft forever inet6 fe80::a00:27ff:fe80:6319/64 scope link valid_lft forever preferred_lft forever
Обычно имя проводной сетевой карты начинается с буквы «е», а имя беспроводной карты начинается с буквы «w».
Как видно из вышеприведенного вывода, имя моей проводной сетевой карты enp0s3. Он может отличаться в вашем дистрибутиве, но обычно начинается с буквы «е».
Давайте настроим статический IP-адрес для этого сетевого адаптера.
Откройте файл конфигурации сетевой карты в любом редакторе:
# nano /etc/sysconfig/network-scripts/ifcfg-enp0s3
nano — текстовый редактор. Вы можете использовать любой текстовый редактор на ваш выбор, например, vi или gedit.
Добавьте IP-адрес, маску подсети, шлюз и DNS -сервер, как показано ниже.
TYPE="Ethernet" BOOTPROTO="none" DEFROUTE="yes" IPV4_FAILURE_FATAL="no" IPV6INIT="yes" IPV6_AUTOCONF="yes" IPV6_DEFROUTE="yes" IPV6_FAILURE_FATAL="no" NAME="enp0s3" UUID="e9f9caef-cb9e-4a19-aace-767c6ee6f849" ONBOOT="yes" HWADDR="08:00:27:80:63:19" IPADDR0="192.168.1.150" PREFIX0="24" GATEWAY0="192.168.1.1" DNS1="192.168.1.1" IPV6_PEERDNS="yes" IPV6_PEERROUTES="yes"
BOOTPROTO = ”none” — эта строка показывает, что IP-адрес сетевой карты должен быть настроен вручную. Если вы установите значение «dhcp», то сетевая карта будет принимать IP-адрес от любого DHCP-сервера в сети;
IPADDR0 = ”192.168.1.150″ — в этой строке указывается IP-адрес сетевой карты. Здесь вы можете заметить число 0 (ноль) после IPADDR. Это означает, что эта карта имеет только один IP-адрес. Если вы хотите установить более одного IP-адреса (то есть виртуального IP-адреса, то вам нужно добавить строки обозначенные как IPADDR1, IPADDR2 и т.д.;
PREFIX0 = ”24″ — эта строка указывает маску подсети, т.е. 25.255.255.0. Здесь вы можете указать более одного PREFIX со строками PREFIX1, PREFIX2 и т.д., в соответствии с числом виртуальных IP-адресов;
После того, как вы настройки, сохраняем и закрываем файл. Перезапускаем сетевой сервис, чтобы изменения вступили в силу.
# systemctl restart network
Или перезагружаем систему.
Проверим правильность настройки сетевых интерфейсов:
Или можно проверить адрес конкретной сетевой карты, как показано ниже.
Пример вывода последней команды
2: enp0s3: mtu 1500 qdisc pfifo_fast state UP qlen 1000 link/ether 08:00:27:80:63:19 brd ff:ff:ff:ff:ff:ff inet 192.168.1.150/24 brd 192.168.1.255 scope global enp0s3 valid_lft forever preferred_lft forever inet6 fe80::a00:27ff:fe80:6319/64 scope link valid_lft forever preferred_lft forever
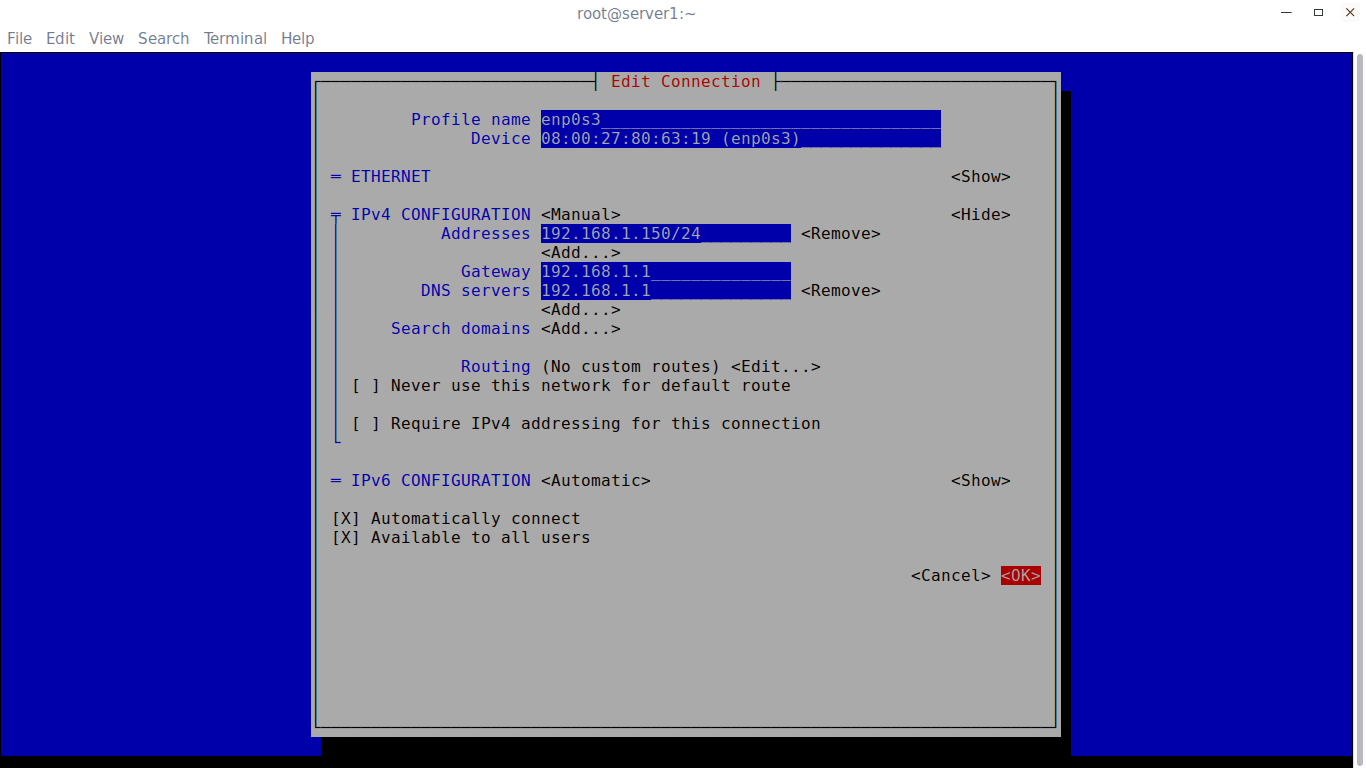
Кроме того, вы можете использовать команду nmtui для настройки IP-адреса.
Введите IP-адрес, маску сети, шлюз, DNS и т.д.

Нажмите OK, чтобы сохранить изменения, и перезапустите сетевую службу или перезагрузите систему, чтобы изменения вступили в силу.
В Ubuntu/Debian/Linux Mint
В системах на основе DEB, таких как Ubuntu, Linux Mint, Elementary OS и т.д. файл конфигурации сетевой карты хранится в каталоге /etc/network/
Чтобы настроить статический IP-адрес в любых системах на основе DEB, выполните следующие действия.
Отредактируйте файл /etc/network/interfaces в любом удобном текстовом редакторе
$ sudo nano /etc/network/interfaces
Добавьте или измените следующие строки для настройки статического IP-адреса.
auto enp0s3 iface enp0s3 inet static address 192.168.1.105 netmask 255.255.255.0 gateway 192.168.1.1 dns-nameservers 192.168.1.1
Сохраните и закройте файл
Перезапустите сетевой интерфейс:
$ sudo systemctl restart ifup@enp0s3
Или перезагрузите систему.
Теперь проверьте новый статический IP-адрес с помощью одной из следующих команд:
$ ifconfig $ ip addr $ ip a s enp0s3
Пример вывода последней команды
2: enp0s3: mtu 1500 qdisc pfifo_fast state UP group default qlen 1000 link/ether 08:00:27:12:f8:c1 brd ff:ff:ff:ff:ff:ff inet 192.168.1.105/24 brd 192.168.1.255 scope global enp0s3 valid_lft forever preferred_lft forever inet6 fe80::a00:27ff:fe12:f8c1/64 scope link valid_lft forever preferred_lft forever
В Unix
Мы уже знаем, как настроить статический IP-адрес в Linux из командной строки. Теперь настроим статический IP-адрес в Unix. В этой статье мы будем использовать FreeBSD 10.3.
Как и в Linux, мы используем команду ifconfig, чтобы узнать имя сетевой карты. Здесь я вошел в систему как пользователь root для выполнения следующих команд.
em0: flags=8843 metric 0 mtu 1500 options=9b ether 08:00:27:f8:ba:d8 inet 192.168.1.103 netmask 0xffffff00 broadcast 192.168.1.255 nd6 options=29 media: Ethernet autoselect (1000baseT ) status: active lo0: flags=8049 metric 0 mtu 16384 options=600003 inet6 ::1 prefixlen 128 inet6 fe80::1%lo0 prefixlen 64 scopeid 0x2 inet 127.0.0.1 netmask 0xff000000 nd6 options=21
Здесь em0 — имя сетевой карты.
Чтобы настроить статический IP-адрес, отредактируем файл /etc/rc.conf:
Добавим или изменим строки, как показано ниже.
hostname="freebsd.test.local" ifconfig_em0="inet 192.168.1.103 netmask 255.255.255.0" defaultrouter="192.168.1.1" local_unbound_enable="YES" sshd_enable="YES" moused_enable="YES" ntpd_enable="YES" powerd_enable="YES" # Set dumpdev to "AUTO" to enable crash dumps, "NO" to disable dumpdev="AUTO"
Теперь перезапустим сетевой интерфейс
# /etc/rc.d/netif restart && /etc/rc.d/routing restart
Чтобы настроить сетевую карту для получения IP-адреса от сервера DHCP, добавьте или измените только следующие строки:
hostname="freebsd.test.local" ifconfig_em0="DHCP"
Сохраните и закройте файл. Перезапустите сетевой сервис или перезагрузите систему, чтобы изменения вступили в силу.
И это все. Теперь вы знаете, как настроить статический IP-адрес в дистрибутивах Unix и Linux. Как видно из приведенных выше примеров, настройка IP-адреса из командной строки не очень сложна, как может показаться.
Если не указано иное, содержимое этой вики предоставляется на условиях следующей лицензии:
CC Attribution-Noncommercial-Share Alike 4.0 International
How to Change IP Address in Linux
Learn different ways of changing the IP address in Linux. Also learn how to make the changes [ermanent.
As a sysadmin, you’ll often deal with IP address configuration. Changing the IP address is one of the common IP configuration tasks.
While the IP addresses on most systems are configured automatically, you may need to change them manually in some cases.
In this article, you’ll see various ways to change the IP address in Linux. I’ll also focus on Ubuntu network configuration separately.
Before you proceed any further, you should run this command to check your current IP address:
This will also show the interface name which you’ll need while changing the IP address.
Using the ip Command to Set an IP Address
The ip command is available on most Linux distributions.
For setting an IP address, use it like this:
ip addr add [ip_address] dev [interface]For example, add an IP address to the eth1 interface as:
sudo ip addr add 192.168.56.21/24 dev eth1You now have two IP addresses: one from the old configuration and one from the new command:
As you can see in the above screenshot, after deleting the old one, you are left with only one.
Making an IP Address Permanent
Surprisingly, the IP addresses set by the above method are not going to persist in system reboots.
sudo nano /etc/network/interfacesIf your file read like the below, your IP address will be set by a DHCP client:
auto eth0 iface eth0 inet dhcpTo change the IP address as per our choice, we can modify this file to manually set the IP address. To set the IP address statically, for e.g. as 192.168.56.20, change the above entry to look as:
auto enp0s3 iface enp0s3 inet static address 192.168.56.20 netmask 255.255.255.0 gateway 192.168.40.31The entries above are self-explanatory for moderate Linux users. To apply the changes, you need to run the command:
$ sudo systemctl restart networking.serviceTip: On RedHat-based systems, the file ‘/etc/sysconfig/networking-scripts/ifcfg-*’ serves the purpose of configuring network interfaces.
Using Netplan for Network configuration (for Ubuntu)
Ubuntu provides a Netplan utility for network configuration.
Let us take an example of configuring an IP address on Ubuntu 20.04. I am using ‘NetworkManager’ as the renderer for the network configuration.
The current IP address can be checked from the Netplan configuration file. This file is in YAML format and can be created if not present:
sudo nano /etc/netplan/config.yamlIf the IP address is dynamic, you will see the ‘dhcp4’ parameter set to true.
In case, you have a pre-configured static IP, the configuration will look much like this:
--- network: version: 2 renderer: networkd ethernets: eth1: addresses: - 192.168.56.66/24 nameservers: addresses: - 8.8.8.8 routes: - to: default via: 10.0.2.2To change the IP address, replace the old IP address with a new one. Additionally, you can keep this IP and add one more to the above interface (en01).
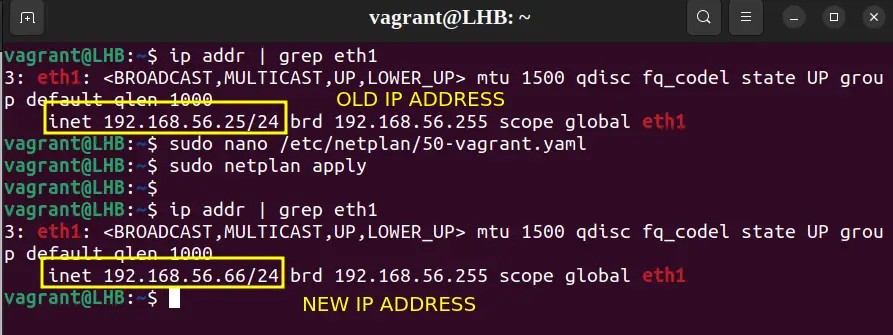
Once you have configured the network, pre-test it before applying:
After confirming the changes, the new configuration can be applied as:
Check if the new settings have been applied:
One of the advantages of using Netplan is that the network configuration will persist between reboots. Your IP address change is permanent.
Using Graphical Interface to Change the System IP Address (for Desktop Users)
Managing IP addresses with a graphical interface is the easiest one and preferable for new Linux users. On a Ubuntu system, the Network settings contain all the required configurations.
Open ‘Settings’ from the GNOME dashboard and look for the ‘Network’ option:
Choose the setting icon from the active network on your system:
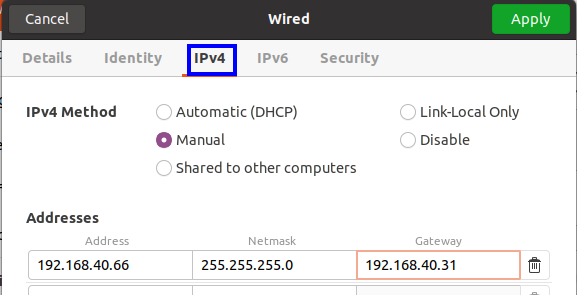
On the new window, select the IPv4 tab and then under the IPv4 method, choose the Manual option. Enter the details for the new IP address:
Now restart your connection and check the IP address:
As you can see from the above screenshot, the IP address has now changed.
Wrapping Up
The ip command is suitable for all Linux systems. Netplan is a new way of managing a network and is a very straightforward approach for Ubuntu systems.
I also added steps for the desktop users to help them change the IP address graphically.
Let me know if you have any questions or suggestions.


