- How to Set Linux Process Priority Using nice and renice Commands
- Understanding the Linux Kernel Scheduler
- Understanding Process Priority and Nice Value
- How to Check Nice Value of Linux Processes
- Difference Between PR or PRI and NI
- How to Run A Command with a Given Nice Value in Linux
- Change the Scheduling Priority of a Process in Linux
- How To Set Default Nice Value Of a Specific User’s Processes
- Приоритеты процессов Linux
How to Set Linux Process Priority Using nice and renice Commands
In this article, we’ll briefly explain the kernel scheduler (also known as the process scheduler), and process priority, which are topics beyond the scope of this guide. Then we will dive into a little bit of Linux process management: see how to run a program or command with modified priority and also change the priority of running Linux processes.
Understanding the Linux Kernel Scheduler
A kernel scheduler is a unit of the kernel that determines the most suitable process out of all runnable processes to execute next; it allocates processor time between the runnable processes on a system. A runnable process is one which is waiting only for CPU time, it’s ready to be executed.
The scheduler forms the core of multitasking in Linux, using a priority-based scheduling algorithm to choose between the runnable processes in the system. It ranks processes based on the most deserving as well as the need for CPU time.
Understanding Process Priority and Nice Value
The kernel stores a great deal of information about processes including process priority which is simply the scheduling priority attached to a process. Processes with a higher priority will be executed before those with a lower priority, while processes with the same priority are scheduled one after the next, repeatedly.
There are a total of 140 priorities and two distinct priority ranges implemented in Linux. The first one is a nice value (niceness) which ranges from -20 (highest priority value) to 19 (lowest priority value) and the default is 0 , this is what we will uncover in this guide. The other is the real-time priority, which ranges from 1 to 99 by default, then 100 to 139 are meant for user-space.
One important characteristic of Linux is dynamic priority-based scheduling, which allows the nice value of processes to be changed (increased or decreased) depending on your needs, as we’ll see later on.
How to Check Nice Value of Linux Processes
To see the nice values of processes, we can use utilities such as ps, top or htop.
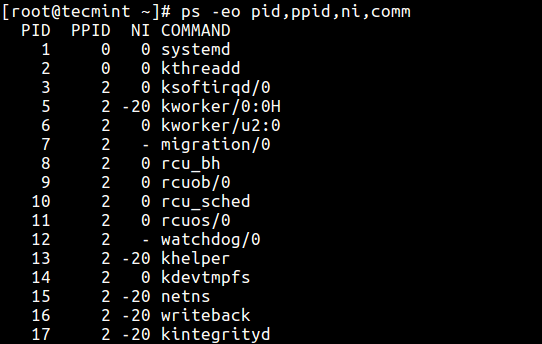
To view processes nice value with ps command in user-defined format (here the NI the column shows the niceness of processes).
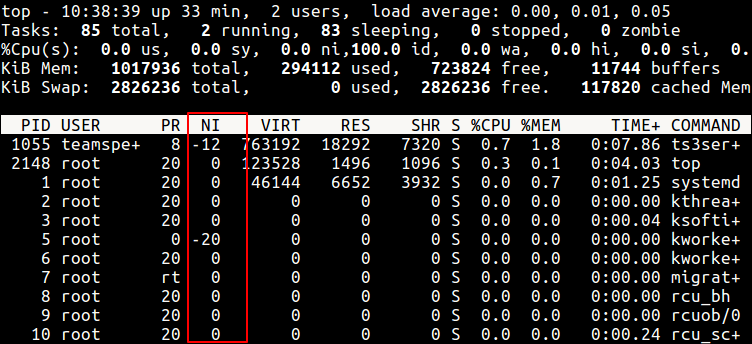
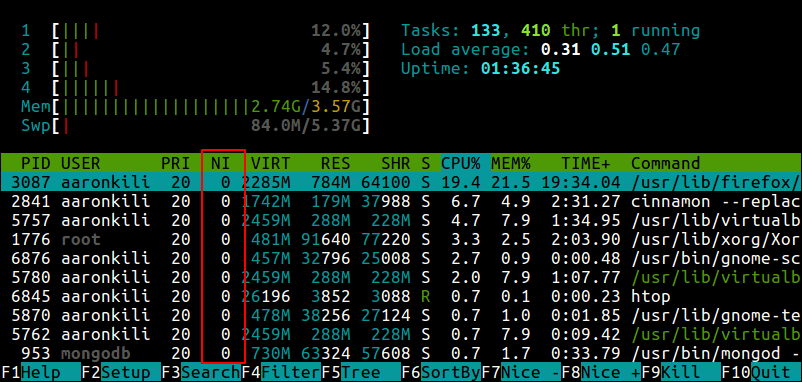
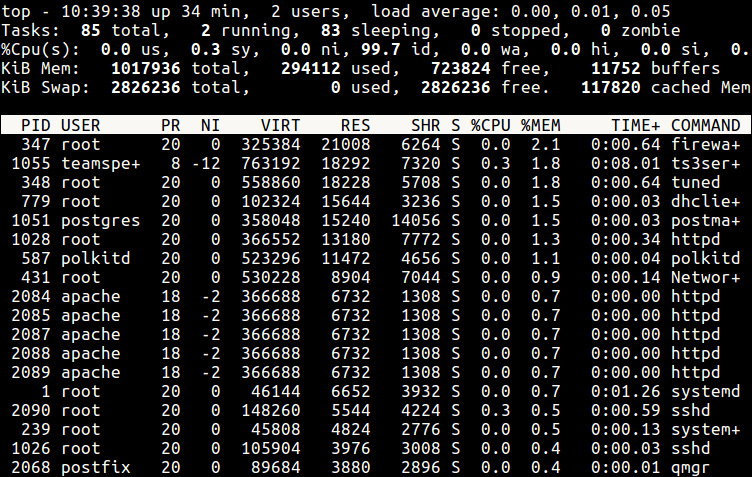
Alternatively, you can use top or htop utilities to view Linux processes nice values as shown.
Difference Between PR or PRI and NI
From the top and htop outputs above, you’ll notice that there is a column called PR and PRI receptively which shows the priority of a process.
This, therefore, means that:
- NI – is the nice value, which is a user-space concept, while
- PR or PRI – is the process’s actual priority, as seen by the Linux kernel.
How To Calculate PR or PRI Values
Total number of priorities = 140 Real time priority range(PR or PRI): 0 to 99 User space priority range: 100 to 139
Nice value range (NI): -20 to 19
PR = 20 + NI PR = 20 + (-20 to + 19) PR = 20 + -20 to 20 + 19 PR = 0 to 39 which is same as 100 to 139.
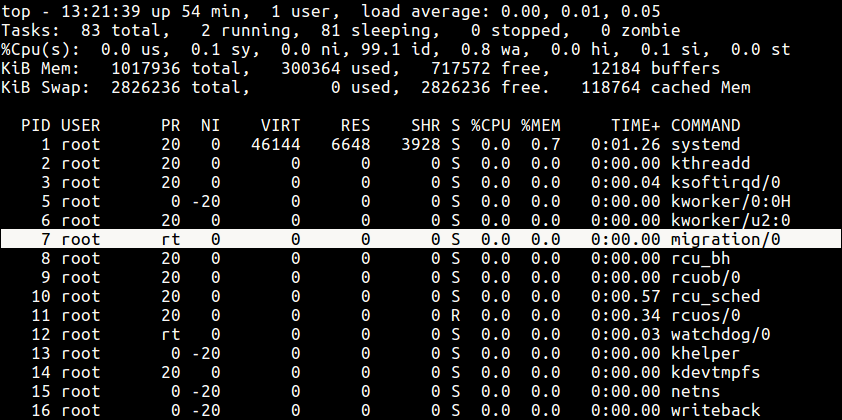
But if you see a rt rather than a number as shown in the screenshot below, it basically means the process is running under real-time scheduling priority.
How to Run A Command with a Given Nice Value in Linux
Here, we will look at how to prioritize the CPU usage of a program or command. If you have a very CPU-intensive program or task, but you also understand that it might take a long time to complete, you can set it a high or favorable priority using the nice command.
$ nice -n niceness-value [command args] OR $ nice -niceness-value [command args] #it’s confusing for negative values OR $ nice --adjustment=niceness-value [command args]
- If no value is provided, nice sets a priority of 10 by default.
- A command or program run without nice defaults to a priority of zero.
- Only root can run a command or program with increased or high priority.
- Normal users can only run a command or program with low priority.
For example, instead of starting a program or command with the default priority, you can start it with a specific priority using following nice command.
$ sudo nice -n 5 tar -czf backup.tar.gz ./Documents/* OR $ sudo nice --adjustment=5 tar -czf backup.tar.gz ./Documents/*
You can also use the third method which is a little confusing especially for negative niceness values.
$ sudo nice -5 tar -czf backup.tar.gz ./Documents/*
Change the Scheduling Priority of a Process in Linux
As we mentioned before, Linux allows dynamic priority-based scheduling. Therefore, if a program is already running, you can change its priority with the renice command in this form:
$ renice -n -12 -p 1055 $ renice -n -2 -u apache

From the sample top output below, the niceness of the teamspe+ with PID 1055 is now -12 and for all processes owned by user apache is -2 .
Still using this output, you can see the formula PR = 20 + NI stands,
PR for ts3server = 20 + -12 = 8 PR for apache processes = 20 + -2 = 18
Any changes you make with renice command to a user’s processes nice values are only applicable until the next reboot. To set permanent default values, read the next section.
How To Set Default Nice Value Of a Specific User’s Processes
You can set the default nice value of a particular user or group in the /etc/security/limits.conf file. Its primary function is to define the resource limits for the users logged in via PAM.
The syntax for defining a limit for a user is as follows (and the possible values of the various columns are explained in the file):
Now use the syntax below where hard – means enforcing hard links and soft means – enforcing the soft limits.
Alternatively, create a file under /etc/security/limits.d/ which overrides settings in the main file above, and these files are read in alphabetical order.
Start by creating the file /etc/security/limits.d/tecmint-priority.conf for user tecmint:
# vi /etc/security/limits.d/tecmint-priority.conf
Then add this configuration in it:
Save and close the file. From now on, any process owned by tecmint will have a nice value of 10 and PR of 30.
For more information, read the man pages of nice and renice:
You might also like to read these following articles about Linux process management.
In this article, we briefly explained the kernel scheduler, process priority, looked at how to run a program or command with modified priority and also change the priority of active Linux processes. You can share any thoughts regarding this topic via the feedback form below.
Приоритеты процессов Linux
![]()
Данная тема важна так как позволяет изменять приоритет процессов в операционной системе Linux. Иногда возникает такая ситуация, что необходимо изменить приоритет процессов, какой — то процесс сделать более приоритетным, отдав побольше ресурсов, а какой-то менее приоритетным забрав часть ресурсов сервера. В данной теме мы рассмотрим следующие вопросы:
- Научимся определять приоритеты процессов;
- Рассмотрим, как запускать программы с повышенным приоритетом или с пониженным;
- Посмотрим, как изменять приоритет запущенных программы.
В Linux любой процесс может иметь приоритет от -20 до +19. Во FreeBSD до +20. Максимальным приоритетом считается, тот процесс у которого минимальное число. Т.е. максимальный по приоритету процесс будет иметь число — 20, а минимальный -19 соответственно. Поэтому задача с приоритетом -20 будет выполняться в первую очередь с максимум ресурсов и наоборот задача с +19 будет выполняться в последнюю очередь и минимум ресурсов. Linux для установки приоритетов использует такую программу nice и renice.
Для того, чтобы рассмотреть данную тему воспользуемся командой ps aux . Запуская данную команду мы получаем все сведения о запущенных процессах на данном сервере. Так же мы можем увидеть от какого пользователя данный процесс запущен. Теперь мы используем другой набор ключей для команды ps .
Чтоб получить нам интересующий вывод данных используем команду ps alx .
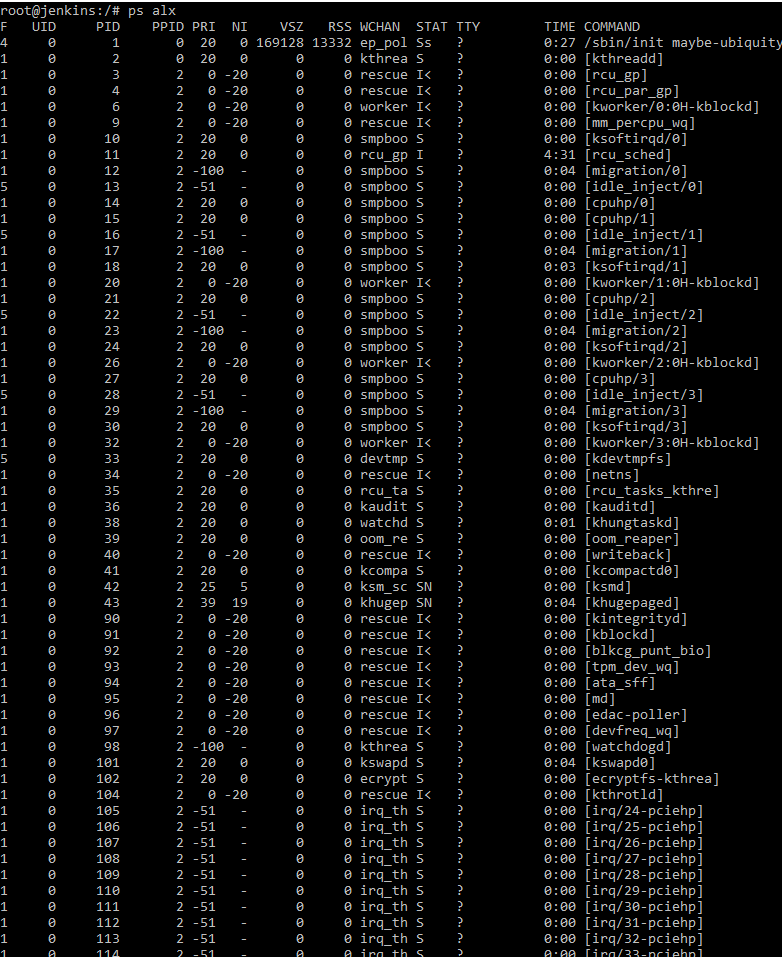
Мы можем видеть, что получили немного другую информацию. Появилась колонка, промаркированная «NI» и колонка «PRI«. Мы можем видеть, что верхние процессы выполняются с nice 0, т.е. это авторитет по умолчанию, который присваивается если не сказано иного. Возьмем другой вариант команды ps , с другими ключами.
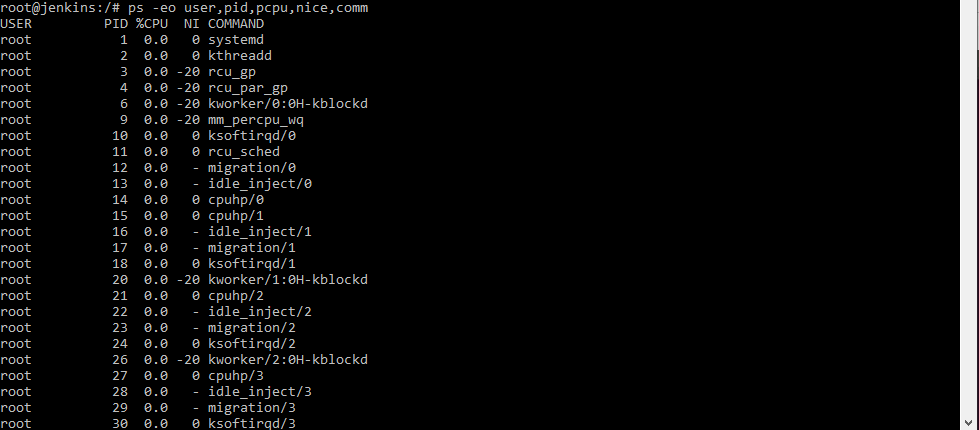
- ps -eo user,pid,pcpu,nice,comm
- -e — ключ показывать все
- -o — output т.е какая информация нужна, далее в команде перечисляется необходимая информация (колонки)
После ввода данной команды, мы видим, что столбцов стало меньше. Только то, что мы запрашивали, пользователь, ID процесса, загрузка CPU, приоритет и какая команда.
Для того, чтобы понять, что такое приоритет, попробуем использовать команду sleep, которая позволяет, остановить операционную систему на указанное число секунд.
И выведем команду ps -eo user,pid,pcpu,nice,comm | grep sleep , используя pipline сортируем по названию процесса sleep. Вот, что у нас вышло.

Видим наш запущенный процесс.
Далее запустим какую-нибудь задачу с максимальным приоритетом. Это полезно если мы хотим запустить, какой ни будь серьезный процесс, чтобы он получил максимальный приоритет. Как пример, срочная переиндексация базы данных на сервере с максимальным приоритетом или программку, которая будет собирать информацию о системе с минимальным приоритетом.
И мы можем увидеть, что появился наш процесс со значение 10 по умолчанию.
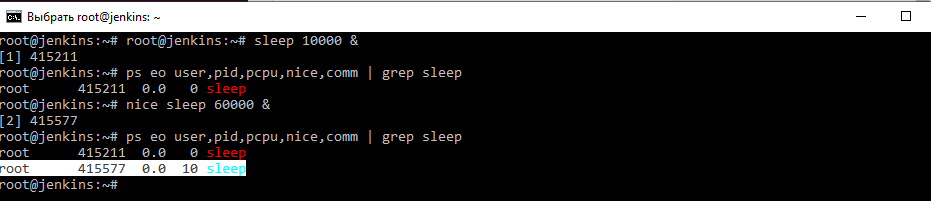
Десять — это приоритет по умолчанию, и он ниже, чем ноль. Чем выше значение, тем приоритет ниже. Т.е. получается если мы запускаем с командой niсе, то процесс запускает с приоритетом ниже в 2 раза, чем просто если бы запустили.
Мы можем принудительно завершить процессы. killall sleep .
Попробуем запустить задачу с минимальным приоритетом. Для этого воспользуемся параметром. Команда будет выглядеть следующим образом.

Как мы видим все получилось. Процесс запущен с минимальным приоритетом.
Аналогично запускается процесс с максимальным приоритетом.

Тут нужно пояснить, что задачи с наивысшим приоритетом, могут пользователи только с правами root. Если мы бы попытались сделать из-под обычного пользователя, то ничего у нас бы не вышло.
killall sleep , еще раз завершим принудительно процессы. Запустим еще раз процесс с наименьшим приоритетом. nice -n 19 sleep 60000 . Теперь изменим приоритет текущего процесса. Для этого есть следующая команда:
renice 5 -p 416802 - т.е 5 - новый приоритет , 416802 - id процесса.

Как мы видим все успешно поменялось. Вот таким образом мы можем динамически менять приоритеты. В Операционной системе Windows мы так же можем менять приоритеты в менеджере задач, но если там пять уровней, то в Linux их получается 40.
Мы можем так же менять приоритеты определенному пользователю.
renice приоритет -u пользователь
Данные команды, нам позволяют гибко управлять распределением ресурсов на нашем сервере.