- Recovery modes
- Install mode
- Run mode
- Recover mode
- Factory reset
- How to Boot to Recovery Mode (Safe Mode) in Ubuntu
- Boot to Recovery Mode in Ubuntu
- Understanding Recovery Options
- The Root Terminal
- Can’t Access GRUB Boot Menu
- How to Boot Ubuntu 22.04 into Rescue / Emergency Mode
- Boot Ubuntu 22.04 into Rescue or Single User Mode
- Alternate Way to Boot System into Rescue Mode
- Boot Ubuntu 22.04 into Emergency Mode
Recovery modes
The following recovery functions are currently available:
- Install mode / factory mode: initialise the device from an onboard system image
- Run mode: restarts normally and runs the boot process
- Recover mode: reboot into recovery mode for data retrieval
- Factory reset: erase system data and initialise the device to its factory state
See Using recovery modes for details on how these modes are accessed.
Install mode
With install mode, all existing user and system data on the device will be removed and the device will be initialised from the system version image dated and listed in the reinstall text.
Unlike with a factory reset (see below), install mode will erase the contents of the ubuntu-save partition, reverting the device to its manufactured state, potentially removing configuration data essential to its functionality.
After the re-initialisation process has completed, you will need to step through the installation process of network configuration and account credentials again.
See Installation steps for further details on how the installation will proceed.
Re-installation can fail if a device’s TPM is assigned to a previous installation. To solve this issue, reset or clear the TPM assignment from the device’s BIOS before selecting reinstall as a recovery mode.
Run mode
When booting in run mode, the device will attempt to boot normally, with no further option to recover or reinstall the system unless the recovery process is reinstantiated.
Recover mode
In recovery mode, the device operates as it would from a pristine initial installation, including its snaps, via a temporary file system.
Most importantly, however, the running system data is untouched. This allows you to log in to the system using prior credentials to recover your data, either via SSH or locally after setting up a password for the user.
Rebooting from recovery mode will return the system to run mode.
Factory reset
The factory reset option will erase all system data and reset the device to its original fresh from the factory state. This means that not everything is removed.
In particular, the contents of the ubuntu-save partition remains intact. This partition typically contains configuration data essential for the original functionality of the device, such as network configuration details. To fully initialise such a device, and remove all data, use install mode .
This is a dangerous option and should only be performed when you are certain the data on a device data is either backed-up or unwanted.
Additionally, the install-device hook may optionally be executed with a factory-reset.
How to Boot to Recovery Mode (Safe Mode) in Ubuntu

Sometimes things go wrong, even on Linux systems, and you need a way to get your computer back to full functionality. On Windows, Safe Mode is usually the first choice to get back in and fix a problem. However, on Linux, there really isn’t a direct counterpart.
On most Linux distributions i, the solution involves using a Live CD to access files on your hard drive or even using a chroot. Ubuntu has come up with a clever solution in recovery mode. It lets you perform several key recovery tasks, including booting into a root terminal to give you full access to fix your computer.
Note: this will only work on Ubuntu, Mint, and other Ubuntu-related distributions.
Boot to Recovery Mode in Ubuntu
As you’re booting your computer, wait for the manufacturer logo to flash from the BIOS. If your computer boots too quickly, you’re going to need to do this immediately after powering it on. Quickly press either the Shift or Escape key. On newer computers, it’s probably Escape . The timing has to be near perfect on some computers, so you may have to press it repeatedly. If you miss the window, reboot and try again.

With any luck, you’ll arrive at Ubuntu’s GRUB boot menu. Just below your regular boot option, you’ll see an entry for “Advanced Options.” Select it and press Enter.

GRUB will take you to a new menu. Toward the bottom you’ll see one of the entries with “Recovery” listed in parentheses.

You’ll arrive on a simple screen with a blue background and a box containing a series of recovery options. This is the main recovery menu for Ubuntu; it allows you to do many of the common tasks required to fix a broken system.
Understanding Recovery Options
As you can tell, you now have seven options to help recover Ubuntu. Depending on the issue you’re facing, you’ll want to choose the right one for your needs.
Each option does the following:
- Resume – If you somehow got to this menu accidentally, just use “resume” to continue booting normally.
- Clean – If you’re have space issues, opt for the “clean” option. It helps you free up valuable space to avoid a variety of system glitches.
- Dpkg – If you’re installing a new package and something went wrong, it can cause Ubuntu not to work properly. Use “dpkg” to try to repair any broken packages.
- Fsck º While it won’t always work, “fsck” is useful in troubleshooting hard drive issues. You can also use it to configure graphics drivers. If you suspect your hard drive may be corrupted or failing, use this tool.
- Grub – This is used just to automatically update the installed Grub bootloader.
- Network – If you’re having network issues, use the “network” option to help set things up again. Since networking is usually disabled unless you manually set it up, this can help with the process.
- Root – This is for more advanced troubleshooting. As you may notice, the Recovery Menu opens the system in a read-only state. The root tool helps you get write access (more on that below).
- System-summary – Get a basic overview of your system. In most cases, this isn’t the most useful option unless you want to ensure Ubuntu is recognizing different parts of your system.
The Root Terminal

Many problems can only be solved as root, and they require more manual intervention than what the default options in the recovery menu provide. When it looks like you’re dealing with one of these cases, select “Drop to root shell prompt” to boot into a root terminal.

As soon as you select it, you’ll see the bottom of your screen switch to a terminal and log in as root. Before you can do much, you’re going to need to remount the root partition of your drive. By default, it’s mounted read-only for safety purposes, but you’ll probably need to modify something to fix whatever issue’s going on. To remount it with write permissions, run the following command.
If you have additional partitions you need to work on, you’ll need to remount them as well. That includes when your “/home” directory is on a separate partition. You can remount them all at once simply with:
Now you’re ready to dig around in your system and resolve the problem that’s preventing you from booting normally. You’ll have access to everything on your system as root, so be careful not to damage anything in the process. Making backups, even just copies of the files you modify, is a great idea. Once you’ve uncovered and remedied the problem, reboot your system and boot normally.
Can’t Access GRUB Boot Menu
If for any reason you can’t access Ubuntu’s GRUB boot menu, you won’t be able to boot into recovery mode in Ubuntu. This usually means the bootloader and/or your Ubuntu system has been corrupted somehow. The easiest solution is to reinstall Ubuntu using a Live CD. There are a variety of reasons to have a Live CD on hand, and this is just one of them.
This method allows you to usually keep your files (as long as the hard drive isn’t corrupted beyond use). Plus, you’ll be able to repair whatever is going on with a fresh installation.
In most cases, booting into recovery mode in Ubuntu should be your first step for troubleshooting many issues you encounter. And, hopefully, you won’t need to reinstall Ubuntu at all.
Crystal Crowder has spent over 15 years working in the tech industry, first as an IT technician and then as a writer. She works to help teach others how to get the most from their devices, systems, and apps. She stays on top of the latest trends and is always finding solutions to common tech problems.
Our latest tutorials delivered straight to your inbox
How to Boot Ubuntu 22.04 into Rescue / Emergency Mode
Hello geeks, booting Ubuntu 22.04 (Jammy Jellyfish) into rescue and emergency mode helps to reset the forgotten user password, fix the file system errors and disabling or enabling systemd service during boot.
In this post, we will learn how to boot Ubuntu 22.04 LTS system into rescue and emergency mode. Rescue mode is similar to single user mode where are all troubleshooting steps are executed. Rescue mode loads the minimal environment and mount root file system.
Whereas in emergency mode, we get the single user shell without starting any system services. So emergency mode is required when we can’t boot the system into rescue mode.
Boot Ubuntu 22.04 into Rescue or Single User Mode
Head to target system which you want to boot into rescue or single user mode. At the boot press ‘ SHIFT & ESC ’ key to enter into grub bootloader screen.

Choose the first option Ubuntu and press ‘ e ’ to enter edit mode.
Go the end of line which starts with linux and delete the string ‘ $vt_handoff ’ and add the string ‘ systemd.unit=rescue.target ’
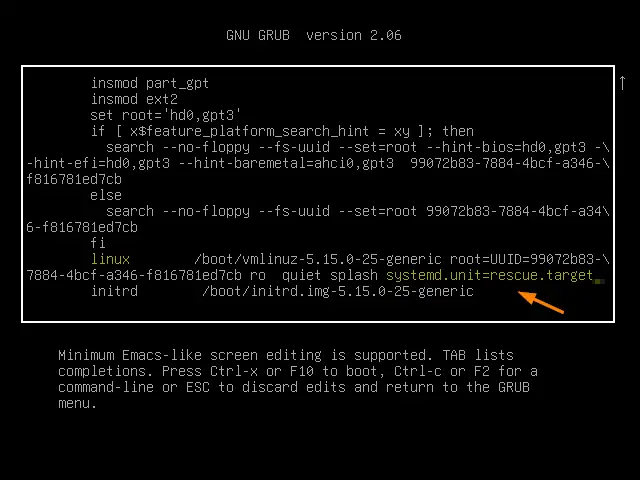
After making the changes, either press Ctrl+x or F10 to boot in rescue mode,
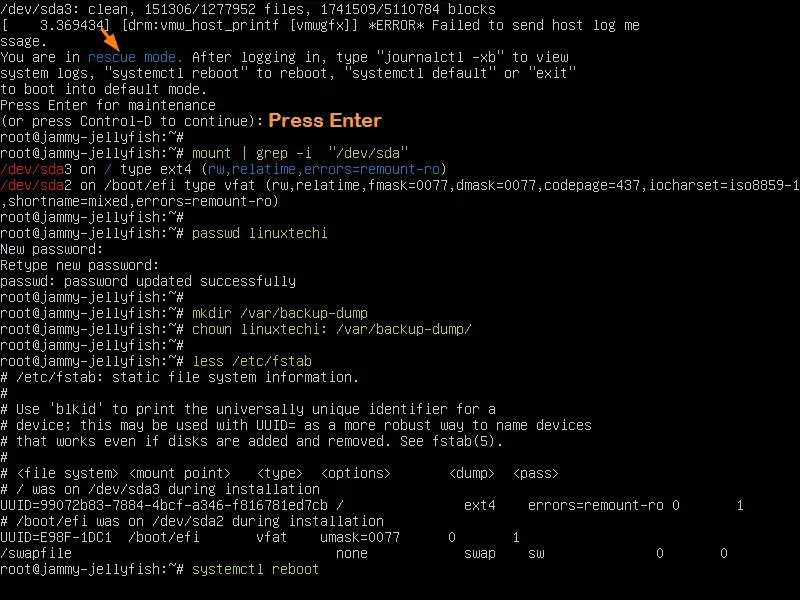
Once you enter into rescue mode, run all troubleshooting commands and to reboot the system run ‘ systemctl reboot ’ command
Alternate Way to Boot System into Rescue Mode
Reboot the system and press ‘ ESC & Shift’ Key to go to grub boot screen.
Choose the 2nd option ‘ Advanced Options for Ubuntu’ –> Choose recovery mode option and hit enter –> Choose Root (Drop to root shell prompt) .
Once you have root shell, run commands to recover and fix the system issues and finally use ‘ systemctl reboot ’ to reboot the system.
Boot Ubuntu 22.04 into Emergency Mode
To boot the system into emergency mode, first go to grub screen.
Select the first option as ‘ Ubuntu ’ and press ‘ e ’ to edit. Look for the line which starts with linux word, go to the end of that line, remove the string $vt_handoff and add the string ‘ systemd.unit=emergency.target ’
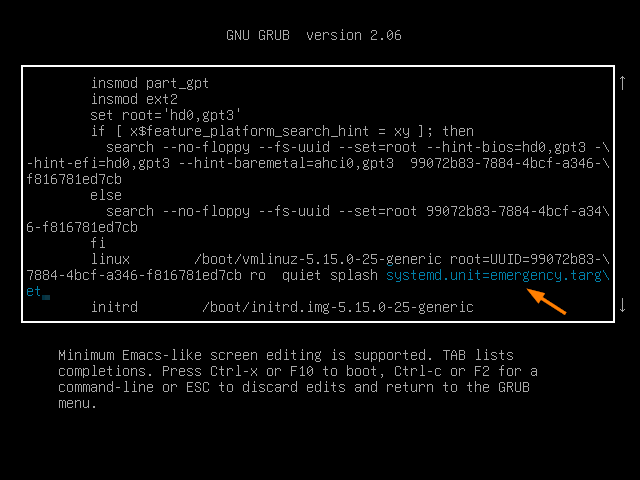
Press Ctrl+x or F10 to boot the system into emergency mode,
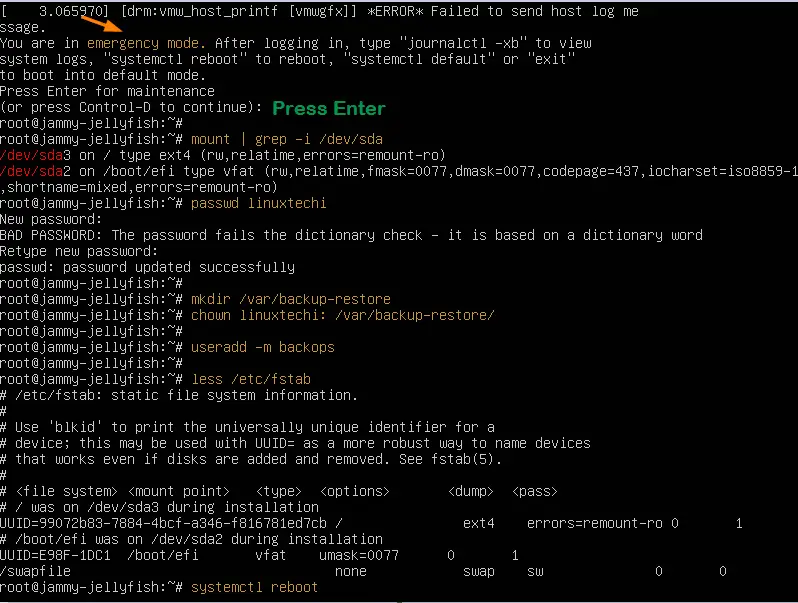
Similarly in rescue mode, you can perform all the troubleshooting in this mode and once done reboot the system with command ‘ systemctl reboot ’.
That’s all from this post. I found it informative and don’t hesitate to share this among your technical friends. Kindly post your queries and feedback in below comments section.