- Мультизагрузочная Linux-флешка
- Создание и форматирование раздела
- Установка загрузчика GRUB
- Еще немного примеров
- Добавление других образов ISO
- Загрузка установочных образов Windows 7 и Windows 10 c помощью GRUB
- Discussion
- How to Boot From a USB Using Grub
- Create a Bootable within USB Flash Drive:
- Conclusion:
- About the author
- Omar Farooq
Мультизагрузочная Linux-флешка
Тут описана процедура создания флешки для загрузки множества iso-образов на компьютерах с BIOS. На компьютерах с UEFI она не работает. Для компов с UEFI я делал Универсальную загрузочную флешку для BIOS/UEFI.
Хорошо иметь под рукой флешку, с которой можно загрузиться для восстановления или установки системы. Также хорошо бы чтобы на ней помещались несколько разных образов ISO, доступных из меню. Создать такую флешку можно с помощью специализированных программных средств как под Linux ( Multisystem) так и под Windows (XBOOT), и даже мультиплатформенных (Yumi). Но можно пойти true linux way™ и использовать GRUB.
Создание и форматирование раздела
Сначала нужно создать на флешке раздел и сделать его загрузочным. Запускаем fdisk и натравливаем его на нашу флешку. Нижеприведенные команды делаем с правами root. Список дисков смотрим командой:
Запускаем fdisk (указав свою флешку):
Если на диске есть разделы, то ликвидируем их. Для этого жмем d
После удаления разделов жмем n и создаем новый.
В процессе создания указваем что раздел p (primary).
После создания жмем a, чтобы сделать раздел активным.
Затем жмем t, чтобы задать тип раздела и вводим тип c (FAT32).
Жмем w и записываем изменения на флешку.
Теперь надо отформатировать созданный раздел в FAT32:
umount /dev/sdx1 mkfs.vfat -F 32 -n MULTIBOOT /dev/sdx1
Установка загрузчика GRUB
Дальше ставим GRUB2 на флешку.
Создаем точку монтирования и монтируем флешку (не забываем sdx менять на актуальные буквы, соотвествующие флешке):
sudo mkdir /mnt/USB && sudo mount /dev/sdx1 /mnt/USB
Устанавливаем GRUB (выполняем с правами root):
sudo grub-install --force --no-floppy --boot-directory=/mnt/USB/boot /dev/sdx
Старые версии GRUB вместо –boot-directory используют -root-directory. Если что-то не так, то установщик GRUB скажет что “Installation is impossible. Aborting”.
Создаем на флешку файлик grub.cfg
nano /mnt/USB/boot/grub/grub.cfg
И заполняем его примерно так:
set timeout=10 set default=0 menuentry "KNOPPIX_V7.2.0CD-2013-06-16-EN LiveCD" < loopback loop /KNOPPIX_V7.2.iso #linux (loop)/boot/isolinux/linux bootfrom=/KNOPPIX_V7.2.iso acpi=off keyboard=us language-us linux (loop)/boot/isolinux/linux bootfrom=/KNOPPIX_V7.2.iso keyboard=us language-us initrd (loop)/boot/isolinux/minirt.gz >menuentry "SystemRescueCd 4.6.1 Live (64bit, cache all files in memory and startX)" < loopback loop /systemrescuecd.4.6.1.iso linux (loop)/isolinux/rescue64 isoloop=/systemrescuecd.4.6.1.iso setkmap=us docache dostartx initrd (loop)/isolinux/initram.igz >menuentry "SystemRescueCd 4.6.1 Live (64bit, default boot options)" < loopback loop /systemrescuecd.4.6.1.iso linux (loop)/isolinux/rescue64 isoloop=/systemrescuecd.4.6.1.iso setkmap=us initrd (loop)/isolinux/initram.igz >menuentry "SystemRescueCd 4.6.1 Live (32bit, default boot options)" < loopback loop /systemrescuecd.4.6.1.iso linux (loop)/isolinux/rescue32 isoloop=/systemrescuecd.4.6.1.iso setkmap=us initrd (loop)/isolinux/initram.igz >menuentry "Ubuntu 14.04.3 x64 Desktop with GNOME. Live and Install" < loopback loop /ubuntu-14.04.3-desktop-amd64.iso linux (loop)/casper/vmlinuz.efi boot=casper iso-scan/filename=/ubuntu-14.04.3-desktop-amd64.iso quiet splash initrd (loop)/casper/initrd.lz >menuentry "Kubuntu 14.04.3 x64 Desktop with KDE. Live and Install" < loopback loop /kubuntu-14.04.3-desktop-amd64.iso linux (loop)/casper/vmlinuz.efi boot=casper iso-scan/filename=/kubuntu-14.04.3-desktop-amd64.iso quiet splash initrd (loop)/casper/initrd.lz >menuentry "Xubuntu 14.04.3 x64 Desktop with LXDE. Live and Install" < loopback loop /xubuntu-14.04.3-desktop-amd64.iso linux (loop)/casper/vmlinuz.efi boot=casper iso-scan/filename=/xubuntu-14.04.3-desktop-amd64.iso quiet splash -- initrd (loop)/casper/initrd.lz >menuentry "Ubuntu 14.04.3 x64 Server" < loopback loop /ubuntu-14.04.3-server-amd64.iso linux (loop)/install/vmlinuz iso-scan/filename=/ubuntu-14.04.3-server-amd64.iso quiet -- initrd (loop)/install/initrd.gz >menuentry "CentOS 7 03.15 x64 Install" < loopback loop /CentOS-7-x86_64-Minimal-1503-01.iso linux (loop)/isolinux/vmlinuz noeject inst.stage2=hd:LABEL=MIKEBOOT:/CentOS-7-x86_64-Minimal-1503-01.iso initrd (loop)/isolinux/initrd.img >menuentry "SystemRescueCd 4.8.1 Live (64bit, default boot options)" < loopback loop /systemrescuecd-x86-4.8.1.iso linux (loop)/isolinux/rescue64 isoloop=/systemrescuecd-x86-4.8.1.iso setkmap=us initrd (loop)/isolinux/initram.igz >menuentry "Try Xubuntu x64 16.04.1 without installing" < loopback loop /xubuntu-16.04.1-desktop-amd64.iso set gfxpayload=keep linux (loop)/casper/vmlinuz.efi iso-scan/filename=/xubuntu-16.04.1-desktop-amd64.iso file=(loop)/preseed/xubuntu.seed boot=casper quiet splash --- initrd (loop)/casper/initrd.lz >menuentry "Install Xubuntu 16.04.1 x64" < loopback loop /xubuntu-16.04.1-desktop-amd64.iso set gfxpayload=keep linux (loop)/casper/vmlinuz.efi iso-scan/filename=/xubuntu-16.04.1-desktop-amd64.iso file=(loop)/preseed/xubuntu.seed boot=casper only-ubiquity quiet splash --- initrd (loop)/casper/initrd.lz >menuentry "Install Xubuntu 16.04.1 i386" < loopback loop /xubuntu-16.04.1-desktop-i386.iso set gfxpayload=keep linux (loop)/casper/vmlinuz iso-scan/filename=/xubuntu-16.04.1-desktop-i386.iso file=(loop)/preseed/xubuntu.seed boot=casper only-ubiquity quiet splash --- initrd (loop)/casper/initrd.lz >menuentry "Install Ubuntu Server 16.04.2 < loopback loop /ubuntu-16.04.2-server-amd64.iso set gfxpayload=keep linux (loop)/install/vmlinuz file=/cdrom/preseed/ubuntu-server.seed quiet --- initrd (loop)/install/initrd.gz >menuentry "Fedora-Workstation-Live 25" < loopback loop /Fedora-Workstation-Live-x86_64-25-1.3.iso linux (loop)/isolinux/vmlinuz iso-scan/filename=/Fedora-Workstation-Live-x86_64-25-1.3.iso root=live:CDLABEL=Fedora-WS-Live-25-1-3 rd.live.image quiet rootfstype=auto ro rhgb rd.luks=0 rd.md=0 rd.dm=0 initrd (loop)/isolinux/initrd.img >menuentry "Fedora-KDE-Live 25" < loopback loop /Fedora-KDE-Live-x86_64-25-1.3.iso linux (loop)/isolinux/vmlinuz iso-scan/filename=/Fedora-KDE-Live-x86_64-25-1.3.iso root=live:CDLABEL=Fedora-KDE-Live-25-1-3 rd.live.image quiet rootfstype=auto ro rhgb rd.luks=0 rd.md=0 rd.dm=0 initrd (loop)/isolinux/initrd.img >menuentry "Install Kubnuntu 16.04.2 Desktop" < loopback loop /kubuntu-16.04.2-desktop-amd64.iso set gfxpayload=keep linux (loop)/casper/vmlinuz.efi iso-scan/filename=/kubuntu-16.04.2-desktop-amd64.iso file=(loop)/preseed/kubuntu.seed boot=casper only-ubiquity quiet splash oem-config/enable=true --- initrd (loop)/casper/initrd.lz >
Этот содержит конфигурацию для загрузки с флешки KNOPPIX 7.2, SystemRescueCd 4.6.1, различных вариантов Ubuntu и CentOS 7. А дальше осталось просто положить указанные в grub.cfg образы ISO в корневую директорию флешки и переименовать их как указано в файле.
Еще немного примеров
menuentry "Linux Mint ISO" < loopback loop /linuxmint.iso linux (loop)/casper/vmlinuz file=/cdrom/preseed/mint.seed boot=casper initrd=/casper/initrd.l iso-scan/filename=/linuxmint.iso noeject noprompt splash -- initrd (loop)/casper/initrd.lz >menuentry "DBAN ISO" < loopback loop /dban.iso linux (loop)/DBAN.BZI nuke="dwipe" iso-scan/filename=/dban.iso silent -- >menuentry "Tinycore ISO" < loopback loop /tinycore.iso linux (loop)/boot/bzImage -- initrd (loop)/boot/tinycore.gz >menuentry "Memtest 86+" < linux16 /memtest86+.bin >menuentry "Debian 9.5 i386 Install" < set background_color=black loopback loop /debian-9.5.0-i386-netinst.iso linux (loop)/install.386/vmlinuz vga=788 --- quiet initrd (loop)/install.386/initrd.gz >menuentry "Install Kubnuntu 19.04 Desktop" < loopback loop /kubuntu-19.04-desktop-amd64.iso set gfxpayload=keep linux (loop)/casper/vmlinuz iso-scan/filename=/kubuntu-19.04-desktop-amd64.iso file=(loop)/preseed/kubuntu.seed boot=casper only-ubiquity quiet splash oem-config/enable=true --- initrd (loop)/casper/initrd >menuentry "Install Ubnuntu 20.04 Server" < insmod part_gpt insmod ext2 insmod search_fs_uuid rmmod tpm search --no-floppy --set=root --fs-uuid 36c1a912-77c7-4cec-8120-c2088e1e131c set isofile="/ubuntu-20.04-live-server-amd64.iso" set gfxpayload=keep loopback loop ($root)$isofile linux (loop)/casper/vmlinuz iso-scan/filename=$quiet --- initrd (loop)/casper/initrd > menuentry "Install Ubnuntu 21.10 Server" < set gfxpayload=keep set isofile="/ubuntu-21.10-live-server-amd64.iso" loopback loop ($root)$isofile linux (loop)/casper/vmlinuz iso-scan/filename=$quiet --- initrd (loop)/casper/initrd > menuentry "Install Ubuntu Server 16.04 i386" < loopback loop /ubuntu-16.04.6-server-i386.iso set gfxpayload=keep linux (loop)/install/vmlinuz isoloop=/ubuntu-16.04.6-server-i386.iso file=/cdrom/preseed/ubuntu-server.seed quiet splash --- initrd (loop)/install/initrd.gz >menuentry 'Debian 10 i386 Install' < set background_color=black loopback loop /debian-edu-10.0.0-i386-netinst.iso linux (loop)/install.386/gtk/vmlinuz findiso=/debian-edu-10.0.0-i386-netinst.iso modules=debian-edu-install-udeb desktop=xfce vga=788 --- quiet initrd (loop)/install.386/gtk/initrd.gz >
Добавление других образов ISO
Для добавления других образов ISO нужно в файлик /boot/grub/grub.cfg прописывать параметры, которые обычно можно найти в файлах grub.cfg, syslinux.cfg и других, входящих в состав образа ISO.
То есть создаем новый раздел меню в /boot/grub/grub.cfg (копируя уже существующий), затем указываем файл ISO в строке loopback, а в строку linux указываем путь к ядру (то что append из syslinux.cfg). В строке initrd указываем путь к файлу initrd.
Скорее всего, в строке linux после пути к файлу ядра придется указать параметры загрузки ядра, которые позволят ядру работать с loop-устройством, на которое монтируется файл ISO. Для систем со схожим ядром, параметры, как правило, одинаковые. Например, для загрузки Fedora подойдут параметры от CentOS.
Много обновляемой информации о загрузке ISO образов с помощью GRUB можно тут: https://wiki.archlinux.org/index.php/Multiboot_USB_drive
Загрузка установочных образов Windows 7 и Windows 10 c помощью GRUB
Монтируем iso-образ Windows 7 или Windows 10, копируем с него все файлы на флешку с помощью cp или rsync и дописываем в grub.cfg такое:
set timeout=10 set default=0 menuentry "Windows 7 or Windows 10 installer" --class windows --class os < insmod part_msdos insmod ntfs insmod ntldr search --no-floppy --label MULTIBOOT --set=root ntldr /bootmgr >
Тут grub будет загружать модули с помощью insmod, потом search — искать раздел с меткой MULTIBOOT и когда найдет — с помощью –set укажет, что root находится на этом разделе, а затем передаст управление /bootmgr
В принципе, для красоты и удобства, было бы неплохо создать отдельный раздел на флешке (так я поступил при создании нового варианта флешки — Универсальная загрузочная флешка для BIOS/UEFI), отформатировать его с меткой Win7, распаковать файлы из iso-образа туда и указывать –label Win7. Просто в дистрибутиве windows также есть директоррия boot и если понадобится очистить флешку от инсталлятора windows, не затрагивая остальные ОС, то из этой директории файлы придется удалять вручную.
Discussion
Здравствуйте, не подскажите, как узнать необходимые параметры ядра, для grub.cfg, чтобы запустить ливобраз с usb накопителя? Что я только не пробовал, никак не выходит. Перекопал кучу сайтов и везде однотипно и не работает. Только благодаря вашему блогу удалось с минимальными корректироваками запустить минт. Такой настройки ни у кого не было: file=/preseed/linuxmint.seed boot=casper initrd=/casper/initrd.lz кстати z в расширении вы недопечатали и /cdrom/preseed в последней сборке просто /preseed. В общем у меня работает так: linux (loop)/live/vmlinuz boot=live initrd=/live/initrd.lz iso-scan/filename=/iso/lmde-4-cinnamon-64bit.iso noeject noprompt splash –
А вот LMDE и дебиан никак не сдаются. Хоть и использую их грубы. Не хочу импользовать программы так как они стирают все разделы на диске, а мне они нужны. Поэтому хочу ручками.
День добрый, Александр! Ну я же написал, что
Для добавления других образов ISO нужно в файлик /boot/grub/grub.cfg прописывать параметры, которые обычно можно найти в файлах grub.cfg, syslinux.cfg и других, входящих в состав образа ISO.
Универсальных рецептов тут нет, поскольку разные дистры собираются разными людьми/программами. Даже в пределах одного семества (например — Ubuntu) от версии к версии и от варианта к варианту (Gnome, KDE) — параметры запуска в grub могут быть разными, как и структура файлов в ISO.
Какой конкретно ISO Debian вы пытаетесь запустить с USB?
How to Boot From a USB Using Grub
![]()
We may have installed and configured many Linux Operating systems via their ISO images in Oracle Virtual Box without creating anything bootable. Of course, that was a simple and easy task to do. Here comes another thing when it comes to Linux distros. When the already installed Linux distribution is not working, the USB bootable for Linux image comes in handy. GRUB (Grand Unified Bootloader) seems to be the most commonly used bootloader in Linux distros. Grub is extremely useful for debugging and altering boot parameters. When the Linux kernel does not start immediately, we may use GRUB to load it from a USB drive. The procedure for booting from a USB drive using GRUB is straightforward, and we’ll go through it in-depth in this article. Ensure you have already installed the Ubuntu 20.04 system in case we are unable to load the kernel via the USB bootable. Now, let’s have a fresh start.
Create a Bootable within USB Flash Drive:
To boot via USB, you first need a simple USB flash drive. This flash drive must be greater in size as compared to the Linux image file you will be creating a boot. First, download the ISO image file of any Linux distribution you want to create a boot, i.e., Ubuntu 20.04, Linuxmint, or Kali Linux. This file might be less than 3 GB in size, so you will need more than 4 GB USB Drive. After the complete download, you need a software to create a bootable downloaded file on USB.
We suggest you use the balenaEtcher program, which you can get at the balenaEtcher website. Connect the USB flash drive to your system via its socket. Open the balenaEtcher program, select the flash drive to create a bootable, and then, select the ISO image file. It may take a little time to do that, but it will be useful. Now, the USB flash drive is ready to be used as a bootable drive.
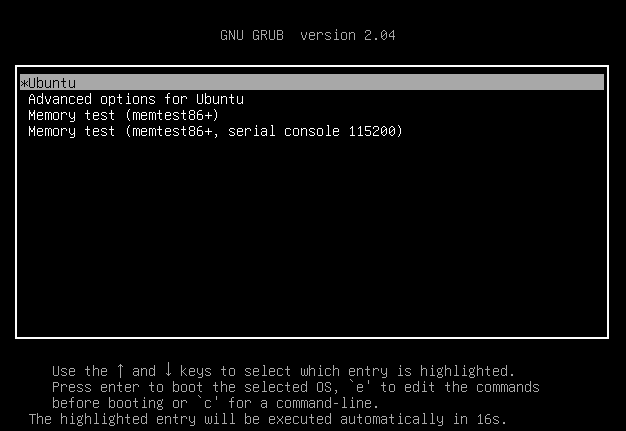
Open your Oracle Virtual Box, and click on the start button to reboot the Linux machine. Now, the machine will start, and on the start screen, you need to open the GRUB MENU of your Linux distros. You can either open it by pressing the “Right-shift” key from the keyboard while at the Linux screen. Or you can also make use of the f12 key from the keyword or simply press any key, i.e., Enter. The following displayed GNU GRUB menu will open as a black screen with a few options. This screen will last for 17 seconds.
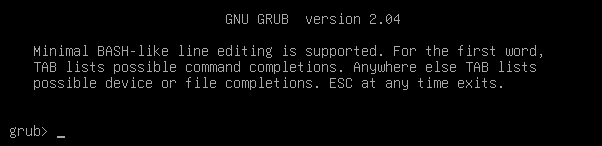
You have to make a quick decision and decide what to do. It will show you some options like Ubuntu, Advanced options for Ubuntu, Memory test (memtest86+), and Memory test (memtest86+ and serial console 115200). You can select any of these options. If you simply want to start the already configured Ubuntu system, then go to the option of Ubuntu and click Enter from the keyboard without booting from USB. If you know that your system is not working, press “c” to open the GRUB command-line shell, as shown in the image output below, to execute some commands on it:
You can also open the GNU GRUB command-line console using the “Esc” key from the keyboard. You will get the following GNU GRUB version 20.04 command-line shell as a black screen. You can see it is ready to be used as a command to boot the Linux distribution via the USB drive. Make sure your USB flash drive is already attached and must not be removed until the end of the whole booting process. Let’s use some commands here:
Within the GNU GRUB console, we need to list all the available devices on your system, i.e., attached devices, including USB drives. So, we have to utilize the simple list “ls” command in the GNU GRUB console and press the Enter key to continue. The list command output is shown below in the image. It offers all the devices connected to our system, i.e., hardware devices. You have to check which one is your USB flash drive to be used. In our case, it’s “(hd0,msdos5)”, so we will use it in the following consecutive command:

Now, as you know about your device to use as a boot. This device must be taken as a root to boot the Linux distro in our system. So, we will be setting our USB drive to root using the “set root” command of GNU GRUB. The “=” sign indicates the setting of this device as root in the command below. Press Enter, and it’s done:

Following the rooting of the USB, the very next step is to find the bootloader on the Flash drive for chain loading. The OS doesn’t enable multi-booting for those unfamiliar with chain-loaders and does not accept GRUB. These OSs are coupled with other OSs using chain-loaders. We’ll provide our USB as a route to the bootloader to fix it all up through the chain load. As our USB is not bootable, it causes the error shown below:

When your bootloader is already located in the USB flash drive and chain loading has been done, it’s time to boot your device using the command displayed in the image:

Your Ubuntu system will start rebooting:

Conclusion:
Hence, this article is about booting the Ubuntu 20.04 system from the USB flash drive using the GNU GRUB Console Menu. We have discussed how to create a bootable Linux ISO image within the flash drive using a specific software in the system. Then, we discussed the way to open the GNU GRUB menu console, to set the USB bootable device as root, and boot the system with the bootable USB drive. It was all quite easy, and we hope you enjoyed the article. Check out other Linux Hint articles for more tips and information.
About the author
Omar Farooq
Hello Readers, I am Omar and I have been writing technical articles from last decade. You can check out my writing pieces.