- Загрузочный диск kali linux
- What You’ll Need
- Kali Linux Live USB Install Procedure
- Creating a Bootable Kali USB Drive on Linux (DD)
- Creating a Bootable Kali USB Drive on Linux (DD with status)
- Creating a Bootable Kali USB Drive on Linux (Etcher)
- Загрузочный диск kali linux
- System Requirements
- Installation Prerequisites
- Preparing for the Installation
- Kali Linux Installation Procedure
- Boot
- Language
- Network
- User Accounts
- Clock
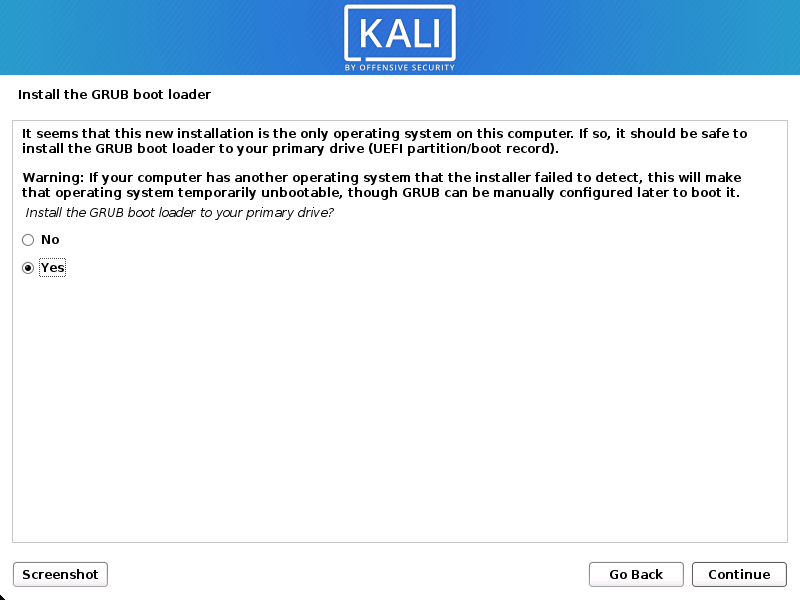
- Disk
- Encrypted LVM
- Proxy Information
- Metapackages
- Boot Information
- Reboot
- Post Installation
Загрузочный диск kali linux
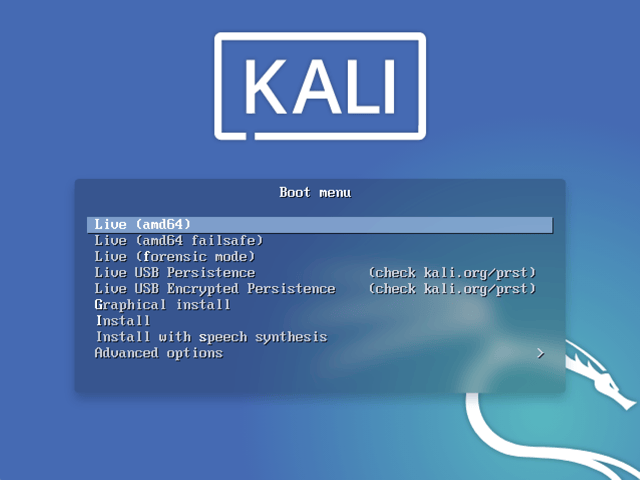
Our favourite way, and the fastest method, for getting up and running with Kali Linux is to run it “live” from a USB drive. This method has several advantages:
- It’s non-destructive — it makes no changes to the host system’s hard drive or installed OS, and to go back to normal operations, you simply remove the “Kali Live” USB drive and restart the system.
- It’s portable — you can carry Kali Linux in your pocket and have it running in minutes on an available system
- It’s customizable — you can roll your own custom Kali Linux ISO image and put it onto a USB drive using the same procedures
- It’s potentially persistent — with a bit of extra effort, you can configure your Kali Linux “live” USB drive to have persistent storage, so the data you collect is saved across reboots
In order to do this, we first need to create a bootable USB drive which has been set up from an ISO image of Kali Linux.
What You’ll Need
- A verified copy of the appropriate ISO image of the latest Kali build image for the system you’ll be running it on: see the details on downloading official Kali Linux images.
- If you’re running under Linux, you can use the dd command, which is pre-installed, or use Etcher.
- A USB thumb drive, 4GB or larger. (Systems with a direct SD card slot can use an SD card with similar capacity. The procedure is identical.)
Kali Linux Live USB Install Procedure
The specifics of this procedure will vary depending on whether you’re doing it on a Windows, Linux, or macOS/OS X system.
Creating a Bootable Kali USB Drive on Linux (DD)
Creating a bootable Kali Linux USB drive in a Linux environment is easy. Once you’ve downloaded and verified your Kali ISO file, you can use the dd command to copy it over to your USB drive using the following procedure. Note that you’ll need to be running as root, or to execute the dd command with sudo. The following example assumes a Linux Mint 17.1 desktop — depending on the distro you’re using, a few specifics may vary slightly, but the general idea should be very similar. If you would prefer to use Etcher, then follow the same directions as a Windows user. Note that the USB drive will have a path similar to /dev/sdb.
WARNING: Although the process of imaging Kali Linux onto a USB drive is very easy, you can just as easily overwrite a disk drive you didn’t intend to with dd if you do not understand what you are doing, or if you specify an incorrect output path. Double-check what you’re doing before you do it, it’ll be too late afterwards.
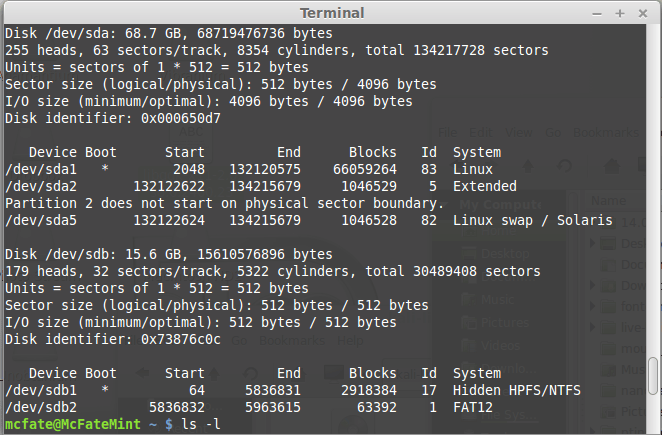
- First, you’ll need to identify the device path to use to write the image to your USB drive. Without the USB drive inserted into a port, execute the command sudo fdisk -l at a command prompt in a terminal window (if you don’t use elevated privileges with fdisk, you won’t get any output). You’ll get output that will look something (not exactly) like this, showing a single drive — “/dev/sda” — containing three partitions (/dev/sda1, /dev/sda2, and /dev/sda5):
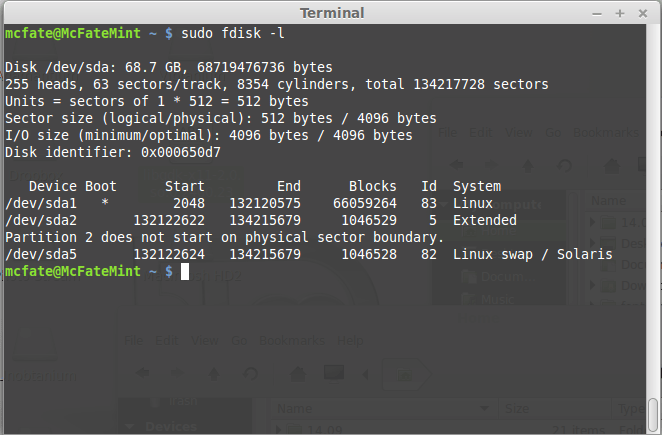
2. Now, plug your USB drive into an available USB port on your system, and run the same command, “sudo fdisk -l” a second time. Now, the output will look something (again, not exactly) like this, showing an additional device which wasn’t there previously, in this example “/dev/sdb”, a 16GB USB drive:
3. Proceed to (carefully!) image the Kali ISO file on the USB device. The example command below assumes that the ISO image you’re writing is named “kali-linux-2023.2-live-amd64.iso” and is in your current working directory. The blocksize parameter can be increased, and while it may speed up the operation of the dd command, it can occasionally produce unbootable USB drives, depending on your system and a lot of different factors. The recommended value, “bs=4M”, is conservative and reliable. Additionally, the parameter “conv=fsync” makes sure that the data is physically written to the USB drives before the commands returns:
[email protected]:~$ dd if=kali-linux-2023.2-live-amd64.iso of=/dev/sdb conv=fsync bs=4M Imaging the USB drive can take a good amount of time, over ten minutes or more is not unusual, as the sample output below shows. Be patient!
The dd command provides no feedback until it’s completed, but if your drive has an access indicator, you’ll probably see it flickering from time to time. The time to dd the image across will depend on the speed of the system used, USB drive itself, and USB port it’s inserted into. Once dd has finished imaging the drive, it will output something that looks like this:
Creating a Bootable Kali USB Drive on Linux (DD with status)
Alternatively there are a few other options available for imaging.
The first option is dd with a status indicator. This is only available on newer systems however. To do this, we simply add the status flag:
[email protected]:~$ dd if=kali-linux-2023.2-live-amd64.iso of=/dev/sdb conv=fsync bs=4M status=progress Another option is to use pv . We can also use the size flag here to get an approximate timer. Change the size depending on the image being used:
[email protected]:~$ dd if=kali-linux-2023.2-live-amd64.iso | pv -s 2.8G | dd of=/dev/sdb conv=fsync bs=4M Creating a Bootable Kali USB Drive on Linux (Etcher)
- Download and run Etcher.
- Choose the Kali Linux ISO file to be imaged with “select image” and verify that the USB drive to be overwritten is the correct one. Click the “Flash!” button once ready.
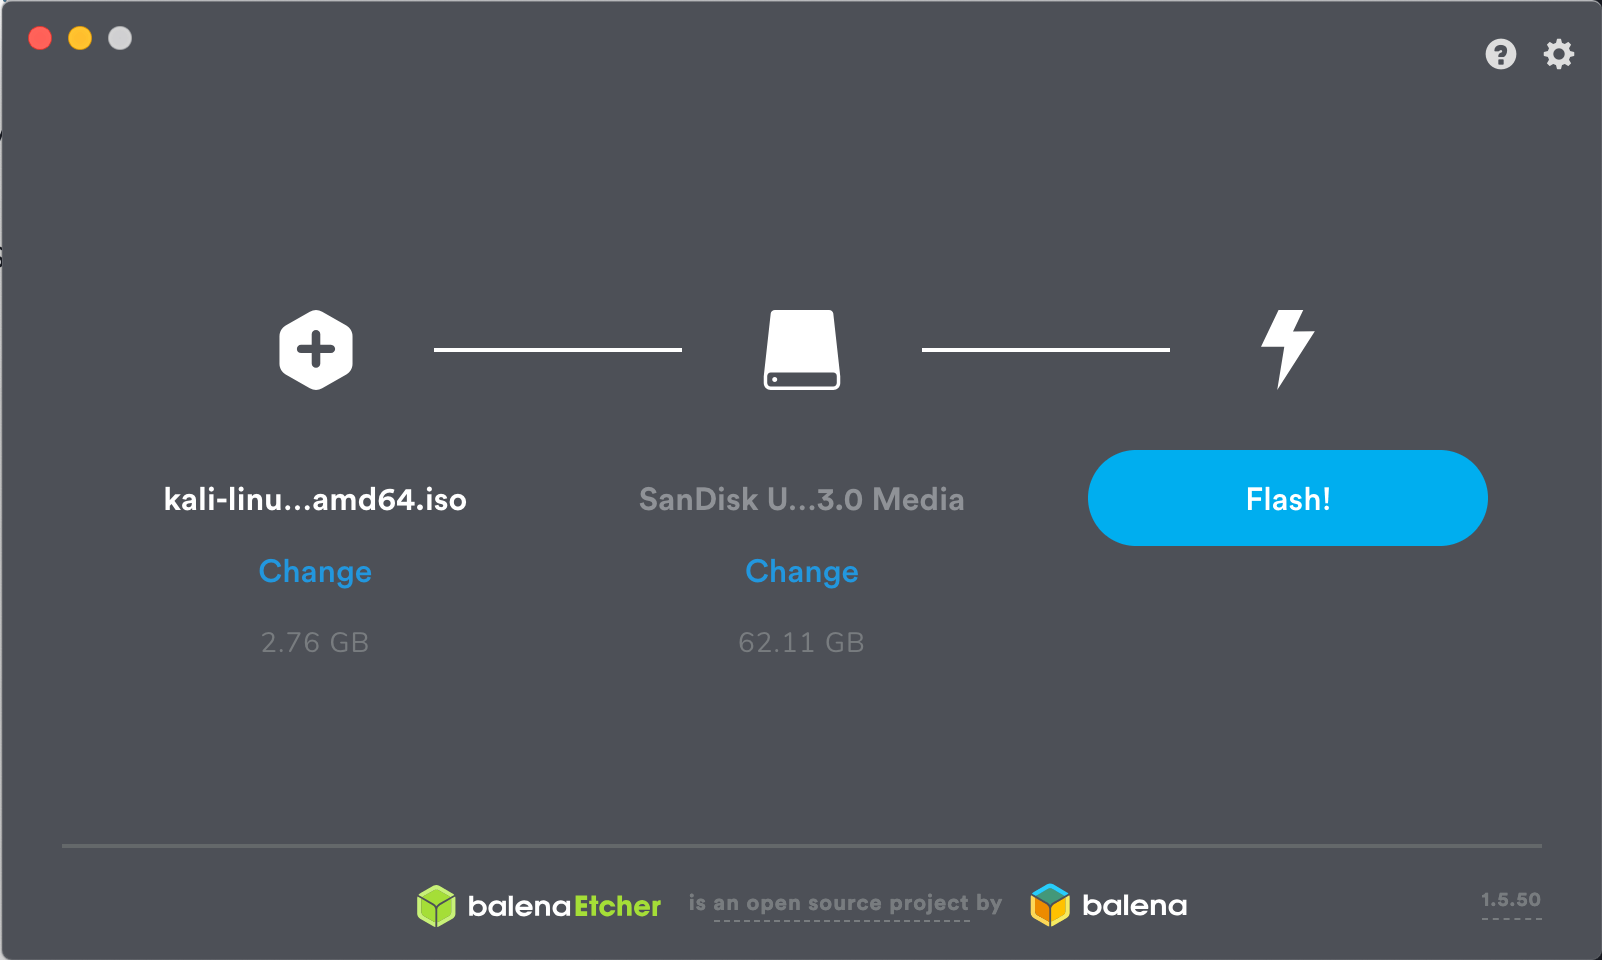
3. Once Etcher alerts you that the image has been flashed, you can safely remove the USB drive.
You can now boot into a Kali Live / Installer environment using the USB device.
Updated on: 2023-May-30
Author: g0tmi1k
Загрузочный диск kali linux
Installing Kali Linux (single boot) on your computer is an easy process. This guide will cover the basic install (which can be done on bare metal or guest VM), with the option of encrypting the partition. At times, you may have sensitive data you would prefer to encrypt using Full Disk Encryption (FDE). During the setup process you can initiate an LVM encrypted install on either Hard Disk or USB drives.
First, you’ll need compatible computer hardware. Kali Linux is supported on amd64 (x86_64/64-bit) and i386 (x86/32-bit) platforms. Where possible, we would recommend using the amd64 images. The hardware requirements are minimal as listed in the section below, although better hardware will naturally provide better performance. You should be able to use Kali Linux on newer hardware with UEFI and older systems with BIOS.
Our i386 images, by default use a PAE kernel, so you can run them on systems with over 4 GB of RAM.
In our example, we will be installing Kali Linux in a fresh guest VM, without any existing operating systems pre-installed. We will explain other possible scenarios throughout the guide.
System Requirements
The installation requirements for Kali Linux will vary depending on what you would like to install and your setup. For system requirements:
- On the low end, you can set up Kali Linux as a basic Secure Shell (SSH) server with no desktop, using as little as 128 MB of RAM (512 MB recommended) and 2 GB of disk space.
- On the higher end, if you opt to install the default Xfce4 desktop and the kali-linux-default metapackage, you should really aim for at least 2 GB of RAM and 20 GB of disk space.
- When using resource-intensive applications, such as Burp Suite, they recommend at least 8 GB of RAM(and even more if it is a large web application!) or using simultaneous programs at the same time.
Installation Prerequisites
This guide will make also the following assumptions when installing Kali Linux:
- Using the amd64 installer image.
- CD/DVD drive / USB boot support.
- Single disk to install to.
- Connected to a network (with DHCP & DNS enabled) which has outbound Internet access.
We will be wiping any existing data on the hard disk, so please backup any important information on the device to an external media.
Preparing for the Installation
- Download Kali Linux(We recommend the image marked Installer).
- Burn The Kali Linux ISO to DVD or image Kali Linux Live to USB drive. (If you cannot, check out the Kali Linux Network Install).
- Backup any important information on the device to an external media.
- Ensure that your computer is set to boot from CD/DVD/USB in your BIOS/UEFI.
- In the UEFI settings, ensure that Secure Boot is disabled. The Kali Linux kernel is not signed and will not be recognized by Secure Boot.
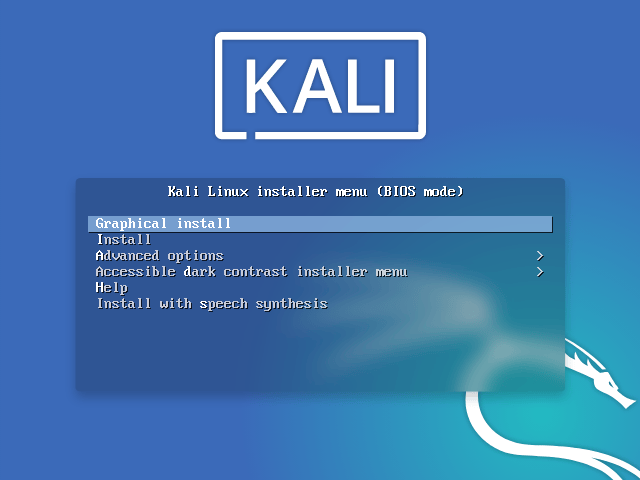
Kali Linux Installation Procedure
Boot
- To start your installation, boot with your chosen installation medium. You should be greeted with the Kali Linux Boot screen. Choose either Graphical install or Install (Text-Mode). In this example, we chose the Graphical install.

If you’re using the live image instead, you will see another mode, Live, which is also the default boot option.
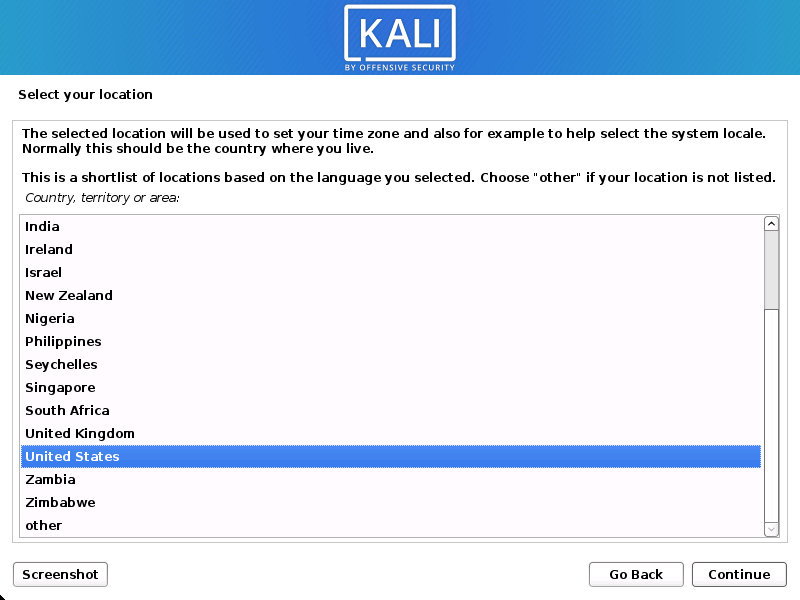
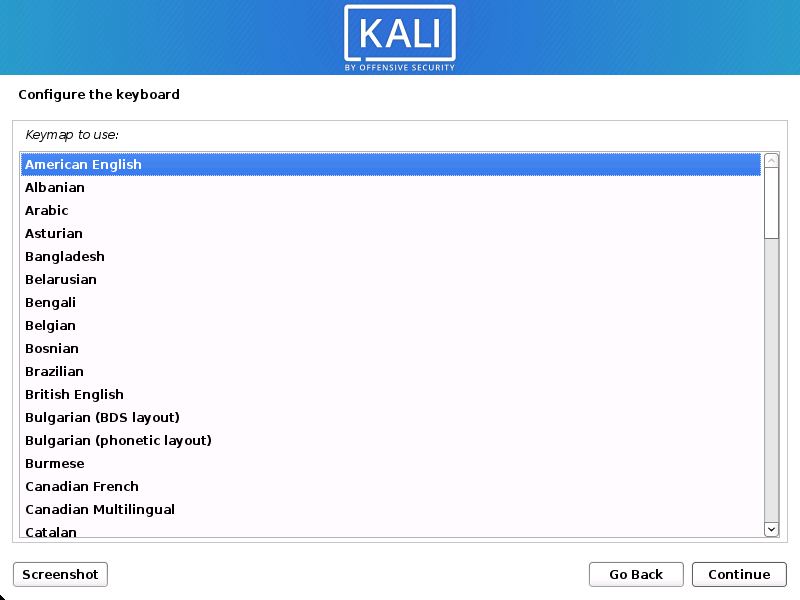
Language
- Select your preferred language. This will be used for both the setup process and once you are using Kali Linux.
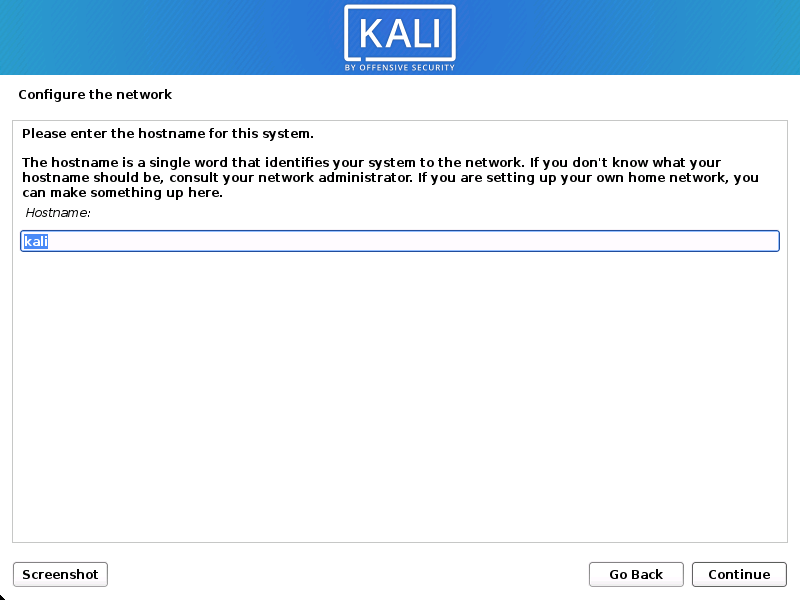
Network
- The setup will now probe your network interfaces, looks for a DHCP service, and then prompt you to enter a hostname for your system. In the example below, we’ve entered kali as our hostname.
If there is no network access with DHCP service detected, you may need to manually configure the network information or do not configure the network at this time.
- If there isn’t a DHCP service running on the network, it will ask you to manually enter the network information after probing for network interfaces, or you can skip.
- If Kali Linux doesn’t detect your NIC, you either need to include the drivers for it when prompted, or generate a custom Kali Linux ISO with them pre-included.
- If the setup detects multiple NICs, it may prompt you which one to use for the install.
- If the chosen NIC is 802.11 based, you will be asked for your wireless network information before being prompted for a hostname.
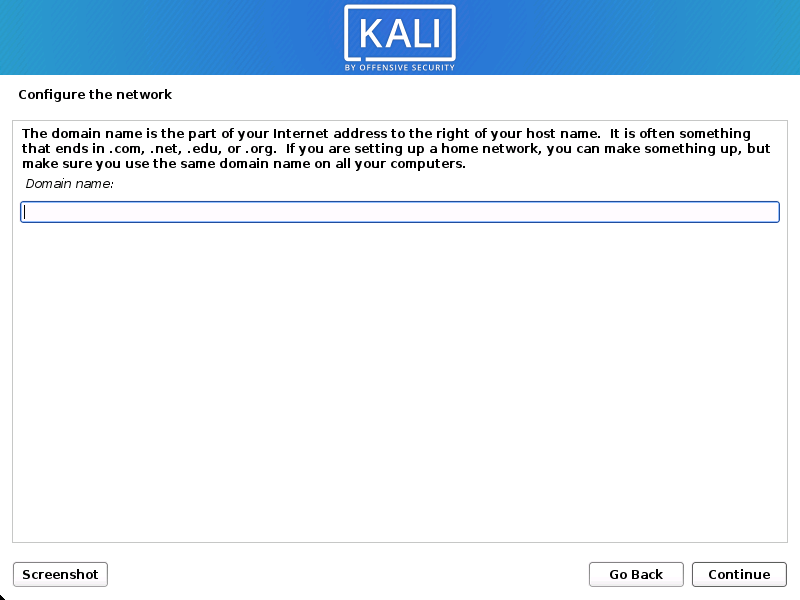
- You may optionally provide a default domain name for this system to use (values may be pulled in from DHCP or if there is an existing operating systems pre-existing).
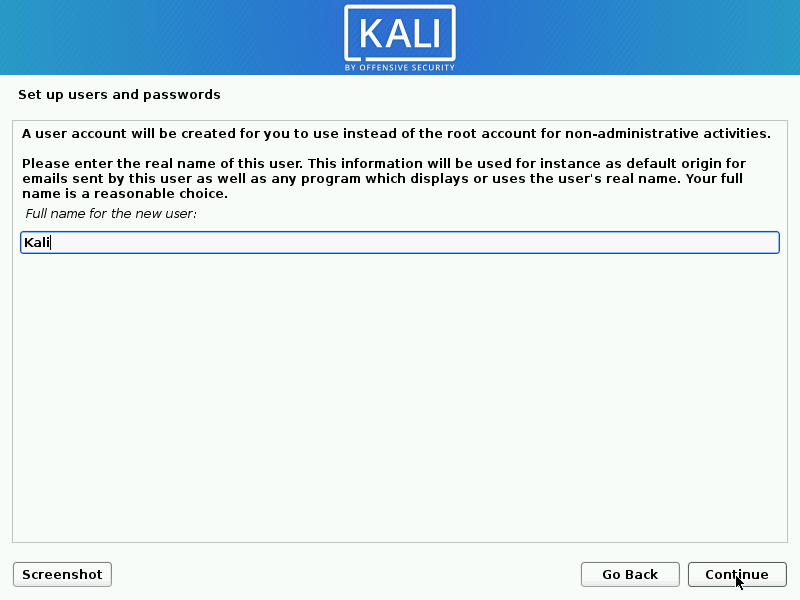
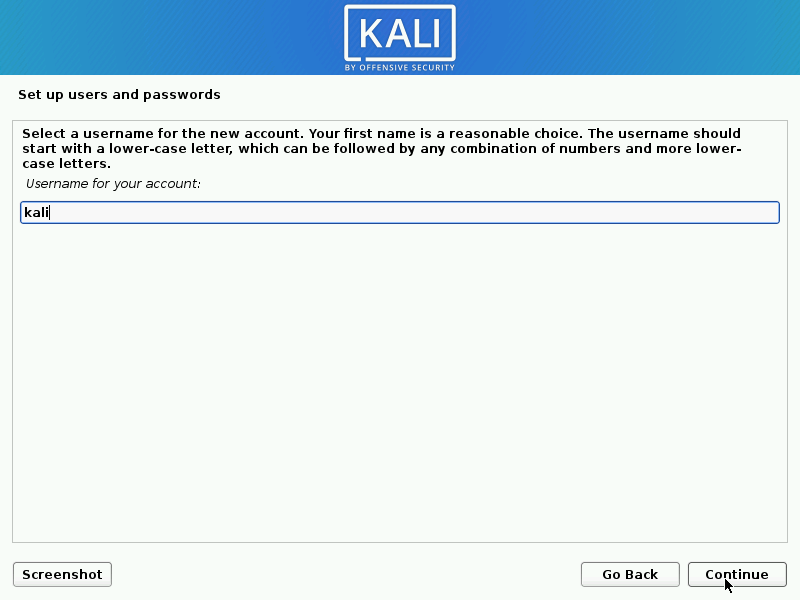
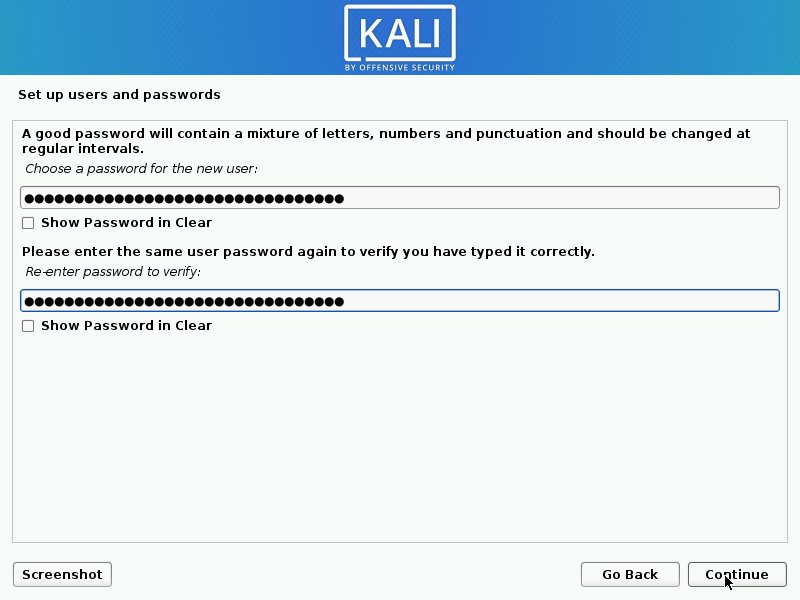
User Accounts
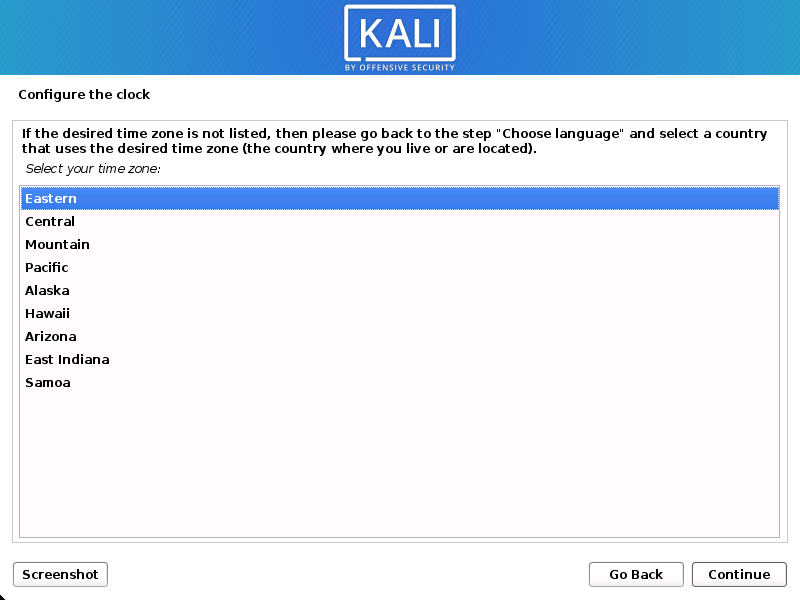
Clock
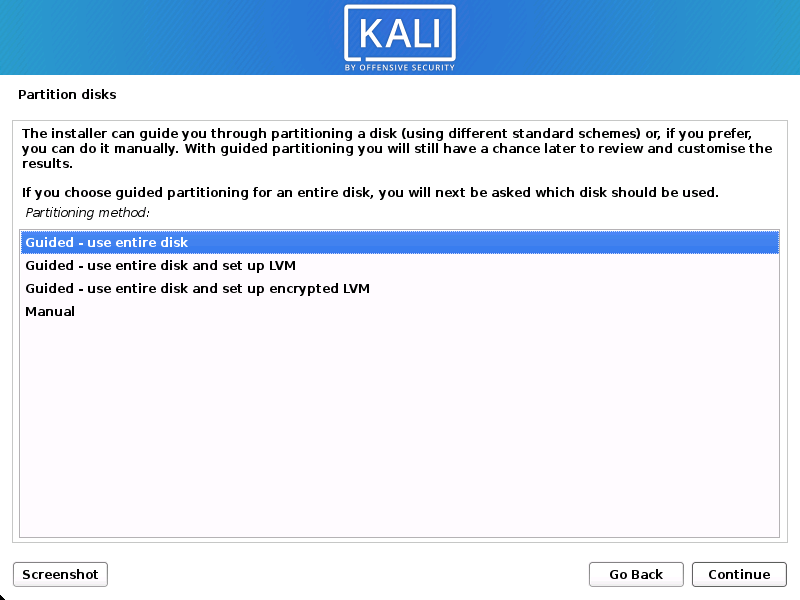
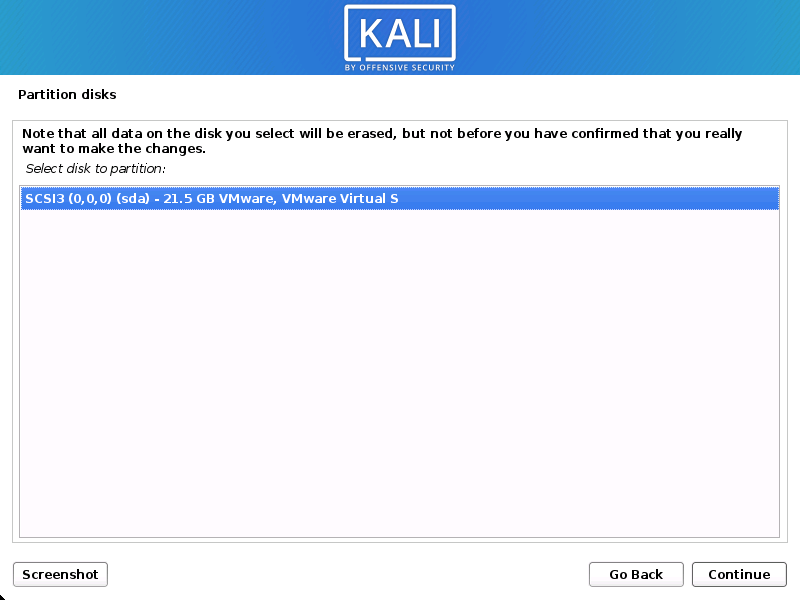
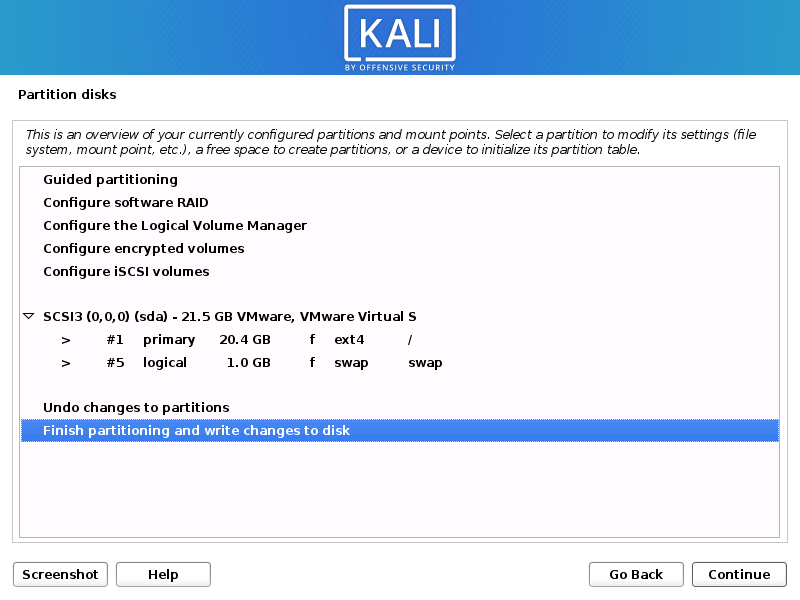
Disk
In our guide, we are using a clean disk, so we have four options to pick from. We will select Guided — the entire disk, as this is the single boot installation for Kali Linux, so we do not want any other operating systems installed, so we are happy to wipe the disk.
If there is an pre-existing data on the disk, you will have have an extra option (Guided — use the largest continuous free space) than the example below. This would instruct the setup not to alter any existing data, which is perfect for dual-booting into another operating system. As this is not the case in this example, it is not visible.
Experienced users can use the “Manual” partitioning method for more granular configuration options, which is covered more in our BTRFS guide.
If you want to encrypt Kali Linux, you can enable Full Disk Encryption (FDE), by selecting Guided — used entire disk and setup encrypted LVM. When selected, later on in the setup (not in this guide) prompt you to enter a password (twice). You will have to enter this password every time you start up Kali Linux.
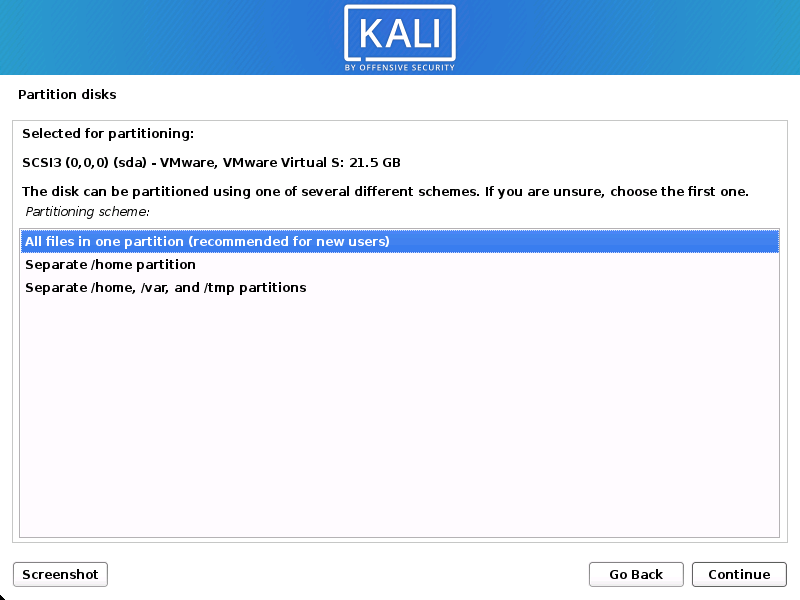
- Depending on your needs, you can choose to keep all your files in a single partition — the default — or to have separate partitions for one or more of the top-level directories.
If you’re not sure which you want, you want “All files in one partition”.
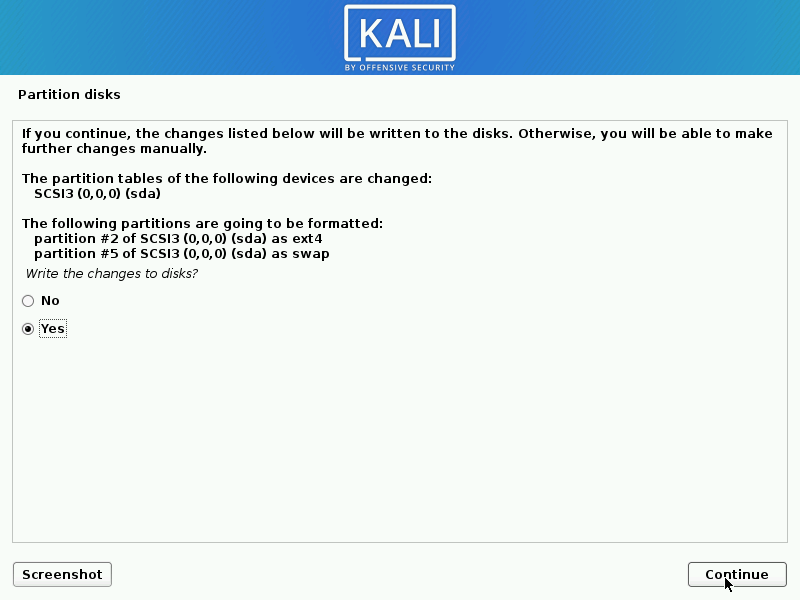
- Next, you’ll have one last chance to review your disk configuration before the installer makes irreversible changes. After you click Continue, the installer will go to work and you’ll have an almost finished installation.
Encrypted LVM
If enabled in the previous step, Kali Linux will now start to perform a secure wipe of the hard disk, before asking you for a LVM password.
Please be sure a strong password is used, or else you will be prompted with a weak passphrase warning.
This wipe may take “a while” (hours) depending on the size and speed of the drive.
If you wish to risk it, you can skip it.Proxy Information
- Kali Linux uses a central repository to distribute applications. You’ll need to enter any appropriate proxy information as needed.
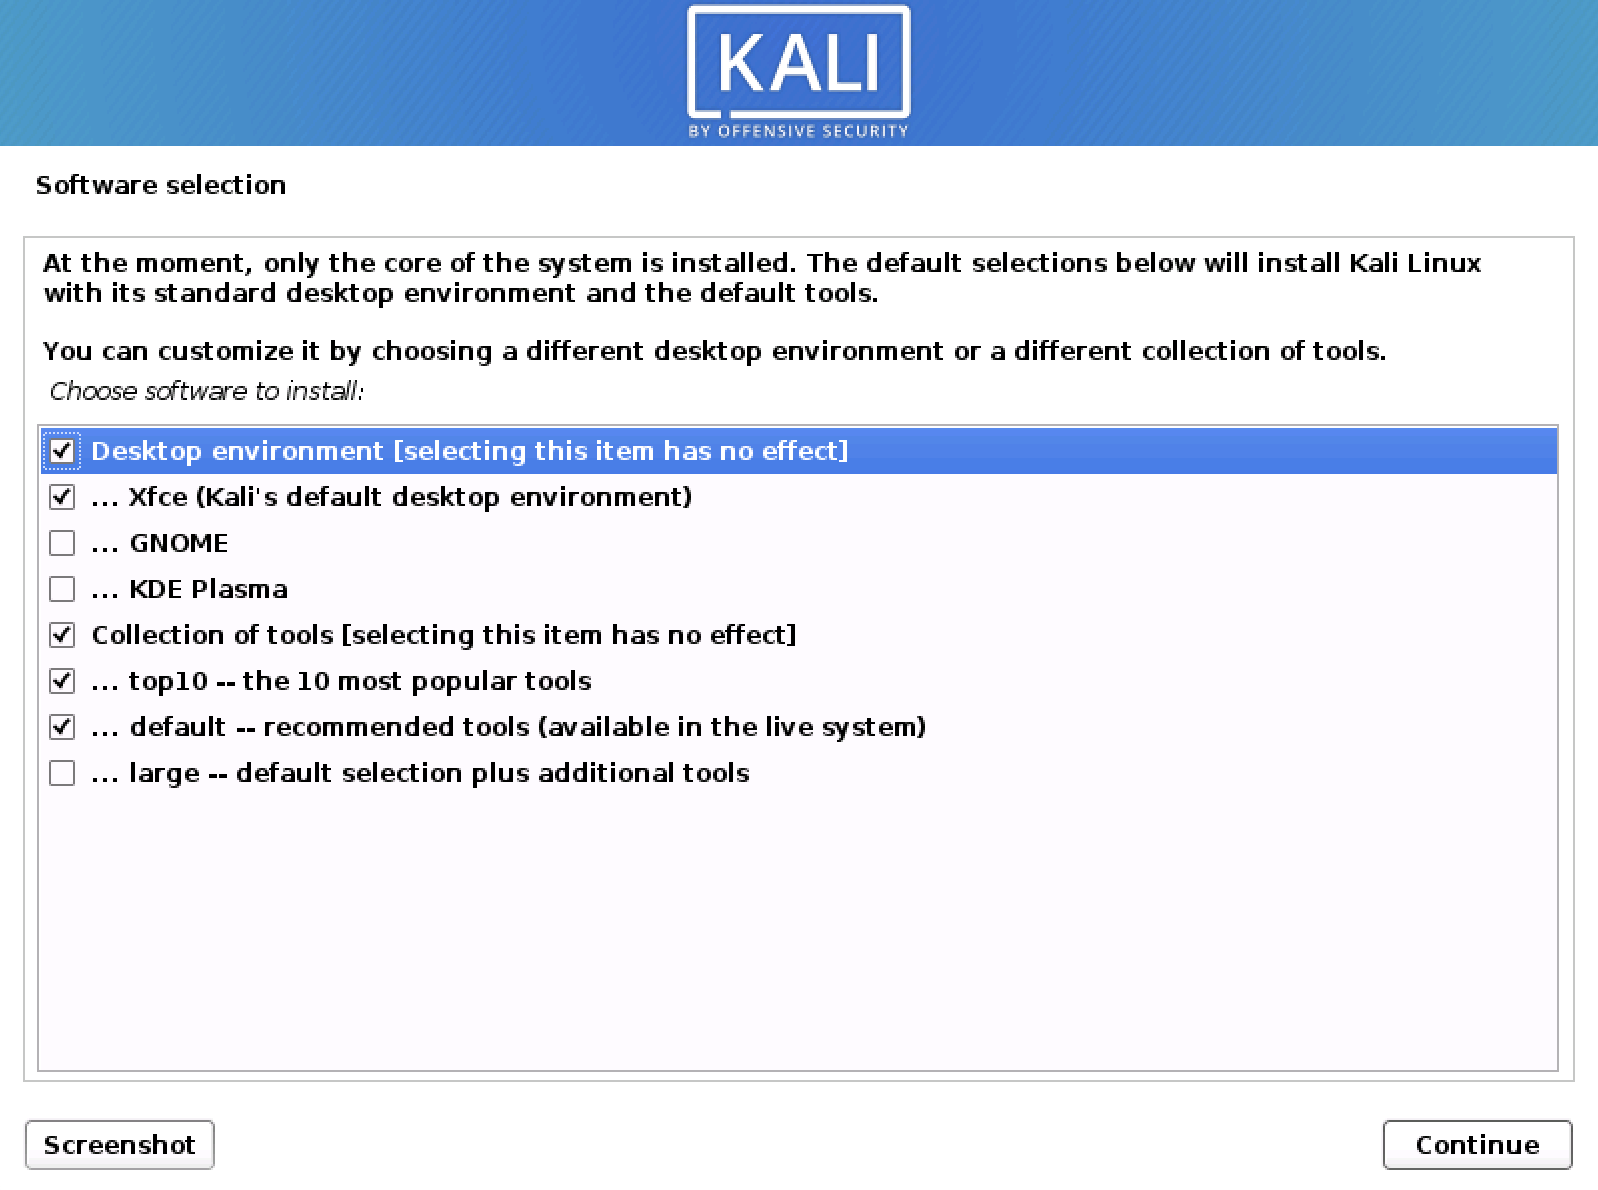
Metapackages
If network access was not setup, you will want to continue with setup when prompt.
If you are using the Live image, you will not have the following stage.
- Next you can select which metapackages you would like to install. The default selections will install a standard Kali Linux system and you don’t really have to change anything here.
Please refer to this guide if you prefer to change the default selections.
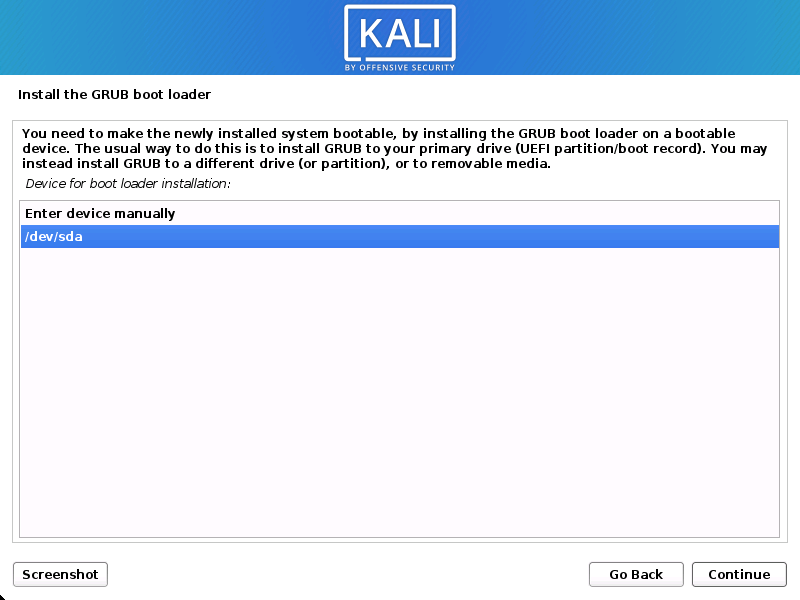
Boot Information
- Select the hard drive to install the GRUB bootloader in (it does not by default select any drive).
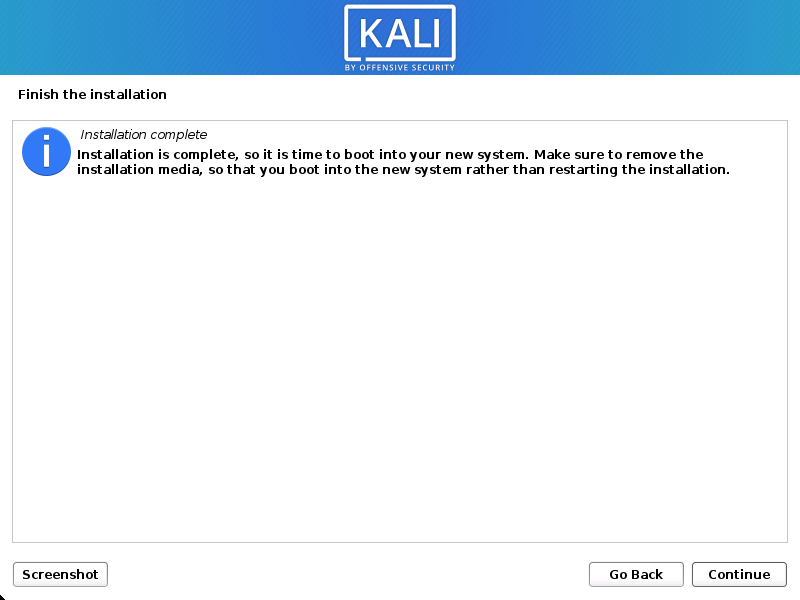
Reboot
Post Installation
Now that you’ve completed installing Kali Linux, it’s time to customize your system.
The General Use section has more information and you can also find tips on how to get the most out of Kali Linux in our User Forums.
Updated on: 2023-Mar-13
Author: gamb1t