- How to capture WiFi traffic using Wireshark on Windows
- Winpcap Capture Limitations and WiFi traffic on Wireshark
- Acrylic Wi-Fi Sniffer
- Acrylic Wi-Fi Sniffer and WiFi interfaces in Wireshark
- WiFi traffic capturing using Wireshark
- Video tutorial Acrylic Wi-Fi with Wireshark on Windows
- Захват Wi-Fi трафика в Windows и анализ в Wireshark
- Пример использования
- Ссылки
- Похожие записи.
- Андрей Торженов
- Latest posts by Андрей Торженов (see all)
- How to Capture Wi-Fi Traffic Using Wireshark
- Setup Check
- Wi-Fi Interface
- Support for Monitor Mode
- Check Wireshark Software
- Configuring Monitor Mode
- Step 1: Enter Superuser Mode
- Step 2: Create Monitor Mode
- Step 3: Configure Wi-Fi Sniffing Channel
- Step 4: Launch Wireshark and Start Capturing
- Conclusion
- About the author
- Bamdeb Ghosh
How to capture WiFi traffic using Wireshark on Windows
Wireshark uses libpcap or Winpcap libraries to capture network traffic on Windows. Winpcap libraries are not intended to work with WiFi network cards, therefore they do not support WiFi network traffic capturing using Wireshark on Windows. Monitor mode for Windows using Wireshark is not supported by default.
Winpcap Capture Limitations and WiFi traffic on Wireshark
Capture is mostly limited by Winpcap and not by Wireshark. However, Wireshark includes Airpcap support, a special -and costly- set of WiFi hardware that supports WiFi traffic monitoring in monitor mode. In other words, it allows capturing WiFi network traffic in promiscuous mode on a WiFi network. However these cards have been discontinued and are deprecated, so they cannot capture traffic on networks running the latest WiFi standards (802.11ac). Acrylic Wi-Fi Sniffer is an innovative alternative for capturing Wi-Fi traffic in monitor mode from Windows, including the latest 802.11ac standard.
Acrylic Wi-Fi Sniffer
Acrylic Wi-Fi Sniffer also enables Wi-Fi packet capture in monitor mode with Wireshark on Windows (in the latest versions Wireshark 3.0.0 or higher) and with other Acrylic Wi-Fi products such as Heatmaps or Professional. Because it has been designed as an economical and easily configurable alternative to AirPCAP hardware, it can capture all data available with this type of card, including SNR values, and is compatible with the latest 802.11ac standard in all channel widths (20, 40, 80 and 160 MHz). If you want to know more about capture modes or discover the features that these two alternatives provide within Acrylic Wi-Fi products, please visit “Monitor mode and native capture mode in Acrylic Wi-Fi” article.
Acrylic Wi-Fi Sniffer and WiFi interfaces in Wireshark
This integration is much easier than the previous one. Just install Acrylic Wi-Fi Sniffer and in the control panel of the sniffer click on the button “Install integration” as shown in the image below
Once done, start Wireshark as administrator and all Acrylic Wi-Fi Sniffer available interfaces will be displayed.
Select an interface to use with Acrylic Wi-Fi Sniffer and click on the configuration wheel as seen in the previous screenshot and configure both channels and bandwidth where the capture will be carried out. Once configured, we can start the capture in Wireshark and start receiving packets. We have added a toolbar in WireShark that allows to quickly change the configuration on-the-go as shown in the image below
In order to activate it please go to “View” menu > “Interface toolbars” > “Acrylic Wi-Fi Sniffer interface integration”.
WiFi traffic capturing using Wireshark
In short, after installing Acrylic Wi-Fi Sniffer we start Wireshark as Administrator (right-click on Wireshark icon and select “Run as Administrator”) and select any Wi-Fi card that appears with the name NDIS network interface or Acrylic Wi-Fi Sniffer. In our case “Dell Wireless 1702/b/g/n WiFi Card” (integrated into Dell equipment) and the “RT8814X” (via Acrylic Wi-Fi Sniffer)
Video tutorial Acrylic Wi-Fi with Wireshark on Windows

Capture WiFi traffic with Wireshark and Acrylic Wi-Fi Sniffer
Analyze WiFi packets with Wireshark in Windows with Acrylic Wi-Fi Sniffer
We appreciate your comments, please share this article on your social networks with the buttons below. Don’t forget to check our hardware compatibility list for better performance.
Related Posts
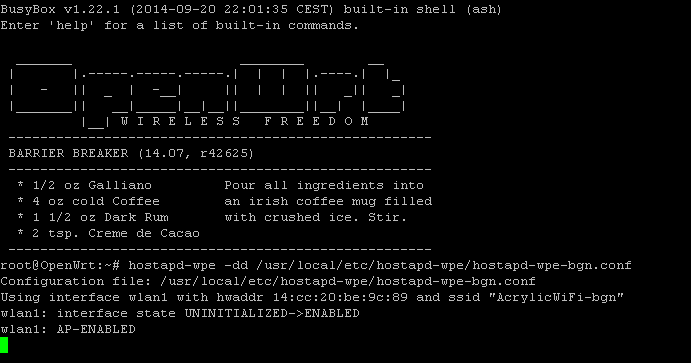
Attacks on WPA Enterprise infrastructures with hostapd-WPE

Signal strength, noise, location and area covered by an access point
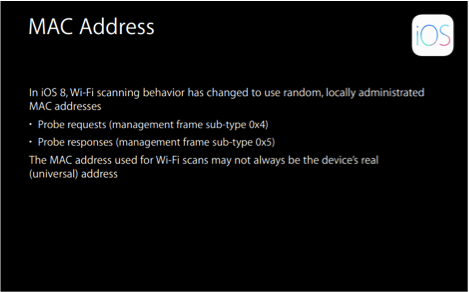
Fake iOS8 Wifi MAC addresses to improve privacy
© 2023 Acrylic WiFi software by Tarlogic Security
This website uses cookies
We are using cookies to give you the best experience on our website. You can find out more about which cookies we are using or switch them off in Cookies Settings
Necesary
Strictly Necessary Cookie should be enabled at all times so that we can save your preferences for cookie settings.
3rd Party Cookies
This website uses Google Analytics to collect anonymous information such as the number of visitors to the site, and the most popular pages.
Keeping this cookie enabled helps us to improve our website.
Захват Wi-Fi трафика в Windows и анализ в Wireshark
Периодически возникает необходимость захватить служебный Wi-Fi трафик для дальнейшего анализа в Wireshark.
Wireshark использует библиотеку WinPcap для захвата трафика, а она не позволяет напрямую захватить Wi-Fi трафик и не позволяет включить Monitor Mode.
Я нашел два варианта захвата Wi-Fi трафика в Wireshark:
- Использовать специализированные Wi-Fi адаптеры с поддержкой библиотеки AirPcap;
- Использовать способ предложенный Acrylic.
Первый и второй вариант — платные. А т.к. данная задача возникает нечасто, хочется, что то бесплатное.
У Microsoft есть замечательная утилита Microsoft Network Monitor. С помощью неё можно перехватывать трафик на сетевых интерфейсах включая и Wi-Fi интерфейсы в Monitor Mode.
Пример использования
После установки, запускаем Microsoft Network Monitor от прав Администратора!
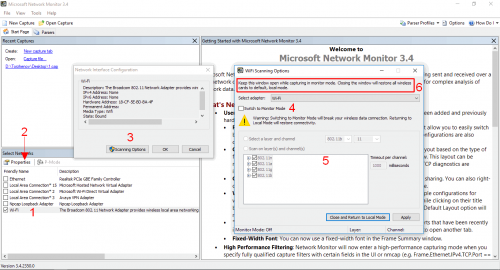
Выбираем Wi-Fi адаптер (1), открываем окно с настройками (2), открываем окно с настройками сканирования эфира (3).
Включаем если нужно Monitor Mode (4) и далее выбираем частоты и стандартны 802.11 (Wi-Fi) (5).
Окно настроек сканирования не закрываем во время захвата Wi-Fi трафика. Иначе все сделанные настройки сбросятся по умолчанию (6).
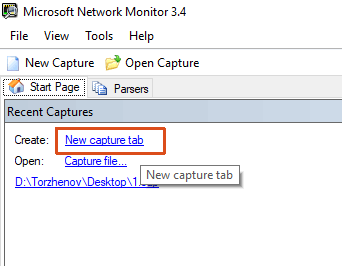
Создаём новую вкладку (tab) для захвата трафика.
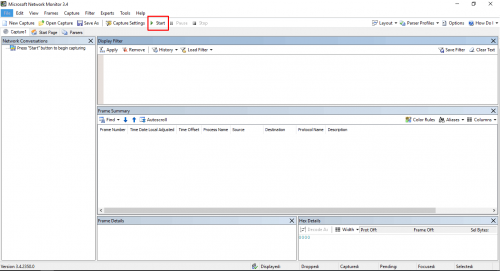
Нажимаем Start и…
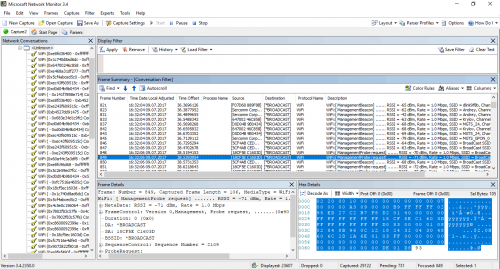
Анализируем его на месте в Microsoft Network Monitor или сохраняем в файл pcap и открываем в Wireshark.
Ссылки
- Подборка ресурсов по захвату и анализу Wi-Fi трафика: Wireless Analysis Resources
- Подборка ссылок на темутику Wi-Fi: https://2keep.net/useful-links#wi-fi
Похожие записи.
Андрей Торженов
В профессиональной сфере занимаюсь всем, что связанно с IT. Основная специализация — VoIP и сети передачи данных. Стараюсь не заниматься Windows серверами (но иногда приходится) и 1С.
Latest posts by Андрей Торженов (see all)
How to Capture Wi-Fi Traffic Using Wireshark
![]()
In this article, you will learn how to capture wireless frames using Wireshark in Linux (Example: Ubuntu. To follow this article, first, you should learn the basics of WireShark in the Wireshark Basic article, and then you can come back here.
There are some steps to be followed to achieve this.
Setup Check
Below are the requirements for capturing Wi-Fi packets using Wireshark.
Wi-Fi Interface
To check whether you meet this requirement, open the terminal using the shortcut Alt+Ctrl+T and run the command “iwconfig.” This output should show if there is an operable Wi-Fi interface. The following screenshot shows the output of this command:

In this example “wlp2s0” is the interface name for the Wi-Fi card.
- “IEEE 802.11” is the indication for the Wi-Fi interface.
- By default, the mode is “Managed,” which means that it is a client or station mode.
Support for Monitor Mode
The Wi-Fi card must support monitor mode to be able to sniff out wireless packets. This is a must, or you cannot sniff wireless packets using Wireshark. Open the terminal and run the command “iw phy0 info” or “iw list.” There is a huge list of information available here, but we just have to check the section for “monitor.” If the device does not support monitor mode, then it will not be possible to sniff the wireless packet using Wireshark.
Check Wireshark Software
Open the terminal and run the command “wireshark –version.” If Wireshark is installed, then there should be a version name with many details, as in the following screenshot:
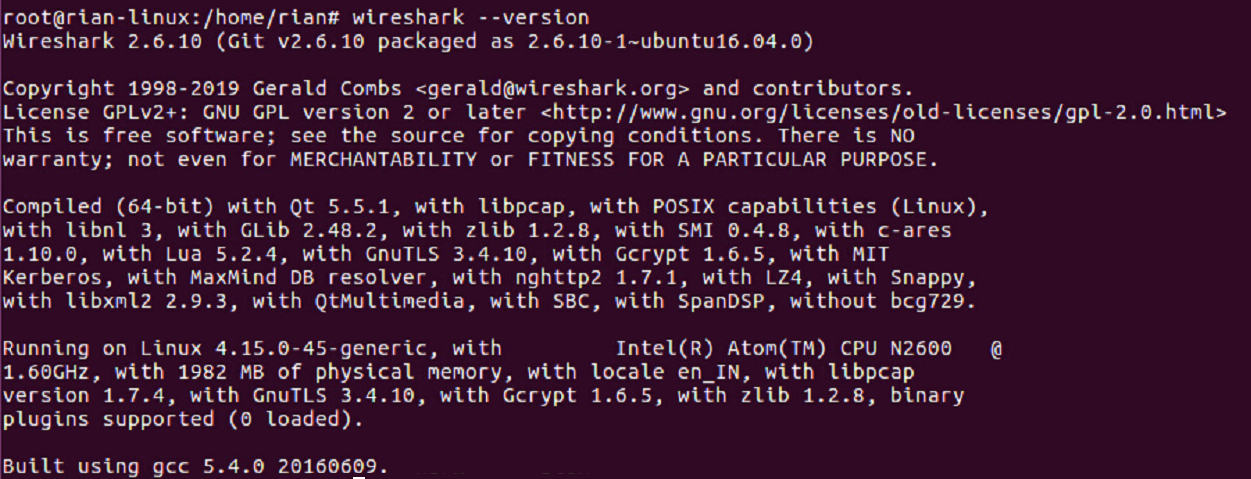
If it is not installed, then use the commands “apt-get update” and “apt-get install wireshark” to install Wireshark on your system.
Configuring Monitor Mode
In previous sections, you saw that the Wi-Fi interface default mode is “managed.” To capture a wireless packet, we need to convert the “managed” mode to “monitor” mode. There are different commands that you can use, but to use a simple method first, we will try using the “iwconfig” command to create monitor mode.
Let us assume that the name of the Wi-Fi interface is “wlp2s0,” as shown in the screenshot.
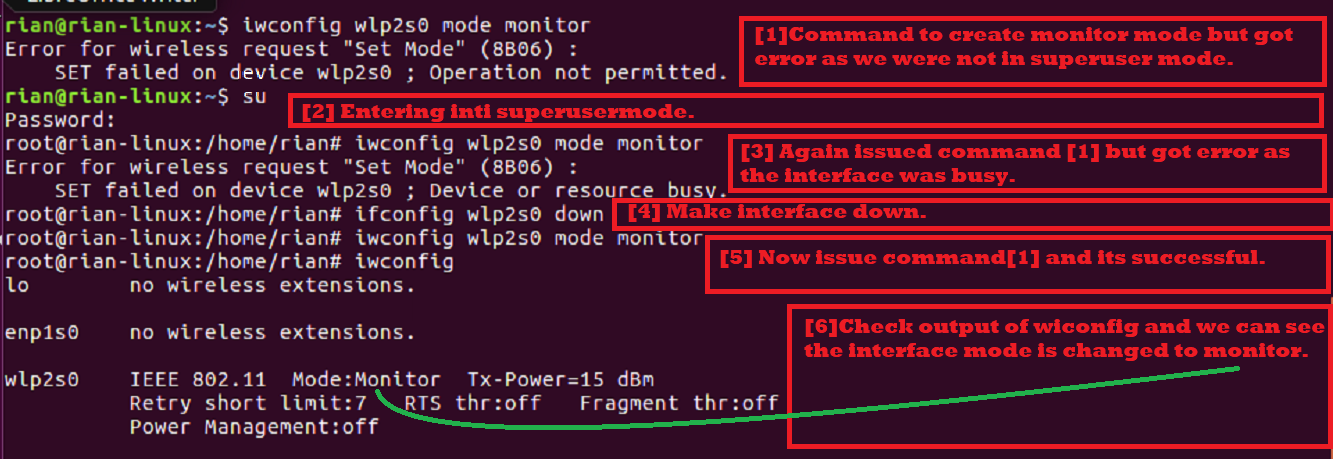
Step 1: Enter Superuser Mode
First, enter into superuser mode; otherwise, we will get permission to do this.
Command: “su”
Step 2: Create Monitor Mode
Command: “iwconfig wlps20 mode monitor”
Output: If the interface is up and active, you will get the “Device or resource busy” error.
So, make interface down using the following command.
Command: “ifconfig wlsp2s0 down”
Then, execute the first command again.
Finally, check whether the interface is in monitor mode using the “iwocnfig” command.
Here is the screenshot to explain all the above steps:
Step 3: Configure Wi-Fi Sniffing Channel
In wireless protocol, there are two radio frequency bands:
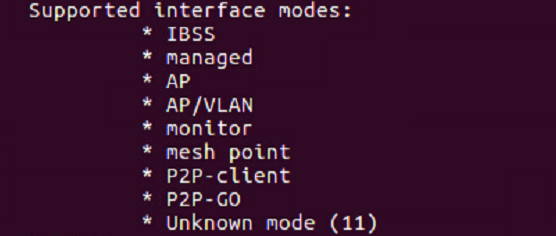
If your wireless card supports 1 and 2, that means that the Wi-Fi card can sniff both bandwidth configured channels. Let us see what our card supports.
Using the command “iw list,” we can check this capability. We are looking for the section below in the command output screenshot:
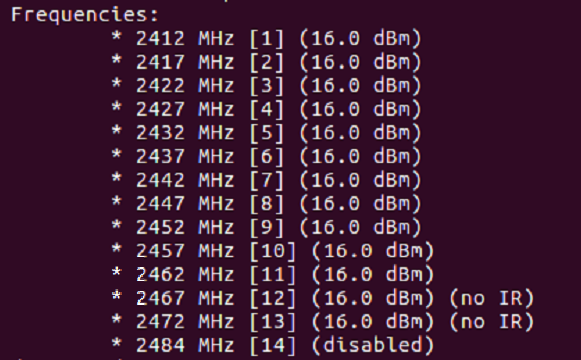
As yu can see in the above list, this Wi-Fi chip supports only 2.4Ghz [Check the frequency range].
Each frequency is known as channel number. For example, 2412MHz is considered channel 1 [Shown in [] ].
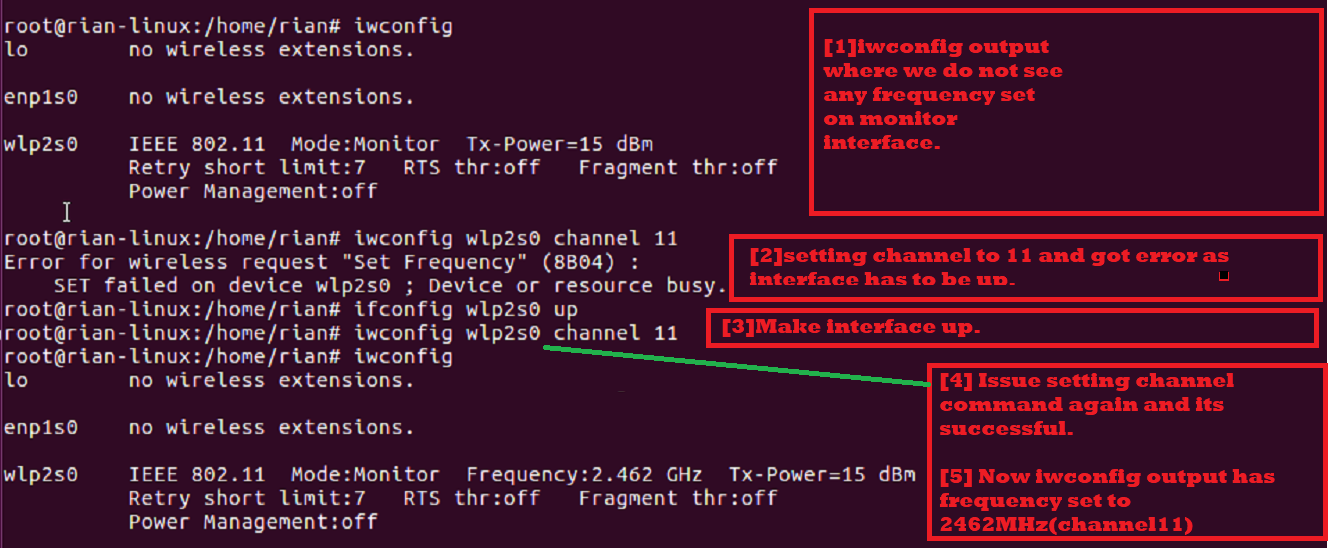
Now, we need to configure one channel for our monitor mode interface. Let us try to set channel 11 [frequency is 2462MHz].
Command: “iwconfig wlp2s0 channel 11”
If above command outputs an error, this makes the interface up [“ifconfig wlp2s0 up”] and then executes the “iwconfig wlp2s0 channel 11” command. Finally, execute the “iwconfig” command to ensure that the channel is set up properly.
The following screenshot explains the steps given above:
Step 4: Launch Wireshark and Start Capturing
Now, we are all set to capture wireless packets. You can start Wireshark in the background using the following command:

In the startup window of Wireshark, you should see the following screen. Here, you can see a list of interfaces.
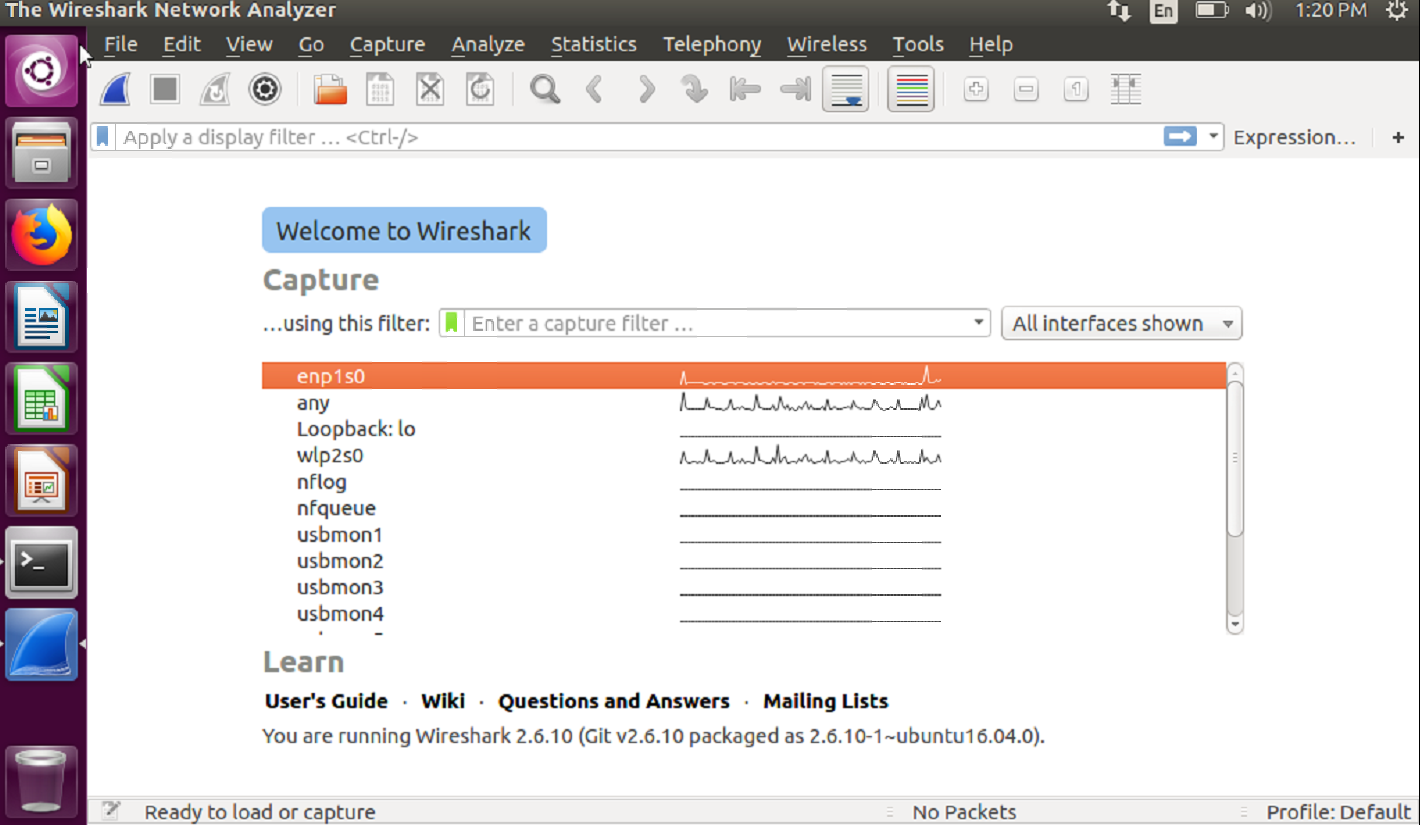
Next, choose your monitor mode interface, which is “wlp2s0.” Select this interface and then double-click on it.
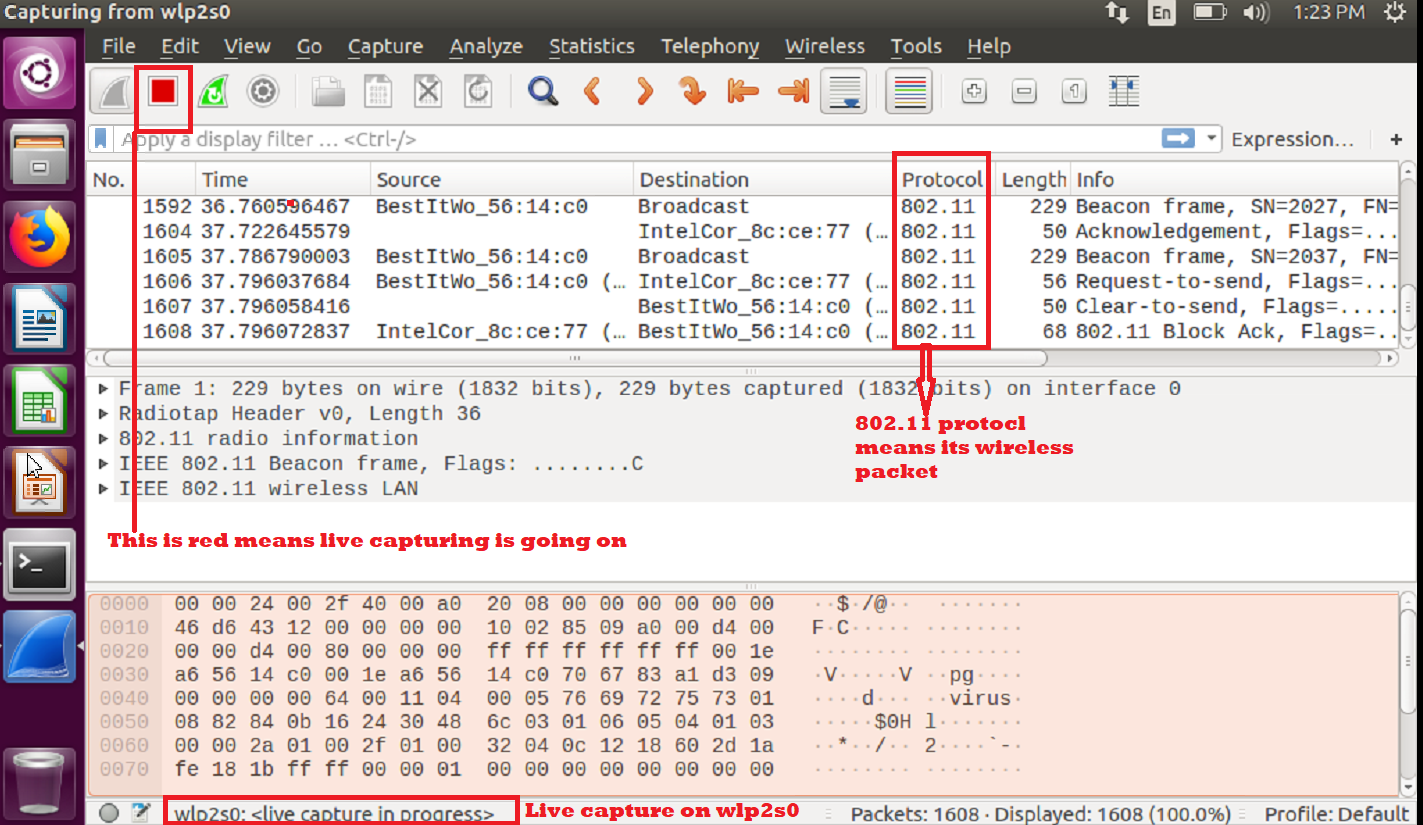
You can see that live capturing is currently going on.
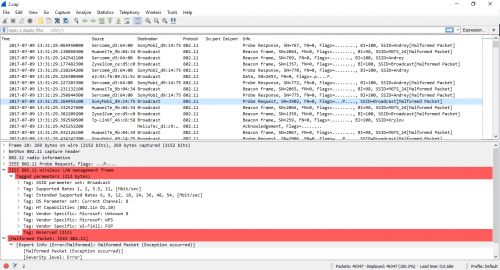
The following include some hints about wireless packets:
You should see the protocol section, which generally shows 802.11, which is wireless IEEE standard.
You should also see the “Beacon,” “Probe Request,” and “Probe Response” frames under the info section of any frame.
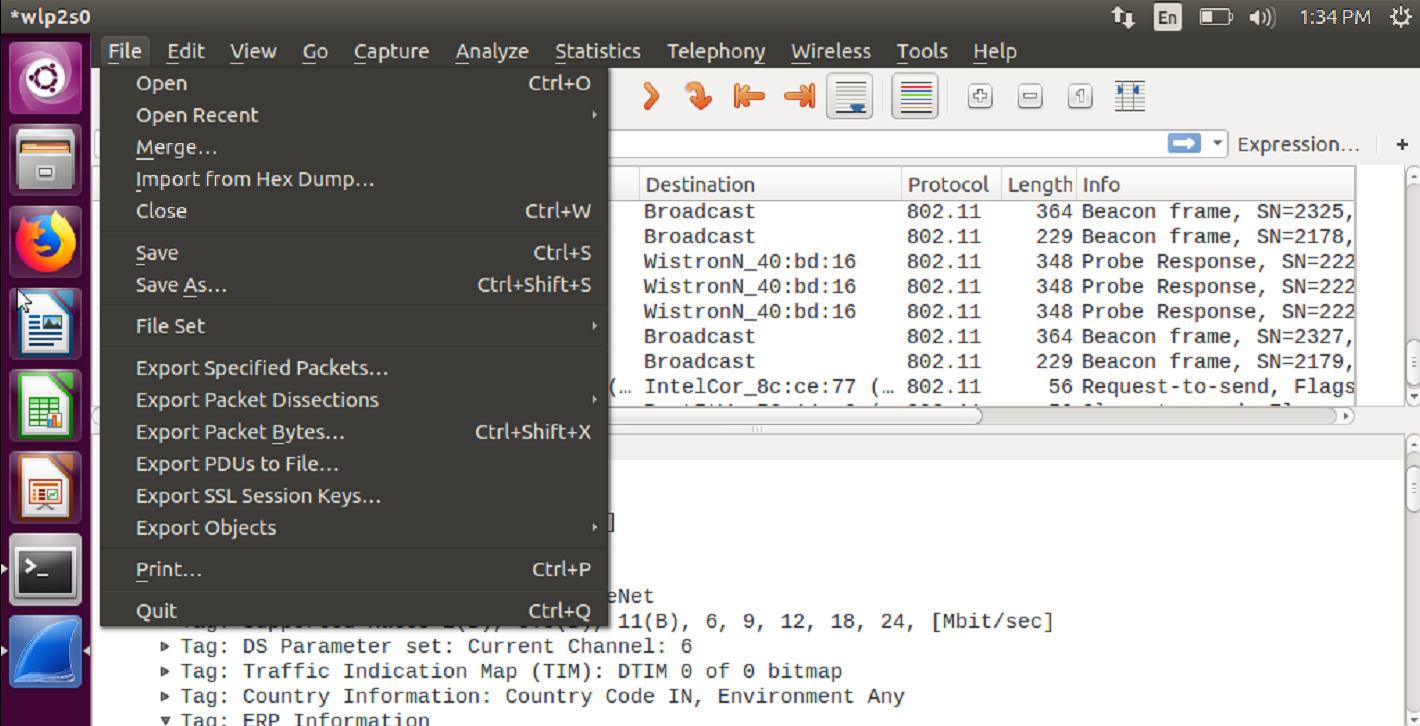
If you wish to save the capture and check it later, then select “save” or “save as” and save it for later analysis.
As long as the interface is in monitor mode you can capture wireless packet. Remember if you reboot the system the wireless interface will come up as “Managed” mod again.
Conclusion
In this article, you learned how to capture wireless packets using Wireshark in Linux. This is very easy to do in Linux using the built-in Wi-Fi card without installing any extra third-party software. You can make a shell script containing all these commands and run that single shell script to configure your system’s Wi-Fi card as monitor mode, set the preferred channel, and start using Wireshark.
About the author
Bamdeb Ghosh
Bamdeb Ghosh is having hands-on experience in Wireless networking domain.He’s an expert in Wireshark capture analysis on Wireless or Wired Networking along with knowledge of Android, Bluetooth, Linux commands and python. Follow his site: wifisharks.com