- Локальный веб-сервер под Linux, с автоматическим поднятием хостов и переключением версий PHP
- Цели
- Install Ubuntu Server
- 2. Requirements
- 3. Boot from install media
- 4. Choose your language
- 5. Choose the correct keyboard layout
- 6. Choose your install
- 7. Networking
- 8. Configure storage
- 9. Select a device
- 10. Confirm partitions
- 11. Confirm changes
- 12. Set up a Profile
- 13. Install software
- 14. Installation complete
- 15. What next?
- Finding help
Локальный веб-сервер под Linux, с автоматическим поднятием хостов и переключением версий PHP
Скорее всего какие-то части этой статьи уже знакомы многим хаброжителям, но в связи с покупкой нового рабочего ноутбука я решил собрать все крупинки воедино и организовать удобное средство для разработки. Мне часто приходится работать со множеством маленьких проектов, с разными версиями PHP, часто переводить старые проекты на новые версии. В далёком прошлом, когда я был пользователем Windows то использовал OpenServer. Но с переходом на Linux мне нехватало той простоты создания хостов и переключений версий которые были в нём. Поэтому пришлось сделать еще более удобное решение на Linux =)
Цели
- Использовать текущий на момент написания статьи софт
- Чтоб разграничить локальные домены, будем использовать специальный домен .loc
- Переключения версий PHP реализуем через поддомен c помощью fast-cgi
- Автоматическое создание хоста с помощью vhost_alias и dnsmasq
будет запущен тот же файл но уже с версией PHP 7.2.7
Другие версии доставляются аналогичным описанным ниже способом.
Для создания еще одного сайта просто создаем в /var/www/ папку имеющую окончание .loc, внутри которой должна быть папка public_html являющаяся корнем сайта
Вот собственно и все. Как без дополнительных мучений, перезапусков, и редактирований конфигов имеем автоматическую систему для работы с сайтами.
Всё это я проверну на LinuxMint19, он на базе Ubuntu18.04, так что с ним все будет аналогично.
Для начала поставим необходимые пакеты
sudo apt update sudo apt install build-essential pkg-config libxml2-dev libfcgi-dev apache2 libapache2-mod-fcgid postfix Postfix ставим в качестве плюшки, как простое решение(в мастере установки, всё по умолчанию выбираем) для отправки почты с локальной машины.
Так как это локальная разработка и я единственный пользователь. То мне удобней перенести папку с проектами в мою домашнюю дерикторию. Она у меня маунтится отдельным диском и мигрирует при переустановке системы. Самый простой способ это создать ссылку, тогда не нужно менять пути в настройках да и путь привычный для всех.
Скопируем папку созданную апачем в домашний каталог, создадим на ее месте ссылку, не забыв поменять пользователя на себя и обменяться группами с апачем.
sudo mv /var/www/ ~/www sudo ln -s ~/www /var/www sudo chown $USER:$USER -R ~/www sudo usermod -a -G www-data $USER sudo usermod -a -G $USER www-data Создадим папку в которой будем собирать исходники PHP для разных версий
sudo mkdir /usr/local/src/php-build Также нам понадобится папки для CGI скриптов
И runtime папка для этих же скриптов, с правами
sudo mkdir /var/run/mod_fcgid sudo chmod 777 /var/run/mod_fcgid И так как каталог у нас находится в оперативной памяти, добавим его создание при старте системы, для этого добавим в /etc/tmpfiles.d/fcgid.conf
#Type Path Mode UID GID Age Argument d /var/run/mod_fcgid 0755 www-data www-data - - У меня dnsmasq-base идет с коробки, если нет то его всегда можно доставить.
sudo updatedb locate dnsmasq.conf Либо если он как и у меня является частью NetworkManager то создать новый файл конфигурации в /etc/NetworkManager/dnsmasq.d/local.conf
Добавим в него строчку для перенаправление нашего локального домена на локальную машину.
Также нужно включить необходимые модули апача
sudo a2enmod fcgid vhost_alias actions rewrite Предварительная подготовка завершена, приступаем к сборке различных локальных версий PHP. Для каждой версии PHP проделываем следующие 4 шага. На примере 5.6.36
1. Скачиваем исходники нужной версии и распаковываем их
cd /usr/local/src/php-build sudo wget http://pl1.php.net/get/php-5.6.36.tar.bz2/from/this/mirror -O php-5.6.36.tar.bz2 sudo tar jxf php-5.6.36.tar.bz2 2. Cобираем из исходников нужную версию PHP, и помещаем ее в /opt/php-5.6.36
sudo mkdir /opt/php-5.6.36 cd php-5.6.36 sudo ./configure --prefix=/opt/php-5.6.36 --with-config-file-path=/opt/php-5.6.36 --enable-cgi sudo make sudo make install sudo make clean 3. Создаем CGI для обработки этой версии в /var/www/cgi-bin/php-5.6.36.fcgi
#!/bin/bash PHPRC=/opt/php-5.6.36/php.ini PHP_CGI=/opt/php-5.6.36/bin/php-cgi PHP_FCGI_CHILDREN=8 PHP_FCGI_MAX_REQUESTS=3000 export PHPRC export PHP_FCGI_CHILDREN export PHP_FCGI_MAX_REQUESTS exec /opt/php-5.6.36/bin/php-cgi 4. Делаем файл исполняемым
sudo chmod +x /var/www/cgi-bin/php-5.6.36.fcgi 5. Добавляем экшен для обработки каждой версии в /etc/apache2/mods-available/fcgid.conf
AddHandler fcgid-script fcg fcgi fpl Action application/x-httpd-php-5.6.36 /cgi-bin/php-5.6.36.fcgi AddType application/x-httpd-php-5.6.36 .php #Action application/x-httpd-php-7.2.7 /cgi-bin/php-7.2.7.fcgi #AddType application/x-httpd-php-7.2.7 .php FcgidIPCDir /var/run/mod_fcgid FcgidProcessTableFile /var/run/mod_fcgid/fcgid_shm FcgidConnectTimeout 20 AddHandler fcgid-script .fcgi 6. Добавляем правило для обработки каждой версии в /etc/apache2/sites-available/000-default.conf
#Универсальный ServerNamе ServerAlias *.loc #Алиас для CGI скриптов ScriptAlias /cgi-bin /var/www/cgi-bin #Универсальный DocumentRoot VirtualDocumentRoot /var/www/%2+/public_html #Директория тоже должна быть универсальной Options +ExecCGI -Indexes AllowOverride All Order allow,deny Allow from all #Ниже все условия для каждой из версий =~ /56\..*?\.loc/"> SetHandler application/x-httpd-php-5.6.36 #По умолчанию, если версия не указанна, запускаем на последней SetHandler application/x-httpd-php-7.2.7 ErrorLog $/error.log CustomLog $/access.log combined Ну вот и всё. Осталось только перезапустить apache и dnsmasq и пользоваться
sudo service apache2 restart sudo service network-manager restart Install Ubuntu Server
Ubuntu Server is a variant of the standard Ubuntu you already know, tailored for networks and services. It’s just as capable of running a simple file server as it is operating within a 50,000 node cloud.
Unlike the installation of Ubuntu Desktop, Ubuntu Server does not include a graphical installation program. Instead, it uses a text menu-based process. If you’d rather install the desktop version, take a look at our Install Ubuntu desktop tutorial.
This guide will provide an overview of the installation from either a DVD or a USB flash drive.
For a more detailed guide on Ubuntu Server’s capabilities and its configuration, take a look at our the Community Ubuntu Server documentation.
2. Requirements
You’ll need to consider the following before starting the installation:
- Ensure you have at least 2GB of free storage space.
- Have access to either a DVD or a USB flash drive containing the version of Ubuntu Server you want to install.
- If you’re going to install Ubuntu Server alongside data you wish to keep, ensure you have a recent backup.
See the server guide pages for more specific details on hardware requirements. We also have several tutorials that explain how to create an Ubuntu DVD or USB flash drive.
3. Boot from install media
To trigger the installation process, perform the following:
- Put the Ubuntu DVD into your DVD drive (or insert the USB stick or other install media).
- Restart your computer.
After a few moments, you should see messages like those shown below on the screen…

Most computers will automatically boot from USB or DVD, though in some cases this is disabled to improve boot times. If you don’t see the boot message and the “Welcome” screen which should appear after it, you will need to set your computer to boot from the install media.
There should be an on-screen message when the computer starts telling you what key to press for settings or a boot menu. Depending on the manufacturer, this could be Escape , F2 , F10 or F12 . Simply restart your computer and hold down this key until the boot menu appears, then select the drive with the Ubuntu install media.
4. Choose your language
After the boot messages appear, a ‘Language’ menu will be displayed.

As the message suggests, use the Up , Down and Enter keys to navigate through the menu and select the language you wish to use.
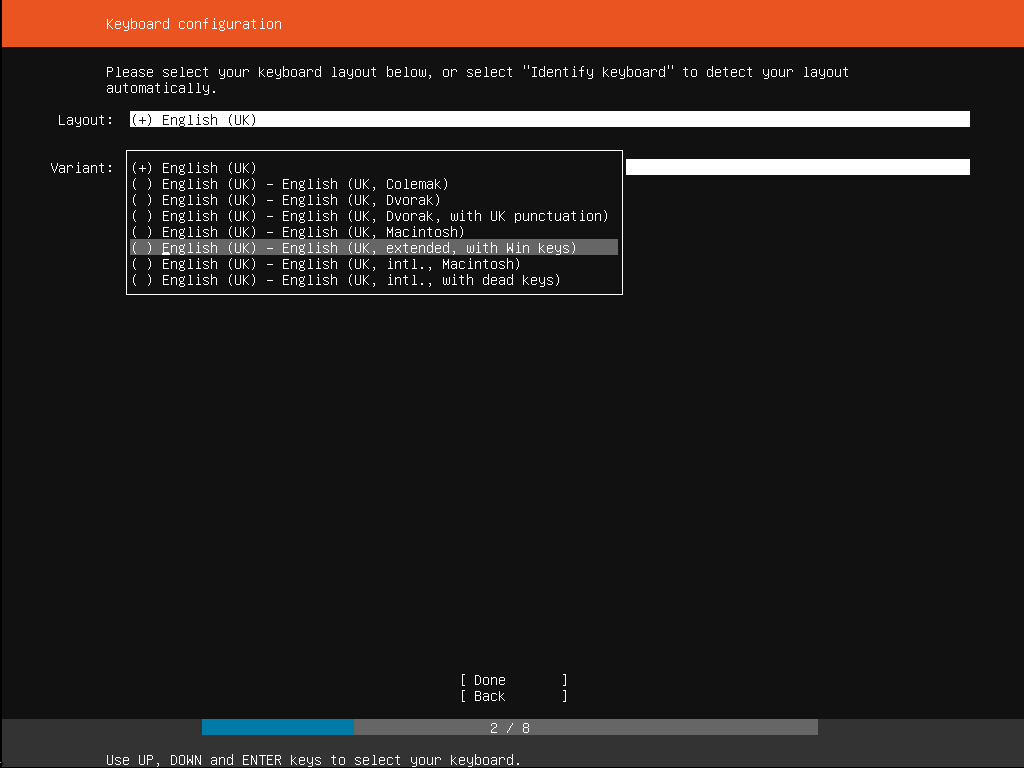
5. Choose the correct keyboard layout
Before you need to type anything in, the installer will next display a menu asking you to select your keyboard layout and, if applicable, the variant.

If you don’t know which particular variant you want, just go with the default — when Ubuntu Server has been installed you can test and change your preferences more easily if necessary.
6. Choose your install
Now we are ready to select what you want to install. There are three options in the menu:
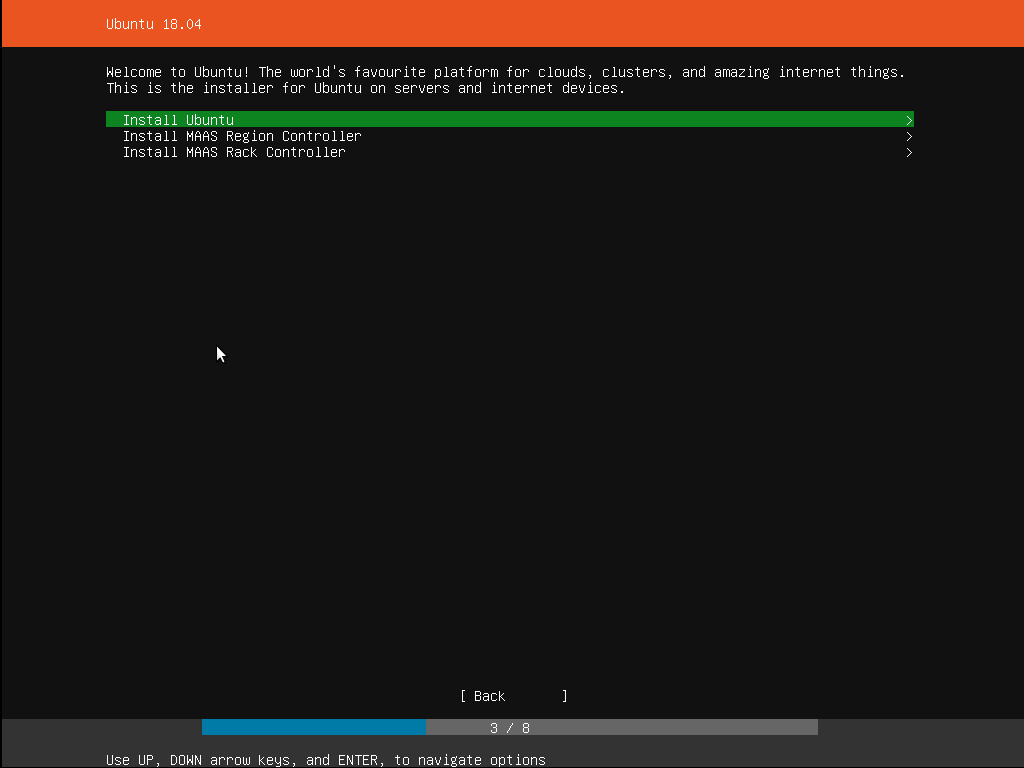
The bottom two options are used for installing specific components of a Metal As A Service (MAAS) install. If you are installing MAAS, you should check out the MAAS documentation for more information on this! The rest of this tutorial assumes you select the first option, Install Ubuntu .
7. Networking
The installer will automatically detect and try to configure any network connections via DHCP.

This is usually automatic and you will not have to enter anything on this screen, it is for information only.
If no network is found, the installer can continue anyway, it just won’t be able to check for updates. You can always configure networking after installation.
8. Configure storage
The next step is to configure storage. The recommended install is to have an entire disk or partition set aside for running Ubuntu.

If you need to set up a more complicated system, the manual option will allow you to select and reorganise partitions on any connected drives.
Note that Ubuntu no longer requires a separate partition for swap space, nor will the automated install create one.
9. Select a device
This menu will allow you to select a disk from the ones detected on the system.

To help identification, the drives will be listed using their system ID. Use the arrow keys and enter to select the disk you wish to use.
10. Confirm partitions
With the target drive selected, the installer will calculate what partitions to create and present this information…
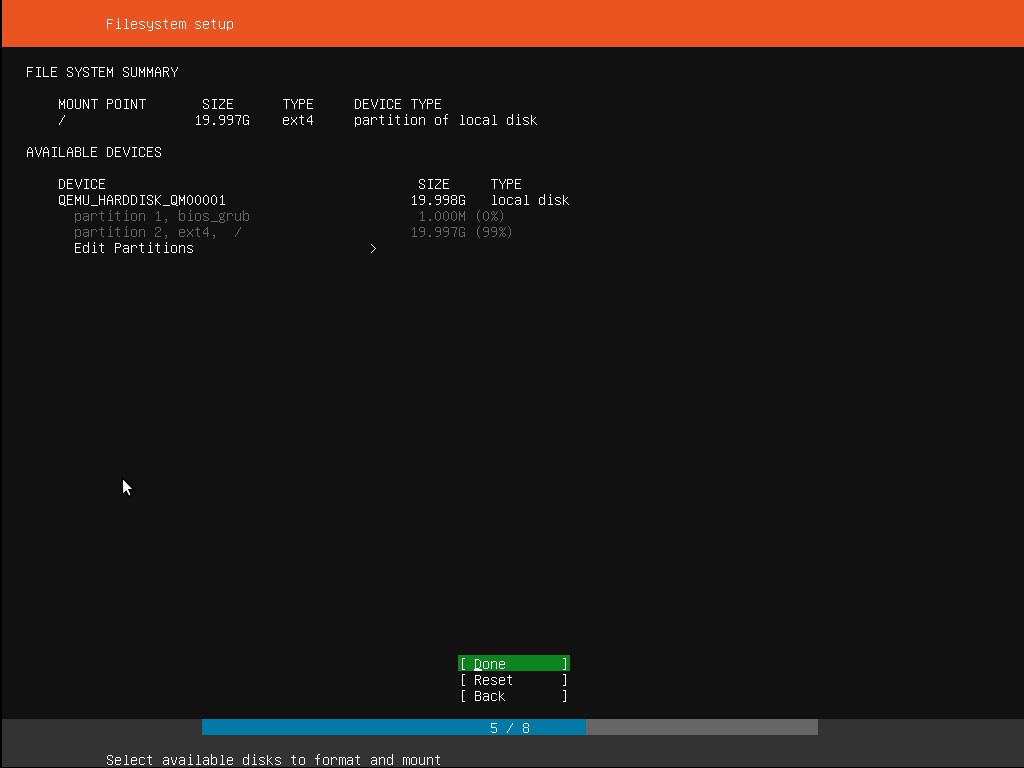
If this isn’t what you expected to see (e.g., you have selected the wrong drive), you should use the arrow keys and enter to select Back from the options at the bottom of the screen. This will take you back to the previous menu where you can select a different drive.
It is also possible to manually change the partitions here, by selecting Edit Partitions . Obviously you should only select this if you are familiar with how partitions work.
When you are happy with the disk layout displayed, select Done to continue.
11. Confirm changes
Before the installer makes any destructive changes, it will show this final confirmation step. Double check that everything looks good here and you aren’t about to reformat the wrong device!

There is no “Undo” for this step, once you confirm the changes, the indicated devices will be overwritten and any contents may be lost
12. Set up a Profile
The software is now being installed on the disk, but there is some more information the installer needs. Ubuntu Server needs to have at least one known user for the system, and a hostname. The user also needs a password.

There is also a field for importing SSH keys, either from Launchpad, Ubuntu One or Github. You simply need to enter the username and the installer will fetch the relevant keys and install them on the system ready for use (e.g. secure SSH login to the server).
13. Install software
Once you have finished entering the required information, the screen will now show the progress of the installer. Ubuntu Server now installs a concise set of useful software required for servers. This cuts down on the install and setup time dramatically. Of course, after the install is finished, you can install any additional software you may need.

14. Installation complete
When the install is complete, you will see a message like this on the screen.

Remember to remove the install media, and then press enter to reboot and start the server. Welcome to Ubuntu!
15. What next?
With Ubuntu Server installed, you can now carry on and build that file-server or multi-node cluster we mentioned!
If you are new to Ubuntu Server, we’d recommend reading the Server Guide.
You can also check out the latest on Ubuntu Server, and what others are using it for on the Ubuntu Server pages.
Finding help
The Ubuntu community, for both desktop and server, is one of the friendliest and most well populated you can find. That means if you get stuck, someone has probably already seen and solved the same problem.
Try asking for help in one of the following places:
Alternatively, if you need commercial support for your server deployments, take a look at Ubuntu Advantage.