WIRELESS JOINT
Ad blocker detected: Our website is made possible by displaying online advertisements to our visitors. Disable your ad blocker to continue using our website.
WE826-T2 — Installing Modem Manager
JimHelms Site Admin Posts: 1356 Joined: Tue Dec 19, 2017 8:59 pm Location: DFW Texas Has thanked: 79 times Been thanked: 186 times Contact:
WE826-T2 — Installing Modem Manager
Post by JimHelms » Sun Mar 17, 2019 10:38 pm
Some may prefer running an OpenWRT build with Modem Manager as opposed to a WiFiX/GoldenOrb build.
A number of WE826-T2 users are now running the Modem Manager firmware build which seem to cure these issues.
DISCLOSURE: As will all tutorials, USE AT YOUR OWN RISK.
This tutorial will demonstrate how to install and configure the Modem Manager build for the WE826-T. There is also a Modem Manager build for the WG3526 that may be downloaded from HERE.
VERY IMPORTANT: Modem Manager is NOT compatible with MBIM composition. Prior to installing Modem Manager, the modem MUST be placed in QMI mode.
Before we get started, if a SIM Card in installed in the router, power off the router and remove the SIM Card.
Note: We will often refer to HARD BOOTING a router. This simply means to power down (unplug power) the router, wait 5 seconds, and power up (plug in power to) the router.
QMI Composition
If this is a new build with a NEW OEM Sierra Wireless MC7455 or EM7564, these modems come preset in QMI composition. These builders can skip this section.
There are two methods for placing the modems list above in QMI composition. This tutorial assumes you are currently running a WiFiX | GoldenOrb build that has access to the AT-COMMAND terminal.
Go to MODEM > MISCELLANEOUS > AT-COMMAND TERMINAL.
Method One (Preferred so that old configurations are deleted): Restore the MC7455 | EM7564 modem to OEM:
AT!ENTERCND="A710" AT!RMARESET=1Method Two: Configure the modem for QMI composition:
Настройка роутера zbt 826 t2 с сим билайн

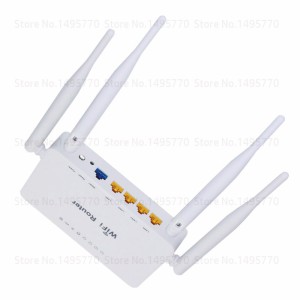
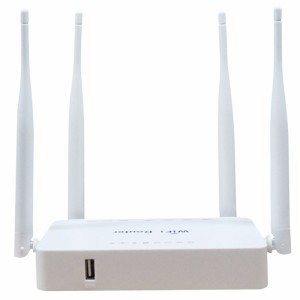
Модель WE826-T2 — маршрутизатор, произведённый в Китае. Этот роутер продается под торговой маркой ZBT (хотя был обнаружен в продаже и под другими брендами). Данная модель является аналогом российского роутера Kroks, имеющая при этом несколько преимуществ перед российским устройством:
Более стабильная работа благодаря наличию модуля mini PCI-E.
a) Наличие USB-разъёма для внешних накопителей.
b) Разъём для карты памяти microSD (до 32 Гб).
Данные преимущества не сильно влияют на общую производительность устройства, но их наличие является приятным бонусом. К тому же китайский роутер стоит на порядок дешевле российского аналога.
В остальном WE826-T2 полностью повторяет функционал и комплектацию отечественного маршрутизатора Kroks Rt-Cse5 sHW:
1. работа в 2G, 3G, 4G и LTE сетях;
основные функции — DHCP, IP и MAC фильтры, VPN и прочие;
2. 4 внешние съёмные антенны: 3G/4G — 2 штуки и Wi-Fi — 2 штуки которые обеспечивают большую площадь покрытия в отличие от конкурентов от Huawei;
3. 5 разъёмов для проводов: LAN — 4 штуки, WAN — 1 штука.
WE826-T2 отличается качественной и надёжной сборкой: все детали и элементы идеально подогнаны, ничего не болтается и не шатается, отсутствует какой-либо посторонний шум. Корпус сделан из качественного металла. Роутер весит намного больше, чем это кажется визуально. При подключении дополнительных внешних антенн устройство не будет скользить по поверхности.
Так же в наличие версия на Qectel EP06-E агрегация частот LTE до 300 мбит/с.
IEEE 802.11n, IEEE 802,11g, IEEE 802.11b, ieeee802. 11ac, ieeee802. 11a
IEEE 802,3, IEEE 802.3u
802.11ac зависит от режима 11AC;
802.11ac: зависит от режима 11AC;
2 или 4 * несъемная 5dBi антенна
1 * слот для карт Micro SD
1*10/100/100 м WAN порт (Авто MDI/MDIX)
4*10/100/100 м LAN порт (Авто MDI/MDIX)
Мощность, режим PCIE, 2,4 г, WAN, LAN1, LAN2, LAN3, LAN4
Макс Мощность потребления
PPPoE, динамический IP, статический IP, 3G 4G Dial up
Сервер, клиент, список клиентов DHCP, адресная БРОНЬ
Порты и разъёмы Forwareding
Виртуальный сервер, запуск порта, UPnP, DMZ
Фильтр ip-адреса/фильтр mac-адреса/фильтр домена
Mac с настраиваемым потоком воздуха, клон kayfun
NTP Синхронизация
Веб-обновление прошивки
В январе 2017г был приобретен китайский роутер ZBT WE1626 с поддержкой операционной системы OpenWRT (это чрезвычайно гибкий дистрибутив GNU/Linux для встраиваемых систем).
Естественно были проведены эксперименты со сменой прошивок. Прошивки менялись через стандартный веб-интерфейс роутера (рис.)
Прошивка (русский интерфейс) openwrt-ramips-mt7620-zbt-wr8305rt-squashfs-sysupgrade-full.bin (любезно предоставленная покупателем из РФ)
- VLAN tag, Wifi клиент и AP одновременно Multi Wan
- Сервер печати
- Сканер по сети (sane)
- Помимо стандартных протоколов есть pptp, l2tp (нужно для поднятия VPN соединения, используется некоторыми провайдерами)
- Поддержка 3g,4g модемов и модемов в режиме hilink
- Сетевое хранилище (семейство fat,ntfs,семейство ext)
- Help prevent damaging the SIM Card Slot internal components, and,
- Help to eliminate disconnect issues that can occur when the router warms up to operating temperatures.
- Type in the APN required for your carrier data plan
- Set the AUTHENTICATION PROTOCOL to NONE.
- SAVE & APPLY
- VLAN tag, Wifi клиент и AP одновременно Multi Wan
- Сервер печати
- Сканер по сети (sane)
- Помимо стандартных протоколов есть pptp, l2tp (нужно для поднятия VPN соединения, используется некоторыми провайдерами)
- Поддержка 3g,4g модемов и модемов в режиме hilink
- Сетевое хранилище (семейство fat,ntfs,семейство ext)
Свободного места для установки пакетов 1.77 MB
Прошивка была успешно проверена на Дом.ру и Билайн.
Оба подключения работают. С Билайном могут быть сложности, т.к. на оф сайте указаны только два протокола (L2TP, PPTP) для работы,а может быть еще неуказанный третий (Динамический IP). В моем случае действующим оказался именно он.
Замена на прошивку openwrt-ramips-mt7620-zbt-wr8305rt-squashfs-sysupgrade-full.bin
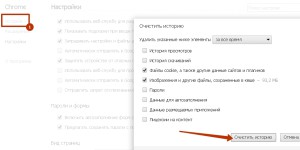
производилась через вебинтерфейс. Ничего примечательного за исключением того, что после прошивки ОБЯЗАТЕЛЬНО нужно очистить кэш браузера,иначе не войти. В Chrom заходим в Настройки -История. Жмем очистить историю:
С помощью скринов приведена процедура настройки билайн соединений по ДИНАМИЧЕСКОМУ протоколу (DHCP-клиент):
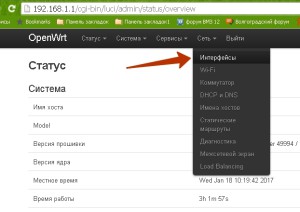
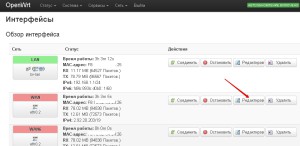

WIRELESS JOINT
Ad blocker detected: Our website is made possible by displaying online advertisements to our visitors. Disable your ad blocker to continue using our website.
WiFiX WE826-T2 | WE826GO-U | Complete Build Instructions
JimHelms Site Admin Posts: 1356 Joined: Tue Dec 19, 2017 8:59 pm Location: DFW Texas Has thanked: 79 times Been thanked: 186 times Contact:
WiFiX WE826-T2 | WE826GO-U | Complete Build Instructions
Post by JimHelms » Fri Feb 01, 2019 11:11 pm
The WiFiX branded WE826-T2 and WE826GO-U are The Wireless Haven — The Wireless Haven’s newest version of the WE826.
This tutorial will take you through the complete build process. We will reference and use other tutorials when appropriate.
The most common modem used on the WE826-T-2 is the Sierra Wireless MC7455 CAT6 Modem.
More and more customers are beginning to use the Sierra Wireless EM7565 CAT12 modem. The EM7565 is a M.2 modem (as opposed to a Mini PCI-E) and requires a Mini PCI-E to M.2 adapter.
The EM7565 also uses MHF4 pigtail connectors (as opposed to the U.FL connects used on the MC7455). When installing the EM7565, two MHF4 to SMA Female Bulkhead 5″ pigtails are required to replace of the U.FL pigtails that come installed in WE826-T2.
STEP ONE: INSTALL THE MODEM
SIM CARD INSTALLATION AND TIPS:
It is important to insert the SIM Card into the router correctly to avoid bending and/or damaging the internal pins and spring in the router’s SIM Card Slot.
It is equally important when using a SIM Card Adapter, that the SIM Card is properly seated into the adapter to avoid damage to the SIM Card slot’s internal components.
DISCLAIMER: Damage to the SIM Card slot, its spring and pins, are NOT covered under warranty.
See below for proper SIM Card and Adapter preparation and installation.
The SIM Card installs into the WE826-T2 with the metal surfaces facing up. The cut corner of the SIM Card is inserted into the SIM Card Slot.
The SIM Card should fit into the adapter with ease, not loose but not tight. Otherwise, when pushed into the router, the SIM Card can tilt ever so lightly on one end (or side), causing damage to the pins in the SIM Card Slot and/or the pins not making adequate contact with the electronic contact chip. This bad connection can worsen as the router warms up.
Check the SIM Card closely for any signs of damage. If SIM Card is bad, worn or dirty from swapping it in and out of devices, clean the SIM Card’s electronic metal chip with an alcohol pad and refrain from touching the metal chip area during re-installation. A pencil eraser may also be helpful to gently clean the metal contact scratches.
STEP TWO: UPDATE THE WE826-T2 WITH GOLDENORB FIRMWARE
NOTE: Step Two may be skipped for the WE826GO since it is already preloaded with the WiFiX version of GoldenOrb.
To flash the firmware follow THIS TUTORIAL.
Once completed, return to this post to configure GoldenOrb.
STEP THREE: CONFIGURING THE ROUTER AND MODEM
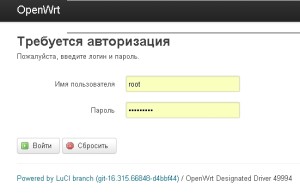
After the firmware flashing is complete, log back into the GoldenOrb user interface at 192.168.1.1
NOTE: It may be necessary to clear the browser cache if any issue is experienced with accessing the login screen. This can normally be done by placing your mouse pointer to the top of the web browser and hitting the CTRL and F5 keys at the same time.
The login user name is root and leave the password blank since no password is required on some builds of GoldenOrb. If it still insist on a password, try admin
NOTE: If the WiFi SSID is broadcasted as rooter the WiFi default password is rooter2017 or rooter2019. If the WiFiX is broadcasted as wifix use 12345678
Once logged into the router:
Always be certain the APN you have entered is the correct one used by your carrier. Some of the more common APN’s are:
Wifi роутер we826 t2 настройка
В январе 2017г был приобретен китайский роутер ZBT WE1626 с поддержкой операционной системы OpenWRT (это чрезвычайно гибкий дистрибутив GNU/Linux для встраиваемых систем).
Естественно были проведены эксперименты со сменой прошивок. Прошивки менялись через стандартный веб-интерфейс роутера (рис.)
Прошивка (русский интерфейс) openwrt-ramips-mt7620-zbt-wr8305rt-squashfs-sysupgrade-full.bin (любезно предоставленная покупателем из РФ)
Свободного места для установки пакетов 1.77 MB
Прошивка была успешно проверена на Дом.ру и Билайн.
Оба подключения работают. С Билайном могут быть сложности, т.к. на оф сайте указаны только два протокола (L2TP, PPTP) для работы,а может быть еще неуказанный третий (Динамический IP). В моем случае действующим оказался именно он.
Замена на прошивку openwrt-ramips-mt7620-zbt-wr8305rt-squashfs-sysupgrade-full.bin
производилась через вебинтерфейс. Ничего примечательного за исключением того, что после прошивки ОБЯЗАТЕЛЬНО нужно очистить кэш браузера,иначе не войти. В Chrom заходим в Настройки -История. Жмем очистить историю:
С помощью скринов приведена процедура настройки билайн соединений по ДИНАМИЧЕСКОМУ протоколу (DHCP-клиент):