Zs 040 bluetooth подключение ардуино
The HC-06 is a slave only BT module that is fairly easy to use with the Arduino using serial communication. Once it is connected it simply relays what it receives by bluetooth to the Arduino and whatever it receives from the Arduino it sends to the connected device. There are several slightly different versions of the HC-06, however, all seem to use the same firmware and have the same AT commands. The ones I have are labelled as zs-040. I also have some HC-05s which share the same PCB and are also labelled as zs-040.
The HC-06 defaults to AT mode at power on. This is indicated by a rapidly flashing LED. After the HC-06 is connected to another device the LED stops flashing and is constant on.
Connections
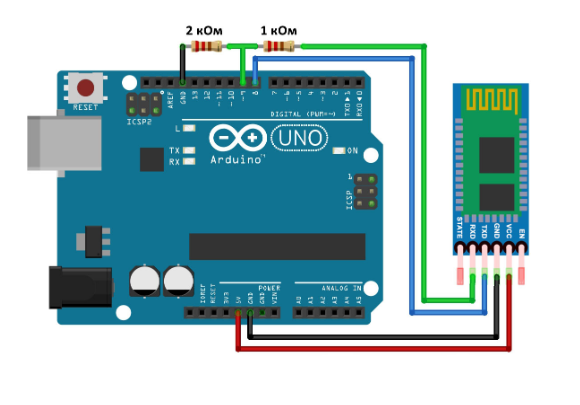
The Bluetooth module the ZS-040 is based on, the EGBT-046S, is a 3.3V device. The HC-06 breakout board has a 3.3v regulator that allows a larger input voltage to be used, in the range of 3.6 to 6 volts. The RX pin can still only accept 3.3V though. This means a voltage divider is required to connect to a 5V Arduino. A simple voltage divider can be created using 2 resistors. I am using a 1K ohm resistor and a 2K ohm resistor. The Arduino will read 3.3V as a HIGH so the HC-06 TX pin can be connected directly to the Arduino.
HC-06 Vin to 5V (can be from the +5V out from the Arduino)
HC-06 GND to common GND
HC-06 RX to Arduino pin D3 (TX) via a voltage divider
HC-06 TX to Arduino pin D2 (RX) connect directly
Test Communication With The HC-06
After connecting everything we need to talk to the HC-06. We can do this by using software serial on the Arduino. I use software serial to talk to Bluetooth modules and use the hardware serial for debugging.
The following sketch takes whatever is entered in to the serial monitor on a host computer and relays it to the HC-06. The sketch also takes whatever the HC-06 outputs and forwards it to the serial monitor. The Arduino is acting like a relay station between the serial monitor and the BT module.
The HC-06s I have have a default baud rate of 9600. Other modules have a different baud rate. If 9600 doesn’t work try other speeds. 38400 is also very common. Once you have communication working you can change the baud rate to suit your needs.
// Basic Bluetooth sketch HC-06_01 // Connect the Hc-06 module and communicate using the serial monitor // // The HC-06 defaults to AT mode when first powered on. // The default baud rate is 9600 // The Hc-06 requires all AT commands to be in uppercase. NL+CR should not be added to the command string // #include SoftwareSerial BTserial(2, 3); // RX | TX // Connect the HC-06 TX to the Arduino RX on pin 2. // Connect the HC-06 RX to the Arduino TX on pin 3 through a voltage divider. // void setup() Serial.begin(9600); Serial.println("Enter AT commands:"); // HC-06 default serial speed is 9600 BTserial.begin(9600); > void loop() // Keep reading from HC-06 and send to Arduino Serial Monitor if (BTserial.available()) Serial.write(BTserial.read()); > // Keep reading from Arduino Serial Monitor and send to HC-06 if (Serial.available()) BTserial.write(Serial.read()); > >
The HC-06 zs-040 expects commands to be in upper case and does not require carriage return and new line (\r\n) characters.
Open the serial monitor and select a baud rate of 9600 and ensure “No line ending” is selected from the drop down list at the bottom of the window.
Enter “AT” (no quotes) into the top text box and hit Send. If the HC-06 likes you it will say OK. AT is a basic communications test command that allows you to check the HC-06 is connected and communicating.
AT Commands
The HC-06 has a limited number of commands. You can rename the device, change the baud rate, and change the PIN/password. That’s about it.
| Command | Reply | Comment |
| AT | OK | Communications test |
| AT+VERSION | OKlinvorV1.8 | Firmware version. |
| AT+NAMEmyBTmodule | OKsetname | Sets the modules name to “myBTmodule” |
| AT+PIN6789 | OKsetPIN | Set the PIN to 6789 |
| AT+BAUD1 | OK1200 | Sets the baud rate to 1200 |
| AT+BAUD2 | OK2400 | Sets the baud rate to 2400 |
| AT+BAUD3 | OK4800 | Sets the baud rate to 4800 |
| AT+BAUD4 | OK9600 | Sets the baud rate to 9600 |
| AT+BAUD5 | OK19200 | Sets the baud rate to 19200 |
| AT+BAUD6 | OK38400 | Sets the baud rate to 38400 |
| AT+BAUD7 | OK57600 | Sets the baud rate to 57600 |
| AT+BAUD8 | OK115200 | Sets the baud rate to 115200 |
| AT+BAUD9 | OK230400 | Sets the baud rate to 230400 |
| AT+BAUDA | OK460800 | Sets the baud rate to 460800 |
| AT+BAUDB | OK921600 | Sets the baud rate to 921600 |
| AT+BAUDC | OK1382400 | Sets the baud rate to 1382400 |
To get the modules firmware version enter “AT+VERSION” (no quotes):
The modules I have report they are using version linvorV1.8 which seems to be common for many HC-06s.
Note: Windows cannot use baud rates above 115200. If you are using Windows and you accidentally set the baud rate higher than 115200 you’re screwed!
After confirming that the HC-06 is working and communicating we can try to connect to an Android device.
HC-06 Connecting to an Android Device
Since the HC-06 is a slave only device, the connection must be started by another device. Below are the steps to pair and then connect with an Android device.
I am using an app called Bluetooth Terminal which is available for free on google play.
Before you can connect to the HC-06 you need to pair it.
Power on the HC-06. The LED will flash rapidly.
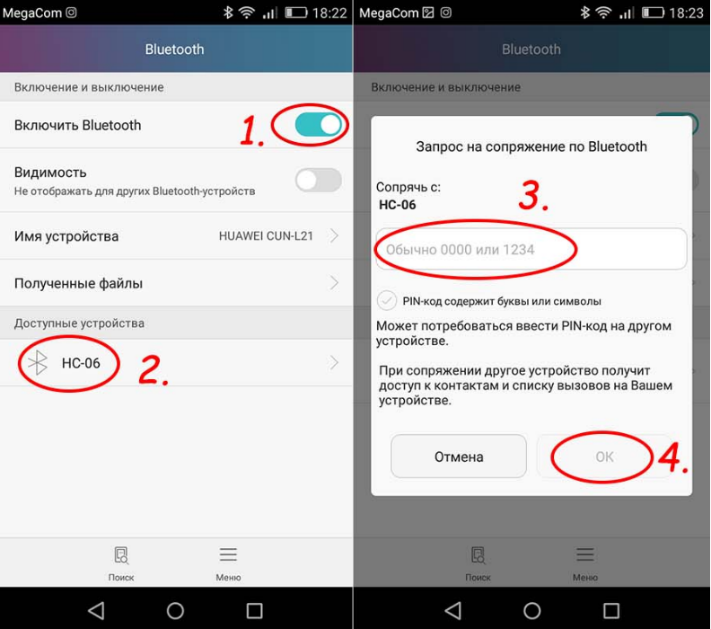
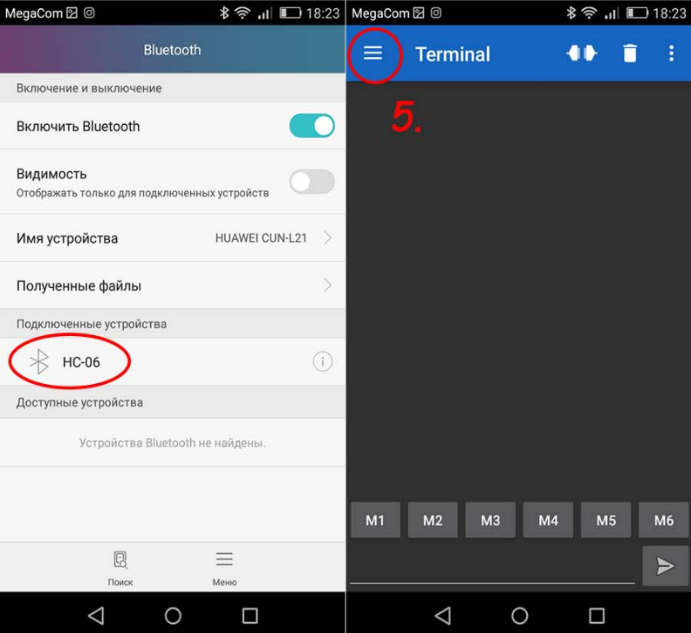
Open Settings on the Android device and select Bluetooth.
If your device does not auto-scan you will need to manually scan for available bluetooth devices. The HC-06 should appear in the list.
Select the HC-06. You will be asked for the pin. The default pin is “1234”.
The modules name may include the mac address; a series of hexadecimal numbers.
After the HC-06 is paired you need to communicate with it somehow. To test things are working you can use a BT terminal program such as Bluetooth Terminal available on Google Play
Install and open Bluetooth Terminal.
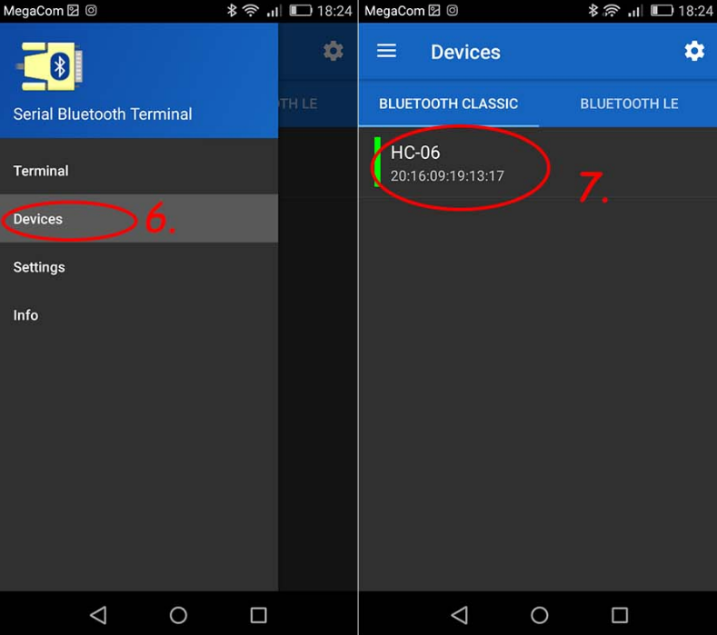
Open the menu, icon at the top of the screen.
Select “Connect a device – Insecure”. This brings up a list of available devices.
Select the HC-06
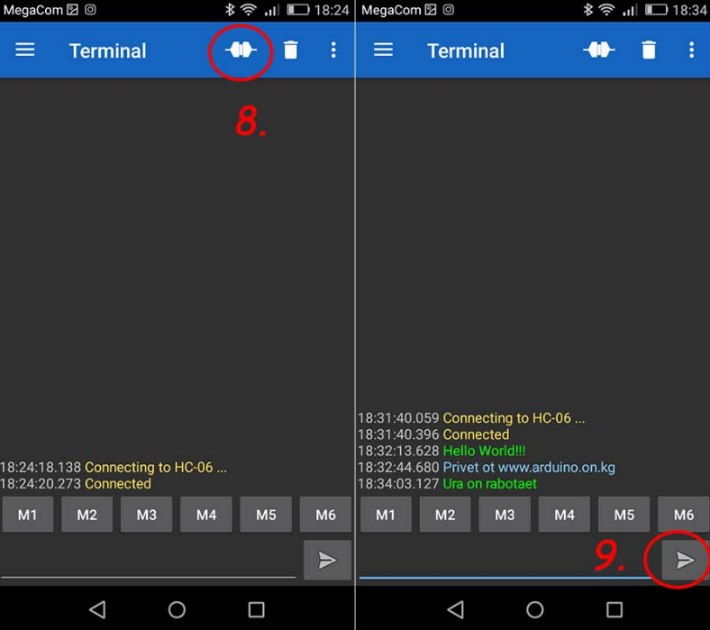
Once connected, “connected: HC-06″ is displayed at the top of the screen.
Make sure the Arduino serial monitor is open and everything you enter into the Android Bluetooth Terminal will be echoed in the serial monitor.
In the Arduino serial monitor, select “Both NL & CR” at the bottom of the window and whatever you type in the serial monitor will be sent to the Android Bluetooth Terminal.
If NL&CR are not selected, the Arduino will still send the data but the Bluetooth Terminal program will not display it until it receives a carriage return / newline.
Turning a LED On and Off by Bluetooth
Update
I have new HC-06 zs-040 modules that have the hc01.comV2.0 firmware. See here.
ZS-040 и Ардуино

На повестке дня – подключение ZS-040 к Ардуино. Мы разберем сферу применения устройства, его базовые параметры, нюансы сборки и т.д.- все, как обычно. Ну и конечно поговорим в целом о том, что представляет собой этот модуль.
Наверное, всем вам уже известны преимущества технологии Bluetooth. Да, это передача информации на небольших расстояниях, быстро и бесплатно, без особых сбоев и дополнительного оборудования ∕ программных приложений. Так вот именно к категории подобных Блютуз-гаджетов относится модуль HC-06. Он построен на базе микрочипа BC417, состоит из двух спаянных вместе плат, имеет кварц на 26 МГц.
Для справки: если говорить о сфере применения таких сенсоров для радиолюбителей, то это в основном телеуправление либо телеметрия.
- питание: 3,3В;
- флеш-память: 8Мб;
- низкое энергопотребление;
- диапазон рабочих температур: -20 . +70 °С;
- габариты: 37х15х3мм.
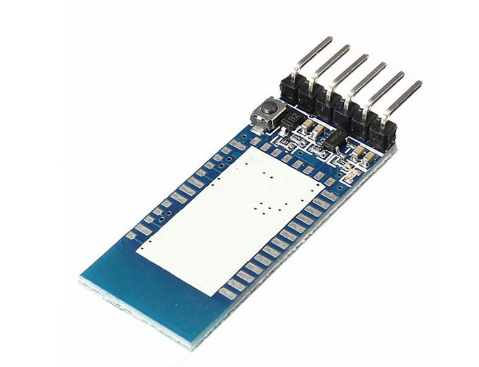
Он компактен и не займет много места, упрощает подключение к контроллеру.
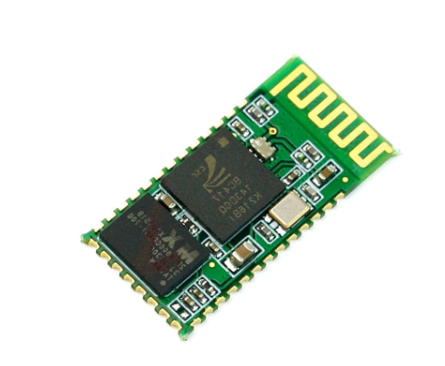
Заводской модуль выглядит иначе:
Теперь рассмотрим непосредственно подключение Bluetooth-модуль ZS-040 к Arduino. Для реализации несложного проекта будем использовать такие аппаратные компоненты:
- Микроконтроллер Arduino UNO (можно и другие).
- Датчик ZS-040.
- Комплект соединительных проводов.
Для управления рабочим процессом и проверки работоспособности схемы нам понадобится библиотека SoftwareSerial.
// Подключаем библиотеку SoftwareSerial #include "SoftwareSerial.h" // Создаем класс BTserial для работы с bluetooth модулем. SoftwareSerial BTserial(8, 9); // порт RX, порт TX void setup() < // Настраиваем скорость передачи данных. Serial.begin(9600); BTserial.begin(9600); // По умолчанию 9600 бот. >void loop() < // Получаем данные от bluetooth модуля и передаем их в монитор порта. if (BTserial.available()) < Serial.write(BTserial.read()); >// Получаем данные от монитора порта и передаем их в bluetooth модуль. if (Serial.available()) < BTserial.write(Serial.read()); >>Для проверки связи можно в дальнейшем использовать программу Serial Bluetooth Terminal. Она инсталлируется на смартфон и проста в конфигурациях. Запустите ПО, найдите в настройках пункт Bluetooth, включите его и дождитесь взаимосвязи между 2 девайсами.
Для вас мы собрали небольшой гайд по использованию утилиты в скриншотах:
Надеемся, вы справитесь с поставленной задачей! На этом прощаемся! До новых встреч!